Experiencing a shortage of disk space is a notoriously irritating situation for Linux users. It’s a frequent issue, particularly as digital content like high-definition images, videos, audio files, and crucial documents accumulate.
Unexpectedly, your storage capacity diminishes, preventing the installation of new applications or the enjoyment of the latest games on platforms like Steam. This is a common frustration for anyone working with Linux, regardless of their expertise level.
In the realm of Linux servers, the problem intensifies. As servers host an increasing number of applications and gather data over time, available disk resources dwindle. Without diligent monitoring of disk usage and proactive management of space-consuming files as a routine aspect of Linux system administration, vital systems can encounter performance degradation or even critical failures once storage is completely depleted. This can result in service interruptions and negatively impact operational efficiency.
Read: Guidance on Copying Files to Multiple Directories in Linux Environments
Statistical data from Statista reveals a dramatic surge in average hard disk drive capacity shipped globally, escalating from approximately 140GB in 2004 to an impressive 10TB by 2021 – marking an extraordinary seventy-fold expansion! Considering this vast storage potential, one might assume that disk space limitations would be obsolete. However, for many Linux users, this remains a persistent challenge.
Intriguingly, surveys indicate that the typical disk utilization rate across consumer devices hovers around a mere 37%. This implies that a substantial portion of our storage drives remains unutilized, even as Linux and Windows systems struggle with sluggish performance and are unable to execute updates or install new software due to minor space constraints. The perceived abundance of free space becomes irrelevant when system functionality is hampered by insufficient available storage.
The solution to this pervasive issue is consistent Linux system maintenance. By systematically identifying and eliminating the most substantial, space-occupying files, you can effortlessly reclaim valuable disk resources and notably enhance your system’s operational speed. Purchasing a larger capacity hard drive may not be immediately necessary. Often, the required additional storage is already present, obscured by redundant large files. Effective Linux storage optimization is key to preserving system integrity.
For Linux administrators, proactively locating and addressing the largest files on Ubuntu and comparable distributions offers considerable advantages:
- Prevent System Disruptions: Avoid system breakdowns or data corruption resulting from complete disk space exhaustion. Full disks can trigger unpredictable and severe system errors.
- Strategic Capacity Planning: Recognize storage usage patterns early to anticipate and schedule storage upgrades before critical thresholds are reached. Early awareness enables timely and economical infrastructure enhancements.
- Identify Redundant Storage Consumption: Pinpoint files that are unnecessarily consuming excessive disk capacity for focused cleanup efforts. Understanding storage utilization trends facilitates targeted optimization strategies.
- Recover Storage Resources: Retrieve valuable disk space through compression, archiving, or removal of large, superfluous files. Recovered space can postpone hardware investments and improve system responsiveness.
- Safeguard Critical Data: Mitigate potential data loss stemming from inadequate storage availability, especially for essential system records and databases. Ensuring sufficient free space protects against data integrity complications.
By employing suitable tools for routine identification, assessment, and management of the largest files, administrators can maintain a transparent understanding of storage utilization dynamics. Taking prompt action on oversized files, outdated logs, and transient data ensures that Linux systems consistently possess adequate storage and avoid storage depletion. This proactive approach is indispensable for optimal Linux server performance and stability.
This article will investigate various efficient techniques for finding large files on Linux and Ubuntu platforms, empowering you to regain control over your disk space and improve system efficiency.
Read: How to Install and Remove Software on Ubuntu
The Importance of Locating and Removing Large Files for Linux System Health
Let’s initially comprehend why it is fundamentally important to regularly examine your Linux environment for substantial, unused files that can be safely eliminated. This forward-thinking method is a cornerstone of effective Linux system upkeep and user maintenance protocols.
As previously noted, hard drive capacity has expanded dramatically in recent times, with 10TB drives becoming commonplace. However, our data storage demands have outpaced even these hardware advancements! High-resolution photographs and videos, increasingly prevalent with contemporary devices, occupy ever-greater storage volumes, and our digital music collections continue to grow. The sheer quantity of data we generate and store constantly strains disk capacity.
According to a 2022 Statista study, the average count of digital photographs captured annually per person exceeded 1,000! These Instagram-worthy images and treasured memories rapidly accumulate, consuming gigabytes of storage space over time. This surge in personal media significantly contributes to storage consumption.
Concurrently, software applications and multimedia content are also expanding in size. For instance, the Windows 10 21H2 release mandates a minimum storage footprint of 64GB, while popular modern games like Call of Duty: Modern Warfare can occupy over 230GB of disk space. Operating systems and applications are becoming increasingly demanding in terms of storage requirements.
Given these converging factors driving up storage necessities, it’s unsurprising that our disks become full quickly. Fortunately, accessible space often lies dormant within our systems. By discovering and cleaning out the largest, neglected files, we can unlock this concealed storage and optimize our Linux installations.
Here are some essential advantages of refining disk utilization by identifying and removing large, unnecessary files from your Linux system:
- Liberate Space for New Software and Updates: Removing redundant files generates room for installing new applications, games, multimedia content, and critical operating system updates, which frequently demand considerable disk resources (multiple gigabytes). Ensuring adequate space prevents update failures and facilitates system growth.
- Boost Overall System Performance: Accessing files on a nearly full disk leads to system deceleration and lag. As the disk read/write head struggles to locate available sectors, access times increase. Removing large files results in quicker file retrieval and enhanced system responsiveness. A decluttered disk translates to a faster system.
- Organize Your File System: Determining what is using storage and its location enables improved organization of your files and directories. This provides a clearer perspective of your data assets and streamlines efficient file management. Disk cleanup can also serve as an opportunity for enhanced organization.
- Eliminate Duplicate, Temporary, and Corrupt Files: Large files frequently encompass redundant downloads, accumulated temporary files, and damaged data. Cleaning these items not only recovers space but also resolves potential system anomalies and strengthens data integrity. Removing these superfluous files contributes to system robustness.
Employing the find Command for Large File Discovery in Linux
The find command is a robust, pre-installed Linux tool for locating files and directories based on diverse criteria, including file size. It is an indispensable asset for any Linux user seeking effective storage management. Initiating a search from a designated directory, the find command systematically explores all subordinate directories, rendering it comprehensive and adaptable. You can even define multiple starting directories for a more extensive search scope.
The subsequent examples illustrate how to utilize the find command to pinpoint large files on Linux and Ubuntu systems. Open your terminal interface and proceed with the following steps:
Initially, it’s often beneficial to acquire root privileges for thorough system-wide searching. Enter the command below to transition to the root user account:
sudo -i
Read: Instructions for Duplicating Files Across Multiple Linux Directories
Next, to present the single largest file within your system, excluding directories, execute the command provided below. This command initiates a search across the entire filesystem (/), filters for files only (-type f), outputs their size and path information, sorts them numerically by size (sort -n), and shows only the final line, representing the largest file (tail -1):
sudo find / -type f -printf "%s\t%p\n" | sort -n | tail -1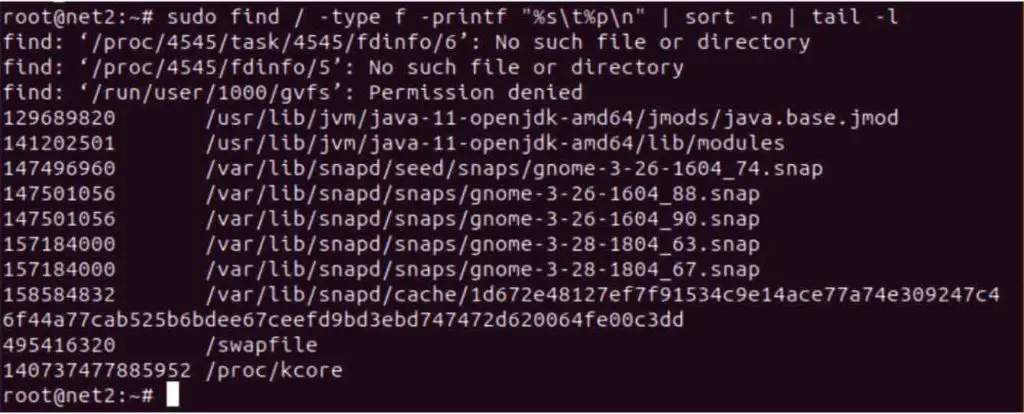
To locate the top ten largest files specifically within your personal home directory, employ this command. It mirrors the preceding command but commences the search within your home directory ($HOME), sorts numerically in reverse order (sort -nr) to prioritize the largest files, and displays the top ten entries (head -10):
find $HOME -type f -printf '%s %p\n' | sort -nr | head -10
Read: A Practical Guide to Utilizing Symbolic Links in Linux
The Linux find command provides powerful functionalities for searching files based on size limits. To identify extremely large files, for example, those exceeding 100MiB (Megabytes – note that ‘M’ in find often denotes Mebibytes, not Megabytes, refer here for specifics), execute the subsequent command. The -size +100M option designates files larger than 100MiB, and -ls offers a detailed listing of the discovered files:
find / -size +100M -ls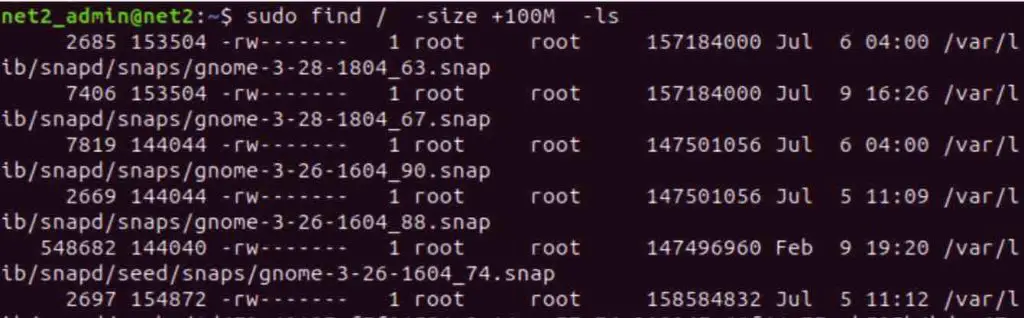
Finding the Largest Files on Linux
Read: Methods to Determine File and Directory Sizes on Linux using du and ncdu commands
For more refined searches, the Linux find command enables you to specify both minimum and maximum file size constraints. This permits administrators to precisely target files within a particular size range for in-depth analysis or cleanup operations. This is valuable for pinpointing files that are substantial but not excessively so, facilitating a more concentrated review process.
As an illustration, to find files with sizes between 100MiB and 200MiB, utilize this command. The -size +100M filter identifies files exceeding 100MiB, and -size -200M (when used after +100M) further refines the selection to include only those smaller than 200MiB:
find / -size +100M -size -200M -lsThe adaptability of the Linux find command extends to its integration with other command-line utilities like ls, sort, and tail. This synergy allows you to isolate, for example, the top five largest files within a specific directory for administrative scrutiny. This technique provides a rapid overview of the primary storage consumers in a targeted directory.
Here’s a command example to find the five largest files in the /var/log directory, which frequently contains voluminous log files:
find /var/log -type f -exec ls -s {} \; | sort -n | tail -n 5Let’s dissect this command structure:
find /var/log -type f: This segment employsfindto locate all standard files (-type f) within the/var/logdirectory hierarchy.-exec ls -s {} \;: For each file discovered, it executes thels -scommand.ls -sdisplays file sizes in block units.{}serves as a placeholder for the encountered file, and\;terminates the-execparameter.| sort -n: The output generated byls -s(size and filename) is channeled tosort -n, which arranges the lines numerically based on file size (the initial column).| tail -n 5: Finally, the sorted output is piped totail -n 5, which presents only the last five lines, representing the five largest files.
In summary, the find command surpasses a mere file search utility. Its versatility extends to various applications beyond simple filename lookups. For instance, you can utilize it to locate files based on their age, such as files created within the last ‘n’ days using the -ctime -n option. Additionally, find can filter files by ownership, enabling identification of files belonging to a specific user through options like -user mrlinux. These advanced capabilities establish find as a truly potent instrument for Linux system management and disk space optimization.
Read: Top 41 Essential Linux Performance Monitoring Tools for System Administrators
Analyzing Storage Consumption with the du Command in Linux Systems
The du command (disk usage) represents another vital Linux tool for analyzing file space usage. This adaptable command empowers administrators and users to effortlessly pinpoint files and directories that are consuming substantial storage volumes. Unlike find, which emphasizes files matching specific criteria, du delivers a summary of storage allocated by directories and files.
When executing du on a disk or directory, it outputs the aggregate storage space assigned to each subdirectory and file within it, typically in a user-friendly format. This simplifies the comprehension of storage consumption at a glance and highlights directories that are utilizing the most space.
To initiate work with du, you might first wish to switch to the root user for comprehensive system-wide analysis:
sudo -iSubsequently, to display the top 20 largest files and directories within the /home directory, run the following command. This command calculates storage usage recursively within /home (du -a /home), sorts the output numerically in reverse sequence (sort -n -r) based on size, and presents the top 20 lines (head -n 20):
sudo du -a /home | sort -n -r | head -n 20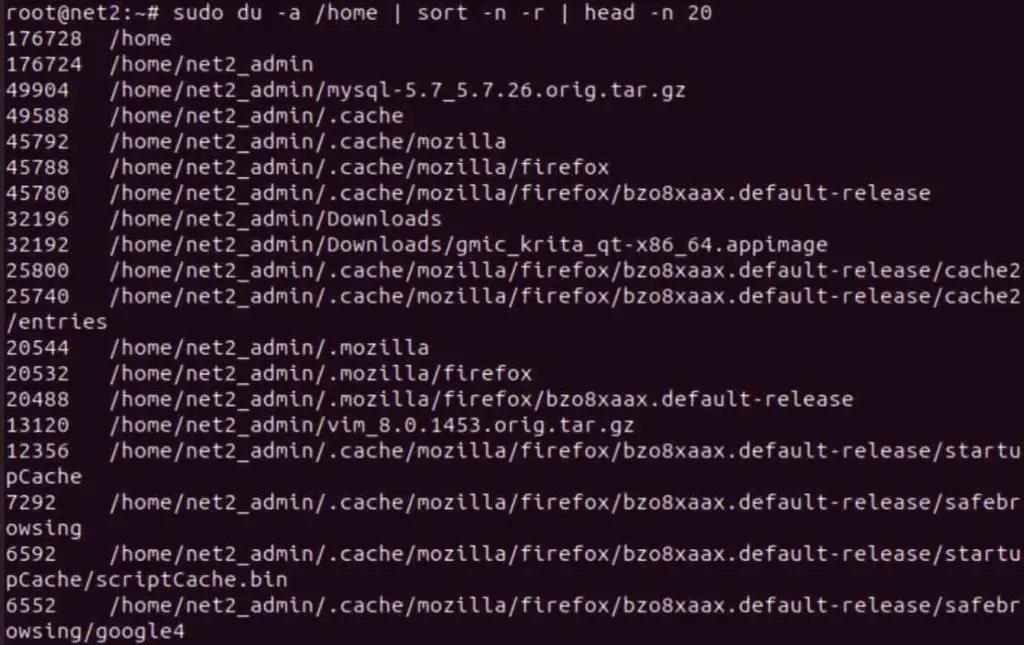
Linux du Command Utility
Read: Methods to Conceal Folders and Reveal Hidden Files in Ubuntu
This du command illustration executes a storage space usage evaluation specifically within the /home directory. The resulting data is then ordered by size utilizing the sort command, and finally, head restricts the output to only the 20 largest files and directories discovered. This offers a concise overview of the most significant storage consumers within your home directory.
Procedure to Identify the 10 Largest Directories in Linux Utilizing du
To specifically showcase the top 10 largest directories within your present working directory on Linux, you can employ a slightly modified du command. This is particularly useful when you intend to concentrate on directory sizes rather than individual files:
sudo du -a | sort -n -r | head -n 10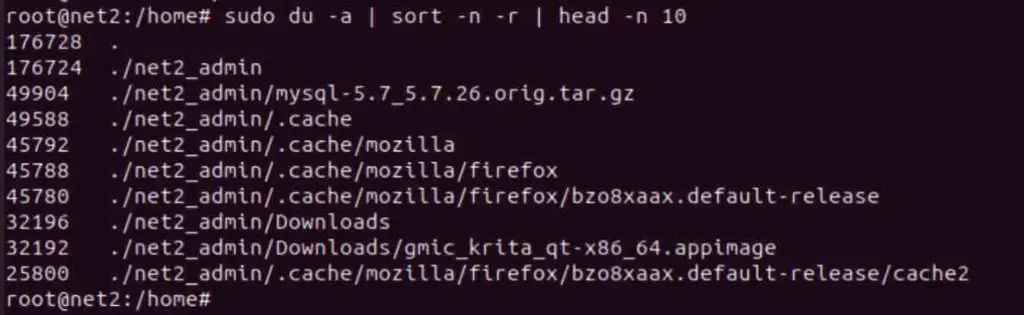
Read: Instructions to Display Graphics Card Details on Ubuntu 22.04
Let’s examine the components of this command to understand each part:
du: The fundamental command to display storage usage statistics.du -a: The-aoption instructsduto present storage usage for all files and directories recursively, implying it encompasses all levels of nested directories.|: The pipe symbol, which directs the output of theducommand as input to the subsequent command.sort: Thesortcommand is employed to arrange the input text.sort -n: The-noption forsortspecifies numerical sorting, meaning it sorts based on the numerical values (file/directory sizes) rather than alphabetically.sort -r: The-roption forsortreverses the sorting order, resulting in a descending sort from largest to smallest.|: Another pipe symbol, channeling the sorted output to the subsequent command.head: Theheadcommand outputs the initial lines of its input.head -n 10: The-n 10option forheadlimits the output to only the initial 10 lines, effectively displaying the top 10 largest directories.
If you prefer to view storage measurements in more user-comprehensible units like KB, MB, or GB, you can utilize the -h option with du, along with wildcards to apply it to the current directory context:
du -hs * | sort -rh | head -n 10
This modified du command displays the top 10 largest directories within the current folder, now presenting sizes in a human-readable format (e.g., 1.2G, 512M). These largest directories are prime candidates for further investigation as they are likely to contain expendable files or subdirectories suitable for deletion to recover disk capacity.
Carefully review the output and assess if any listed directories contain files that are no longer necessary or can be archived. Typical candidates for cleanup often include temporary files, outdated system logs, build artifacts from software development endeavors, and unused downloads. Deleting these types of files can safely free up considerable disk space.
To further refine the output and display storage usage including the sizes of subdirectories within each listed directory, you can utilize the -Sh options with du:
du -Sh | sort -rh | head -n 10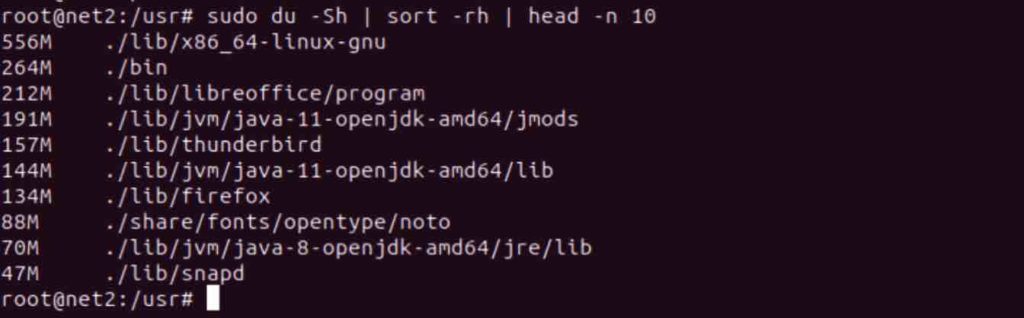
Read: Instructions for Displaying File Sizes in Megabytes (MB) on Linux
Below is a breakdown of the components of the du -Sh | sort -rh | head -n 10 command:
du: This is the du command itself.'-h': Sizes are displayed in a human-readable format (e.g., 3MB).'-S': Subdirectory sizes are excluded.'Sort': Sorts the text file input stream (from the pipe entry).'-r': This flag reverses the result of comparisons.'-h': Enables human-readable number comparisons (e.g., 2K, 1G).'head': Prepares the provided list for standard output.'-n': Specifies the number of lines to return (in this case, limited to the first 10 lines).”
To exclude error message of type “permission denied” for instance , just add the parameter : 2>/dev/null like for example:
du -a var wpcf7 = {"apiSettings":{"root":"https:\/\/net2.com\/wp-json\/contact-form-7\/v1","namespace":"contact-form-7\/v1"},"cached":"1"};