Running out of disk space is a frustratingly common occurrence for Linux users. As your media libraries swell with high resolution photos, videos, and music, and your work documents pile up, available capacity can vanish before you know it.Suddenly you’re unable to install new software or download that hot new game on Steam.
As Linux servers accumulate data from more applications over time, available disk space gets consumed. Without carefully monitoring utilization and optimizing large space-hogging files as part of regular Linux File management, critical systems can experience performance slowdowns or even outages once capacity is fully exhausted.
According to statistics from Statista, the average hard disk drive capacity shipped worldwide has ballooned from around 140GB in 2004 to 10TB in 2021 – over a 70x increase! With all that space, you’d think running out of room would be a thing of the past.
However, various surveys have found that the average disk utilization rate across consumer devices is only around 37%. All that free space taunts us while Windows and Linux systems grind to a halt, prevented from updating due to a lack of a few gigabytes.
The solution lies in periodically cleaning up your Linux system by locating and removing the space hogs. By deleting or archiving large, unused files, you can reclaim capacity and dramatically speed up your system’s performance. No need to rush out and buy a larger disk drive – the extra room is already there hiding in plain sight.
There are important benefits for administrators to proactively locate and address the biggest files in Ubuntu and similar distributions:
- Avoid disruptive system failures or corruption from 100% disk usage.
- Identify storage trends early to plan upgrades before hitting limits.
- Determine what is unnecessarily consuming excess space for clean up.
- Reclaim capacity by compressing, archiving or deleting large unnecessary files.
- Prevent essential data loss resulting from insufficient available storage space.
By leveraging tools to regularly find, review and optimize the largest files, administrators can maintain a clear picture of disk usage. Taking prompt action on oversized files, older logs and temporary data ensures Linux systems do not run out of storage space.
Within this article, we will delve into several distinct approaches to find large files on linux / Ubuntu.
Read: How to copy a file to multiple directories in Linux
Why You Should Find and Remove Large Files
First let’s look at why it’s so important to periodically search your Linux system for large, unused files that can be safely removed.
As we saw earlier, disk drive capacity has rapidly grown over the years, with 10TB drives now common. However, our data storage needs have grown even faster! High resolution photos and videos take up more and more space, while music collections continue to expand.
According to a 2022 Statista survey, the average number of digital photos taken annually per person reached over 1,000! All those Instagram perfect shots devour GBs over time.
At the same time, programs and media files are ballooning in size. For example, the Windows 10 21H2 release requires a minimum of 64GB of storage, while popular games like Call of Duty: Modern Warfare take up over 230GB.
With all this upward pressure on storage space, it’s no wonder our disks fill up. Luckily there’s already extra room available if you can find and clean out the largest files collecting dust.
Here are some key benefits to optimizing disk usage by locating and removing large unnecessary files:
- Free up space for new software and updates – By deleting unused files, you open up capacity for new programs, games, media files and operating system updates which often require many GBs.
- Speed up overall system performance – Accessing files on a disk that’s nearly full causes slowdowns and lag as the head scrambles around looking for free blocks. Removing large files results in faster access times.
- Organize your filesystem – See what’s using space and where it resides so you can properly organize your files and folders.
- Remove duplicate, temporary and corrupted files – Large files often include duplicate downloads, old temporary files that pile up, and corrupted data. Cleaning them up fixes issues…
Find command
Initiating its search from the designated directory, the ‘find’ command traverses all accessible subdirectories. It’s possible to indicate multiple starting directories for the search. The forthcoming command aids in the identification of large files in Linux / Ubuntu.
To start, launch your terminal and input the following command:
sudo-i

Read: How to copy a file to multiple directories in Linux
Next execute the provided commands below to display the largest files while excluding directories. Enter the following command on your computer :
sudo find / -type f -printf “%s\t%p\n” | sort -n | tail -1
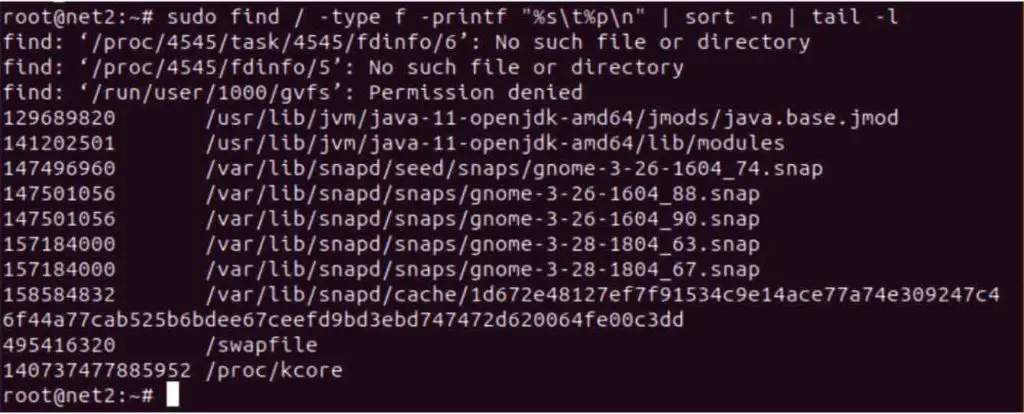
$ find $HOME -type f -printf ‘%s %p\n’ | sort -nr | head -10

Read: How to use symbolic links on Linux
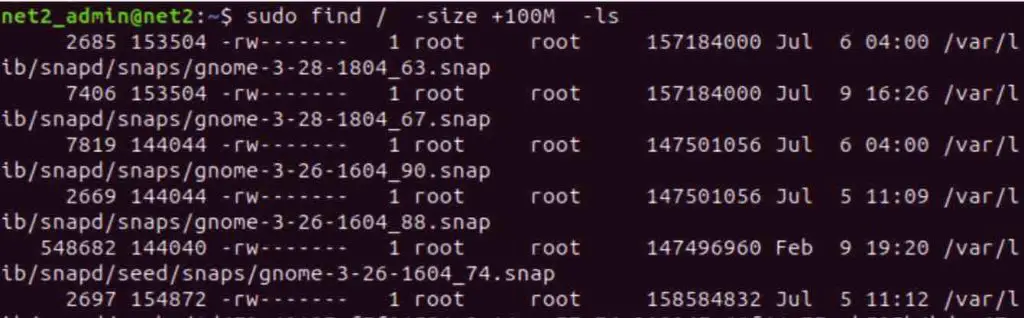
The Linux ‘find’ command supports useful options to search for files exceeding specified size thresholds. For example, to locate extremely large files over 100MiB in size use the command below: (this is not 100MB, see here):
find / -size +100M -ls
Find largest files Linux
Read: How to find the size of a file or directory on Linux using du and ncdu commands
The Linux ‘find’ command supports specifying both minimum and maximum file size thresholds when searching directories. This allows administrators to precisely target files within a certain size range for optimized analysis.
For example, to find files between 100MiB and 200MiB:
find / -size +100M -size -200M -ls
The Linux ‘find’ command can be combined with ‘ls’, ‘sort’ and ‘tail’ to isolate the top 5 biggest files within a directory for admin review.
For example:
find /var/log -type f -exec ls -s {} \; | sort -n | tail -n 5
This first uses ‘find’ to locate all regular files in /var/log. The ‘-exec ls -s’ parameter prints the size of each file. Output is piped to ‘sort -n’ for numerical sorting, and ‘tail -n 5’ returns the last 5 entries (the 5 largest files).
In concluding remarks concerning the ‘find’ command, it’s noteworthy that the command’s versatility extends to scenarios beyond simple file searches. For example, it can be employed to locate files that are within a certain age range, such as those created less than or equal to ‘n’ days ago (-ctime -n). Additionally, the ‘find’ command facilitates filtering files based on their ownership, enabling users to identify files attributed to specific users (e.g., -user mrlinux).
Read: Removing duplicates from content: 6 effective tools in 2022
du Command
The du command provides a powerful tool for analyzing file space usage in Linux. This versatile command lets administrators easily identify and retrieve files and directories consuming substantial storage capacity.
Running du on a disk or directory outputs the total allocated space for each subfolder and file in human-readable format.
First , invoke the command below which will enable you to switch to root :
sudo-i
And then execute :
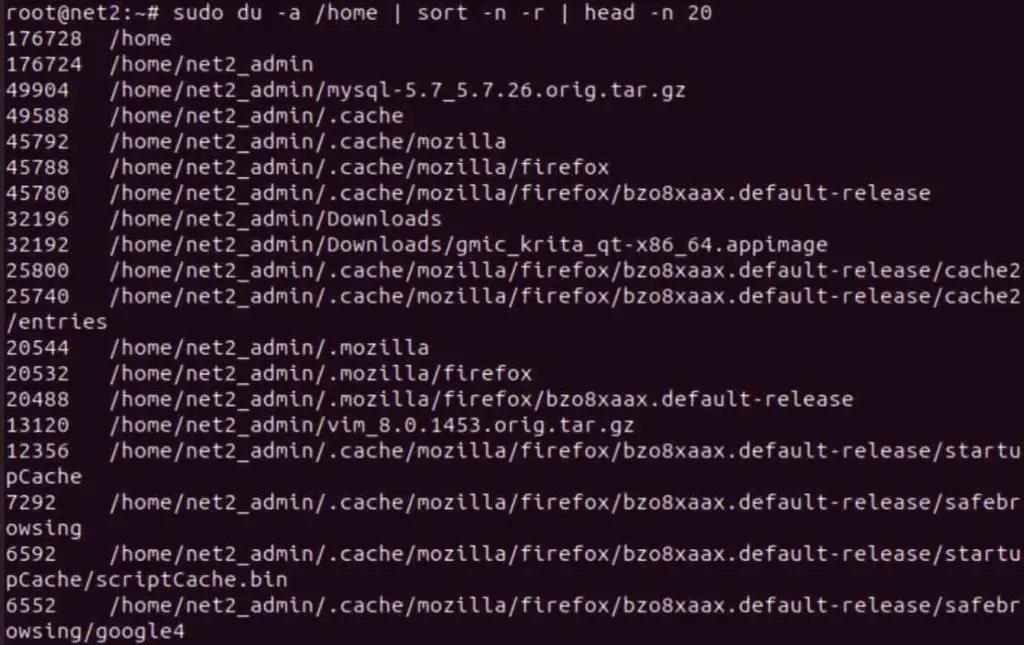
sudo du -a /home | sort -n -r | head -n 20
du Linux command
Read: How to hide folders and show hidden files in Ubuntu
The du command performs a file size assessment within the home directory. This assessment data is then sorted using the sort command. Finally, the head argument constrains the output to only the top 20 largest files.
How do I find 10 largest directories in Linux?
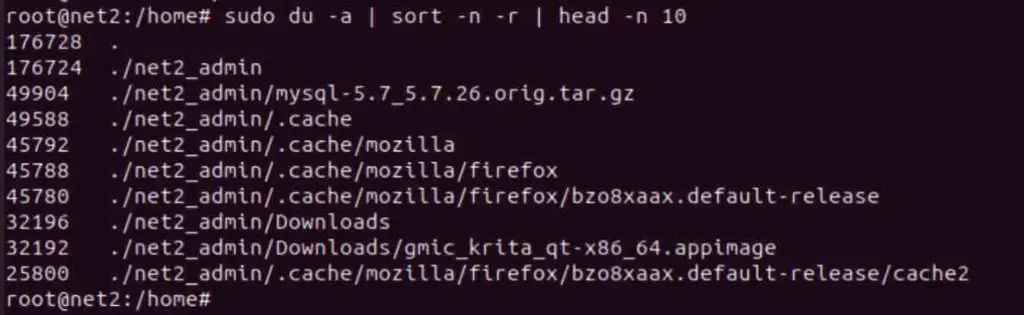
To display the top 10 largest directories in the current working directory on Linux, the following command can be used:
sudo du -a | sort -n -r | head -n 10
Read: How to display Graphics card information on Ubuntu 22.04
The Linux command provided above shows the top 10 largest directories in the current working directory. Here is an explanation of each part:
- du – Display disk usage statistics
- du -a – Show disk usage for all files and directories recursively
- | – Pipe symbol, takes output of one command and provides as input to next
- sort – Sort input text
- sort -n – Sort numerically rather than alphabetically
- sort -r – Reverse sort order, largest to smallest
- | – Pipe output of sort to next command
- head – Output first lines of input
- head -n 10 – Show first 10 lines only
Read: How to fix: ‘cannot open shared object file : No such file or directory’ on Ubuntu
If you intend to utilize measurements in KB or GB, you can achieve this by executing the command :
du -hs * | sort -rh | head -n 10

The du command shown earlier displays the top 10 largest directories in the current folder. These may contain expendable files or subdirectories that can be deleted to free up disk space.
Review the output and determine if any directories are good candidates for removal. Things like temporary files, old logs, build artifacts, and unused downloads can often be safely deleted.
To take it a step further and show disk usage including subdirectory sizes, use:
du -Sh | sort -rh | head -n 10
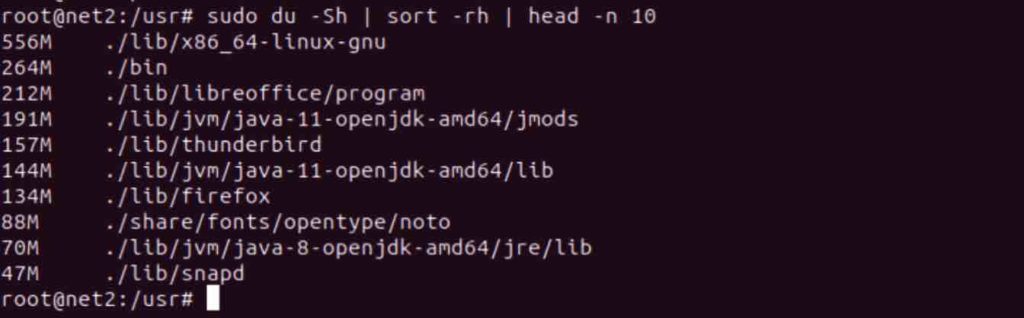
Below is a breakdown of the above command’s components:
- ‘du’: This is the du command itself.
- ‘-h’: Sizes are displayed in a human-readable format (e.g., 3MB).
- ‘-S’: Subdirectory sizes are excluded.
- ‘Sort’: Sorts the text file input stream (from the pipe entry).
- ‘-r’: This flag reverses the result of comparisons.
- ‘-h’: Enables human-readable number comparisons (e.g., 2K, 1G).
- ‘head’: Prepares the provided list for standard output.
- ‘-n’: Specifies the number of lines to return (in this case, limited to the first 10 lines).”
To exclude error message of type “permission denied” for instance , just add the parameter : 2>/dev/null like for example:
du -a var wpcf7 = {"apiSettings":{"root":"https:\/\/net2.com\/wp-json\/contact-form-7\/v1","namespace":"contact-form-7\/v1"},"cached":"1"};