Virtual machines have been a cornerstone of IT for years, but there’s a more efficient technology that’s now an essential part of modern infrastructure: Linux Containers.
Containers offer a lightweight, efficient, and incredibly flexible way to package, deploy, and manage applications. If you’re an IT administrator working with Ubuntu, understanding containers is becoming increasingly essential.
This guide will give you a solid foundation in Linux containers. We’ll cover the core concepts, explore the advantages of containers, and walk through practical examples of using them on Ubuntu. While the examples were initially tested on Ubuntu 20.04, the concepts and commands are applicable to Ubuntu 22.04 and 24.04 as well, with only minor variations that we’ll note where relevant.
1. What are Linux Containers? (And Why Should You Care?)
Imagine you could package up an application and all its dependencies (libraries, configuration files, runtime environment) into a single, self-contained unit. That’s essentially what a container does. Unlike virtual machines (VMs), which include an entire operating system, containers share the kernel of the host operating system. This makes them much smaller and faster than VMs.
Key Concepts:
- Kernel Sharing: Containers leverage the Linux kernel’s ability to isolate processes and resources. Each container gets its own isolated user space, but they all share the same underlying kernel.
- Lightweight: Containers are much smaller than VMs because they don’t include a full OS. This means they start up much faster (often in seconds) and use fewer resources.
- Portable: You can easily move containers between different systems (e.g., from your development laptop to a testing server to a production cloud environment) without worrying about compatibility issues.
- Isolation: Containers provide a degree of isolation between applications. If one container crashes, it doesn’t affect other containers or the host system.
- Image-Based: Containers are built from images, which are read-only templates. This ensures consistency and reproducibility.
- Ephemeral by Design: Containers are designed to be temporary and replaceable. Any data that needs to persist must be explicitly managed through volumes or other persistent storage mechanisms.
Why are containers important?
- Efficiency: Run more applications on the same hardware with lower overhead.
- Speed: Containers start and stop quickly, making them ideal for dynamic scaling and rapid deployments.
- Consistency: The same container will run the same way, regardless of the underlying infrastructure.
- DevOps: Containers are a key enabler of DevOps practices, facilitating continuous integration and continuous delivery (CI/CD).
- Microservices: Containers are perfect for deploying microservices-based applications.
- Scalability: They make it much simpler to achieve horizontal scalability.
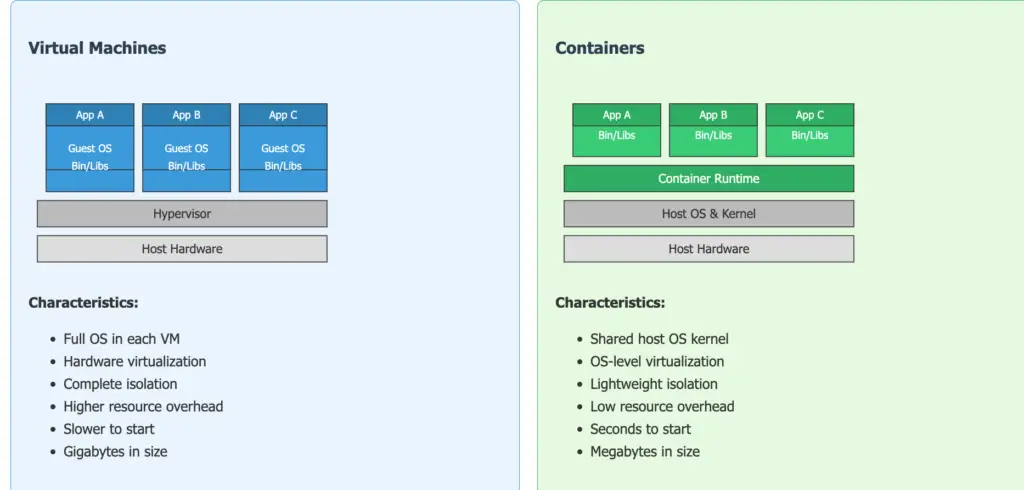
Containers vs. Virtual Machines: Understanding the Difference
2. Container Use Cases: Where Do They Shine?
Containers are incredibly versatile. Here are some common use cases:
Application Packaging and Deployment
Package an application and its dependencies into a single, portable unit. This eliminates the “it works on my machine” problem and streamlines deployment.
Microservices Architecture
Break down large applications into smaller, independent services, each running in its own container. This approach improves scalability, development velocity, and application resilience.
Dev/Test Environments
Create consistent, reproducible environments for development and testing. Every developer can run the exact same environment locally, matching production.
Continuous Integration/Continuous Delivery (CI/CD)
Integrate containers into your CI/CD pipeline to automate building, testing, and deploying applications. Containers ensure consistency across the entire pipeline.
Cloud-Native Applications
Containers are a fundamental building block of cloud-native applications, enabling efficient resource utilization and simplified infrastructure management.
High-Density Hosting
Run many isolated applications on a single server, maximizing resource utilization and reducing infrastructure costs.
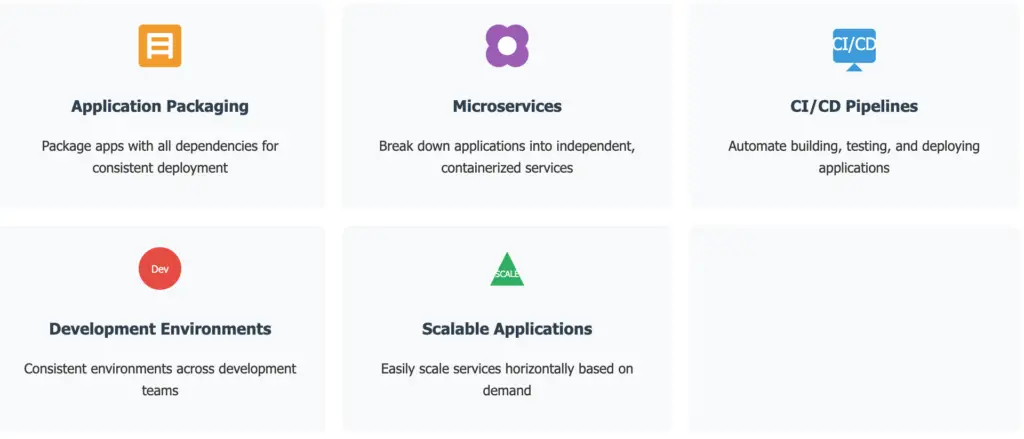
Container Use Cases: Where They Shine
3. Ubuntu Container Tools: Beyond Docker
While Docker is the most well-known container platform, Ubuntu and the wider Linux community offer a powerful set of alternative tools, often preferred for their security and flexibility. These tools are fully compatible with Docker images and follow the Open Container Initiative (OCI) standards.
Core Container Tools
- podman: A daemonless container engine for managing containers, images, and pods (groups of containers). It’s a drop-in replacement for the docker command, so most Docker commands you know will work with podman. Key advantage: Doesn’t require a running daemon, improving security and reducing overhead.
- buildah: A tool for building container images. It gives you fine-grained control over the image creation process.
- skopeo: A utility for working with container images and registries. You can use it to inspect images, copy them between registries, and even convert them to different formats.
- runc: A lightweight container runtime. It’s the underlying technology that runs the containers.
Why use these tools instead of Docker?
- No Daemon: podman and buildah don’t require a central daemon (like dockerd) to be running. This reduces the attack surface and improves security.
- Rootless Containers: podman allows you to run containers as a non-root user, further enhancing security.
- Compatibility: These tools are OCI-compliant, meaning they work with Docker images and registries.
- Flexibility: buildah gives you more control over the image building process than Docker’s Dockerfile approach.
Read: Docker container orchestration tools
4. The Container Registry Ecosystem: Where Images Live
Container images are stored in registries. A registry is like a central repository for images. The most well-known registry is the Docker Hub, but there are others, including:
- Docker Hub: A public registry with a vast collection of pre-built images.
- Quay.io: Another popular public registry maintained by Red Hat.
- Google Container Registry (GCR): Google Cloud’s private registry.
- Amazon Elastic Container Registry (ECR): Amazon Web Services’ private registry.
- Azure Container Registry (ACR): Microsoft Azure’s private registry.
- Private, self-hosted registries: Organizations can set up their own registries for internal use.
You can pull images from registries to your local system, and you can push your own images to registries to share them with others or deploy them to different environments.
Security Note:
When using public registries, always verify the source of the images you’re using. Prefer official images when available, and check for security vulnerabilities using tools like Trivy or Clair.
5. Container Networking: Connecting Your Containers
By default, containers on Ubuntu use a bridged network via the Container Networking Interface (CNI).
Basic Networking Concepts
- Bridged Network: Containers are connected to a virtual network bridge (usually named cni0) on the host system. They can communicate with each other on this virtual network.
- NAT (Network Address Translation): The host system acts as a NAT gateway, allowing containers to access the external network. The containers share the host’s IP address.
Exposing Container Services
To make services inside a container accessible from outside, you’ll need to expose ports. Here’s how to do it with podman:
# Run a web server container and expose port 8080 on the host
podman run -d --name webserver -p 8080:80 docker.io/library/nginx
This command maps port 8080 on the host to port 80 in the container. You can then access the web server by navigating to http://localhost:8080 on the host machine.
Read: How to Pass Environment Variables to Docker Containers
Advanced Networking Options
For more complex networking scenarios, you can create custom networks:
# Create a new network
podman network create mynetwork

# Run a container on the custom network
podman run -d --name db --network mynetwork postgres

# Run another container on the same network
podman run -d --name api --network mynetwork my-api-image
Containers on the same custom network can communicate with each other using their container names as hostnames.
6. Getting Started: Installing the Container Tools on Ubuntu
Let’s install the essential tools (podman, buildah, skopeo) on your Ubuntu system:
Install the curl utility:
sudo apt install curl -y
Add the Kubic Project repository:
The Kubic Project (maintained by the openSUSE community) provides up-to-date packages for these container tools. These commands add the repository and its signing key:
sudo sh -c "echo 'deb https://download.opensuse.org/repositories/devel:/kubic:/libcontainers:/stable/xUbuntu_$(. /etc/os-release; echo $VERSION_ID)/ /' > /etc/apt/sources.list.d/devel:kubic:libcontainers:stable.list"
curl -L "https://download.opensuse.org/repositories/devel:/kubic:/libcontainers:/stable/xUbuntu_$(. /etc/os-release; echo $VERSION_ID)/Release.key" | sudo apt-key add -
What’s happening?
- The first command adds the Kubic repository as a trusted package source to your system.
- The second command fetches a key from the added repository and adds it to your system.
Note for Ubuntu 22.04 and newer: The
apt-keycommand is deprecated. For newer Ubuntu versions, use the following approach instead:curl -L "https://download.opensuse.org/repositories/devel:/kubic:/libcontainers:/stable/xUbuntu_$(. /etc/os-release; echo $VERSION_ID)/Release.key" | sudo gpg --dearmor -o /etc/apt/trusted.gpg.d/kubic.gpg
Update the package lists:
sudo apt update
Install the tools:
sudo apt install podman buildah skopeo -y
7. Setting Up Rootless Containers: Enhanced Security
Rootless containers allow you to run containers without root privileges, which significantly improves security by reducing the potential impact of container breakouts.
Configure your user for rootless containers:
# Install the required packages
sudo apt install uidmap slirp4netns fuse-overlayfs -y

# Configure subuid and subgid mappings if not already present
sudo usermod --add-subuids 100000-165535 --add-subgids 100000-165535 $USER

# Set up correct path for XDG_RUNTIME_DIR
echo 'export XDG_RUNTIME_DIR=/run/user/$UID' >> ~/.bashrc
source ~/.bashrc
Testing rootless mode:
# Verify podman works in rootless mode
podman run --rm docker.io/library/alpine echo "Hello from rootless container!"
If everything is set up correctly, you’ll see the output without needing to use sudo.
Read: Secure Your Ubuntu 24.04 System: 30 Essential Steps for Enhanced Security
8. Pulling a Container Image: Getting Your First Image
Before you can run a container, you need an image. An image is a read-only template that contains everything needed to run an application (code, libraries, runtime, environment variables, etc.). Let’s pull the official Ubuntu image from the Docker Hub:
podman pull docker://docker.io/library/ubuntu:latest
Explanation:
podman pull: This command downloads an image from a registry.docker://: This specifies that we’re using the Docker image format.docker.io/library/ubuntu: This is the image name.docker.io: The registry (Docker Hub).library/ubuntu: The repository (official Ubuntu images).ubuntu: The image name.
:latest: This is the tag. Tags are used to identify different versions of an image.latestusually refers to the most recent stable release.
Inspecting the Image:
You can use skopeo to get information about an image without downloading it:
skopeo inspect docker://docker.io/library/ubuntu:latest
This will show you metadata about the image, including its layers, architecture, and environment variables.
You can also use podman to inspect a downloaded image:
podman inspect ubuntu:latest
Scanning Images for Vulnerabilities:
For production environments, it’s important to scan container images for security vulnerabilities:
# Install trivy (vulnerability scanner)
sudo apt install -y wget apt-transport-https gnupg lsb-release
wget -qO - https://aquasecurity.github.io/trivy-repo/deb/public.key | sudo apt-key add -
echo deb https://aquasecurity.github.io/trivy-repo/deb $(lsb_release -sc) main | sudo tee -a /etc/apt/sources.list.d/trivy.list
sudo apt update
sudo apt install -y trivy

# Scan an image
trivy image docker.io/library/ubuntu:latest
Read: How to clean up unused Docker containers, images and volumes
9. Running the Image in a Container: Bringing it to Life
Now that you have an image, you can run it in a container.
Example 1: Running a command and exiting:
podman run --rm ubuntu:latest cat /etc/passwd
Explanation:
podman run: This command creates and starts a container.--rm: This option tells podman to remove the container after it exits. This is useful for short-lived tasks.ubuntu:latest: The image to use.cat /etc/passwd: The command to run inside the container. This will display the contents of the /etc/passwd file from the container’s filesystem (which is different from your host system’s /etc/passwd file).
Example 2: Running an interactive shell:
podman run -it --name=mycontainer ubuntu:latest /bin/bash
Explanation:
-it: This combines two options:-i(interactive): Keeps STDIN open, even if not attached.-t(tty): Allocates a pseudo-TTY (a terminal). This is what gives you an interactive shell.
--name=mycontainer: Assigns a name to the container. This makes it easier to refer to the container later (instead of using a randomly generated ID)./bin/bash: The command to run inside the container. This starts a Bash shell.
Once you run this command, you’ll be inside the container’s shell. You can run commands, explore the filesystem, and even install software.
Example 3: Running a container in the background (daemon mode):
podman run -d --name=webserver -p 8080:80 docker.io/library/nginx
Explanation:
-d: Runs the container in detached (background) mode.-p 8080:80: Maps port 8080 on the host to port 80 in the container.docker.io/library/nginx: The official NGINX web server image.
You can now access the web server by navigating to http://localhost:8080 in your web browser.
10. Managing Containers: Basic Operations
Listing Containers:
# List running containers
podman ps

# List all containers (including stopped ones)
podman ps -a
Container Lifecycle Management:
# Stop a running container
podman stop mycontainer

# Start a stopped container
podman start mycontainer

# Restart a container
podman restart mycontainer

# Pause and unpause a container
podman pause mycontainer
podman unpause mycontainer

# Remove a container (must be stopped first)
podman rm mycontainer

# Force remove a running container
podman rm -f mycontainer
Interacting with Running Containers:
# Execute a command in a running container
podman exec -it mycontainer bash

# Attach to a running container's primary process
podman attach mycontainer

# View container logs
podman logs mycontainer

# Follow container logs in real-time
podman logs -f mycontainer
Monitoring Container Resource Usage:
# View container stats (CPU, memory, network, etc.)
podman stats

# View stats for a specific container
podman stats mycontainer
11. Managing Persistent Data: Volumes
Containers are ephemeral by design – when a container is removed, any data stored inside it is lost. Volumes provide a way to persist data outside the container lifecycle.
Creating and Managing Volumes:
# Create a named volume
podman volume create mydata

# List volumes
podman volume ls

# Inspect a volume
podman volume inspect mydata

# Remove a volume
podman volume rm mydata
Using Volumes with Containers:
# Run a container with a volume
podman run -d --name=db -v mydata:/var/lib/postgresql/data postgres

# Use a bind mount to share a host directory
podman run -v /path/on/host:/path/in/container ubuntu:latest ls /path/in/container
Volume Backup and Restore:
# Backup a volume
podman run --rm -v mydata:/source -v $(pwd):/backup ubuntu tar -czvf /backup/volume-backup.tar.gz
Restore a volume
podman run –rm -v mydata:/target -v $(pwd):/backup ubuntu tar -xzvf /backup/volume-backup.tar.gz -C /target
### Best Practices for Data Management:

1. **Use named volumes** for important data rather than anonymous volumes.
2. **Document volume usage** so team members understand what data is stored where.
3. **Back up volumes regularly** to prevent data loss.
4. **Consider volume drivers** for specialized storage needs (e.g., shared storage across nodes).
5. **Separate different types of data** into different volumes for better management.

## 12. Building Custom Container Images: Creating Your Own Templates

There are two main approaches to building custom container images: using Containerfiles (equivalent to Dockerfiles) or using buildah's interactive approach.

### Method 1: Using Containerfiles

A Containerfile is a text file that contains a series of instructions for building an image. Here's a simple example:

```bash
# Create a Containerfile
cat > Containerfile << EOF
FROM ubuntu:latest
RUN apt-get update && apt-get install -y nginx
COPY ./my-nginx.conf /etc/nginx/conf.d/
EXPOSE 80
CMD ["nginx", "-g", "daemon off;"]
EOF

# Build the image
podman build -t my-nginx-image:1.0 .
This Containerfile:
- Starts from the base Ubuntu image
- Updates package lists and installs NGINX
- Copies a custom configuration file
- Documents that the container will expose port 80
- Sets the default command to run NGINX in the foreground
Method 2: Using buildah Interactively
buildah allows you to build images step by step, without needing a Containerfile:
# Create a working container
ctr=$(buildah from ubuntu:latest)

# Install software
buildah run $ctr -- apt-get update
buildah run $ctr -- apt-get install -y nginx

# Set configuration
buildah copy $ctr ./my-nginx.conf /etc/nginx/conf.d/

# Configure the image
buildah config --port 80 $ctr
buildah config --cmd "nginx -g 'daemon off;'" $ctr

# Commit the image
buildah commit $ctr my-nginx-image:1.0

# Remove the working container
buildah rm $ctr
Multi-stage Builds for Smaller Images
For production images, multi-stage builds can dramatically reduce image size by including only what’s needed for runtime:
cat > Containerfile << EOF
# Build stage
FROM golang:1.18 AS builder
WORKDIR /app
COPY . .
RUN go build -o myapp

# Runtime stage
FROM ubuntu:22.04
COPY --from=builder /app/myapp /usr/local/bin/
CMD ["myapp"]
EOF

podman build -t myapp:1.0 .
This approach:
- Uses a larger image (golang) to build the application
- Creates a second image with just the compiled binary
- Results in a much smaller final image
13. Saving and Sharing Container Images
Once you’ve created a custom container image, you may want to save it or share it with others.
Saving Changes from a Container to an Image:
If you’ve made changes to a running container (e.g., installed software, modified configuration files), you can save those changes as a new image:
podman commit mycontainer my_custom_ubuntu:v1.0
Pushing Images to a Registry:
To share your image with others, you can push it to a container registry:
# Log in to the registry
podman login docker.io

# Tag your image for the registry
podman tag my_custom_ubuntu:v1.0 docker.io/yourusername/my_custom_ubuntu:v1.0

# Push the image
podman push docker.io/yourusername/my_custom_ubuntu:v1.0
Saving Images as Archive Files:
You can also save images as archive files for offline transfer:
# Save an image to a tar file
podman save -o my_custom_ubuntu.tar my_custom_ubuntu:v1.0

# Load an image from a tar file
podman load -i my_custom_ubuntu.tar
14. Container Resource Management: Performance Optimization
Containers share the host’s resources, but you can control how much CPU, memory, and other resources each container can use.
Setting Resource Limits:
# Limit a container to 2 CPU cores and 1GB of memory
podman run --cpus 2 --memory 1g --name resource_limited ubuntu:latest

# Limit a container to specific CPU cores
podman run --cpuset-cpus 0,1 --name cpu_pinned ubuntu:latest
Monitoring Resource Usage:
# View real-time resource usage for all containers
podman stats

# View real-time resource usage for a specific container
podman stats mycontainer
Adjusting Limits for Running Containers:
# Update memory limits for a running container
podman update --memory 2g mycontainer

# Update CPU limits for a running container
podman update --cpus 4 mycontainer
15. Container Security: Protecting Your Environment
Container security requires attention at multiple levels: the container runtime, the images, the host, and the network.
Security Best Practices:
- Use rootless containers whenever possible to minimize privilege escalation risks.
- Scan images for vulnerabilities using tools like Trivy before deployment.
- Apply the principle of least privilege by not running containers as root.
- Keep images minimal to reduce the attack surface.
- Use read-only containers where possible to prevent runtime modifications.
- Implement network policies to control container communication.
Practical Security Examples:
# Run a container with a non-root user
podman run --user 1000:1000 ubuntu:latest id

# Run a container with read-only filesystem
podman run --read-only ubuntu:latest

# Drop capabilities to improve security
podman run --cap-drop ALL --cap-add NET_BIND_SERVICE nginx
Security Scanning:
# Scan an image for vulnerabilities (requires Trivy)
trivy image docker.io/library/ubuntu:latest

# Scan a running container
trivy container mycontainer
16. Container Orchestration: Managing at Scale
While podman is excellent for managing individual containers, orchestration tools help manage containers at scale across multiple hosts.
Introduction to Orchestration Options:
- Kubernetes: The industry standard for container orchestration, offering advanced scheduling, scaling, and self-healing capabilities.
- podman-compose: A podman-compatible alternative to docker-compose for simpler multi-container applications.
- nomad: A lightweight orchestrator from HashiCorp that can handle containers and other workloads.
Getting Started with podman-compose:
# Install podman-compose
pip3 install podman-compose

# Create a compose file
cat > docker-compose.yml << EOF
version: '3'
services:
  web:
    image: nginx
    ports:
      - "8080:80"
  db:
    image: postgres
    environment:
      POSTGRES_PASSWORD: example
    volumes:
      - pgdata:/var/lib/postgresql/data

volumes:
  pgdata:
EOF

# Run the multi-container application
podman-compose up -d

# Stop and remove the application
podman-compose down
Kubernetes Integration:
podman can generate Kubernetes YAML files from containers:
# Generate Kubernetes YAML for a container
podman generate kube mycontainer > mycontainer.yaml

# Create containers from Kubernetes YAML
podman play kube mycontainer.yaml
Read: What is Kubernetes and how does it work
17. Troubleshooting Containers: Common Issues and Solutions
Even with the best setup, you’ll occasionally encounter issues with containers. Here are some common problems and their solutions:
Container Won’t Start:
# Check for detailed error messages
podman logs mycontainer

# Inspect container configuration
podman inspect mycontainer

# Try running with more verbose output
podman run --rm -it --log-level=debug ubuntu:latest
Network Connectivity Issues:
# Check container IP address
podman inspect -f '{{.NetworkSettings.IPAddress}}' mycontainer

# Test network from within container
podman exec mycontainer ping -c 3 google.com

# Inspect network configuration
podman network inspect podman
Storage Issues:
# Check available disk space
df -h

# Inspect volume details
podman volume inspect myvolume

# Clean up unused resources
podman system prune -a
Resource Constraints:
# Check if container is hitting resource limits
podman stats mycontainer

# Increase limits if necessary
podman update --memory 2g --cpus 2 mycontainer
18. Summary: Your Container Journey
This guide has provided a comprehensive introduction to Linux containers on Ubuntu, covering the key concepts, tools, and techniques. You’ve learned:
- What containers are and why they’re important
- The differences between containers and virtual machines
- How to install and use the podman, buildah, and skopeo tools
- Running containers securely with rootless mode
- Managing persistent data with volumes
- Building custom container images
- Setting resource limits and monitoring performance
- Security best practices for container environments
- Introduction to container orchestration for scaling
- Troubleshooting common container issues
Containers continue to evolve rapidly, but the fundamental concepts covered in this guide will remain relevant. By understanding these core principles and practices, you’re well-equipped to adopt containers in your Ubuntu environment and leverage their benefits for your applications and services.
FAQ
General Container Questions
Q: Can I run Windows containers on Ubuntu?
A: No. Linux containers share the Linux kernel. You can’t run Windows applications in a Linux container. To run Windows containers, you need a Windows host (or a Windows VM).
Q: Is podman a complete replacement for Docker?
A: For most common use cases, yes. podman provides a very similar command-line interface to Docker, and it can work with Docker images and registries. However, Docker has some features (like Docker Swarm for orchestration) that podman doesn’t directly replicate. For those features, you’d typically use Kubernetes or Podman’s own podman-compose tool.
Q: What’s the difference between podman and buildah?
A: podman is primarily for running and managing containers. buildah is primarily for building container images. You can use podman to run pre-built images, but if you need to create your own custom images from scratch, buildah gives you more control.
Container Management
Q: How can I see the IP address of a container?
A: If using the default bridged network (CNI), you can see the assigned IP address using the podman inspect command:
podman inspect -f '{{.NetworkSettings.IPAddress}}' mycontainer
Alternatively, you can run ip addr inside the container:
podman exec mycontainer ip addr
Q: How do I share files between the host and a container?
A: The best way to share files is to use volumes or bind mounts:
# Using a named volume
podman run -v myvolume:/path/in/container ubuntu:latest

# Using a bind mount
podman run -v /path/on/host:/path/in/container ubuntu:latest
Q: Can I run graphical applications inside a container?
A: Yes, but it requires sharing your X11 socket with the container:
podman run -it --net=host -e DISPLAY=$DISPLAY -v /tmp/.X11-unix:/tmp/.X11-unix ubuntu:latest
You may also need to run xhost +local: on the host before launching the container.
Q: What’s the difference between stopping and pausing a container?
A:
- Stopping: The container’s processes are terminated, but the container’s filesystem and configuration are preserved. You can start it again later.
- Pausing: The container’s processes are suspended (frozen), but they remain in memory. This uses less CPU, but the container still occupies RAM.
Storage and Performance
Q: Where are container images stored locally?
A: The exact location depends on the storage driver being used, but it’s typically within /var/lib/containers/ (for rootful podman) or within your user’s home directory (e.g., ~/.local/share/containers/ for rootless podman). You generally don’t interact with these files directly; use podman commands to manage images.
Q: How can I copy files between the host and a container?
A: You can use the podman cp command:
# Copy a file from the host to the container
podman cp my_local_file.txt mycontainer:/path/inside/container/

# Copy a file from the container to the host
podman cp mycontainer:/path/inside/container/remote_file.txt ./
Q: How do I handle log files in containers?
A: Container logs should be directed to stdout/stderr rather than files. podman captures these streams and makes them available through podman logs. For applications that can only log to files, consider using a volume for logs or a logging sidecar container.
Q: How can I clean up unused containers and images to save disk space?
A: Use the system prune command:
# Remove all stopped containers, unused networks, and dangling images
podman system prune

# Also remove all unused images, not just dangling ones
podman system prune -a
Security
Q: How can I ensure my containers are secure?
A: Follow these key practices:
- Run rootless containers when possible
- Scan images for vulnerabilities regularly
- Don’t run containers as root
- Use minimal base images
- Implement proper network policies
- Apply security updates promptly
- Use read-only filesystems where possible
Q: Can containers escape and access the host system?
A: While container isolation is strong, it’s not perfect. Containers with elevated privileges (especially those running as root or with special capabilities) might be able to escape under certain circumstances. This is why following security best practices is crucial.
Advanced Usage
Q: Can I limit container resource usage?
A: Yes, you can limit CPU, memory, and other resources:
podman run --cpus 2 --memory 1g --name resource_limited ubuntu:latest
Q: How do I update a running container’s configuration?
A: Use the podman update command:
podman update --cpus 4 --memory 2g mycontainer
Q: Can I automatically restart containers if they crash or if the host reboots?
A: Yes, use the –restart flag:
podman run --restart=always myimage
For system-wide persistence, consider using systemd units:
# Generate a systemd unit for a container
podman generate systemd --name mycontainer > ~/.config/systemd/user/container-mycontainer.service

# Enable and start the service
systemctl --user enable --now container-mycontainer
If you like the content, we would appreciate your support by buying us a coffee. Thank you so much for your visit and support.