TeamViewer is a super popular proprietary application that works across different operating systems (like Windows, macOS, and Linux) and lets you securely connect to another computer’s desktop over the internet.
You can see their screen, control their mouse and keyboard, and even transfer files back and forth.
It’s a favorite among IT support folks because it makes helping remote users so much easier when they get stuck. If you’re using Ubuntu, getting TeamViewer set up is pretty straightforward.
This guide will walk you through the steps to install TeamViewer on Ubuntu 24.04 LTS, and the process is identical for Ubuntu 22.04 LTS and 20.04 LTS as well. Let’s get started!
Read: How to Install Microsoft Teams on Ubuntu 24.04
Installing TeamViewer on Your Ubuntu System
Step 1: Update System Packages
Before we install anything new, it’s always a smart move to make sure your system’s package lists are up-to-date and any existing software is upgraded. This helps avoid potential conflicts and ensures you’re starting from a known state. Open your terminal (you can usually use the shortcut Ctrl+Alt+T) and run these two commands:
sudo apt update && sudo apt upgrade
This refreshes your package sources and applies any pending updates.
Step 2: Download the TeamViewer Debian Package
Once your system is updated, we need to grab the TeamViewer installer file. TeamViewer provides a `.deb` package specifically for Debian-based systems like Ubuntu.
You have two main ways to do this:
- Graphical Method: Head over to the official TeamViewer Linux download page in your web browser and download the appropriate Debian/Ubuntu package (usually marked as 64-bit).
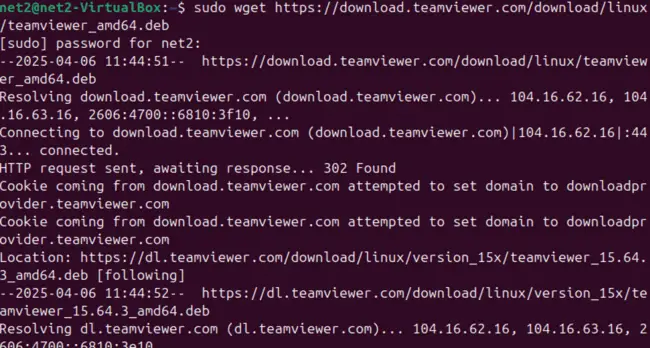
- Terminal Method (using `wget`): If you prefer using the terminal, you can copy the direct download link from the official page and use the `wget` command to download it. Here are the typical links (though it’s always best to verify on the official site for the latest version):
For 64-bit Systems (Most common):
sudo wget https://download.teamviewer.com/download/linux/teamviewer_amd64.deb
After the download finishes (using either method), you can confirm the file is in your current directory (usually your Home directory if you used `wget` without changing location) using the `ls` command combined with `grep`:
ls | grep teamviewer
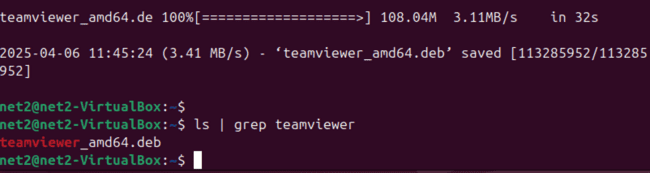
You should see the downloaded `.deb` file listed as shown above.
Read: How to use grep command in Linux
Step 3: Install TeamViewer using APT
Now that we have the `.deb` file, we can install it using the `apt` package manager. Using `apt` is recommended because it will automatically handle installing any other necessary dependencies TeamViewer might need.
Make sure you are in the same directory where you downloaded the `.deb` file, then run the following command:
sudo apt install ./teamviewer_amd64.deb
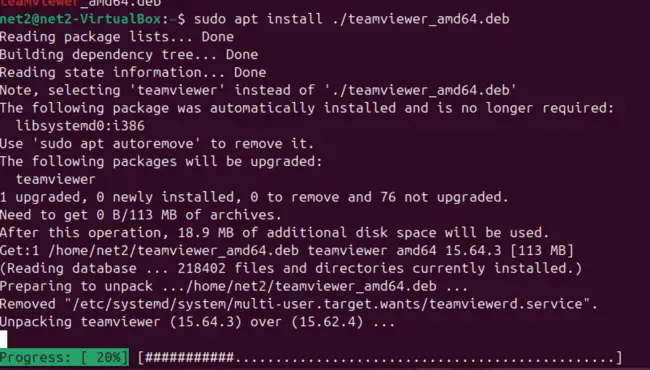
The system will analyze the package and its dependencies. It will likely ask for confirmation to proceed with the installation. When prompted, type ‘Y’ (for Yes) and press the ‘ENTER’ key.
Step 4: Launch TeamViewer
Once the installation process completes successfully, you’re ready to launch TeamViewer!
Again, you have a couple of options:
- From the Terminal: Simply type the command:
teamviewer
- From the Application Menu: Click on your Ubuntu application launcher (the grid icon or Activities overview) and search for “TeamViewer”. Click on the TeamViewer icon to start it.

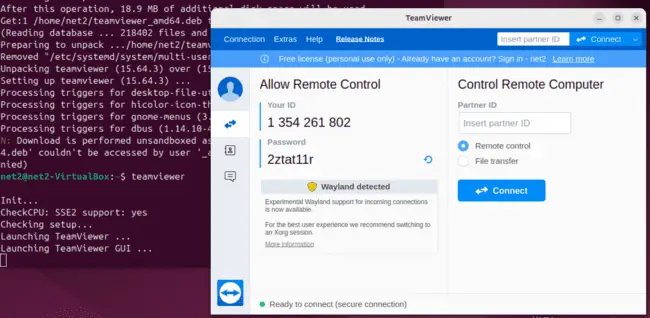
The first time you launch TeamViewer, you’ll be presented with the End-User License Agreement (EULA). You need to accept this to continue.
After accepting the agreement, TeamViewer will open its main window. It will display Your ID and a temporary Password. These are the credentials someone else would need to connect *to* your computer remotely.
Step 5: Using TeamViewer for Remote Connections
To connect *to* another computer that also has TeamViewer running, you’ll need their TeamViewer ID. Enter that ID into the “Partner ID” field under the “Remote Control” section, and then click the “Connect” button.
TeamViewer will then prompt you for the password associated with that Partner ID. Once you enter the correct password, you’ll establish a remote connection to their desktop.
Conversely, if someone needs to connect to your computer, you provide them with Your ID and Password displayed in your TeamViewer window.
Uninstalling TeamViewer from Ubuntu
If you decide you no longer need TeamViewer on your system, you can remove it easily using the `apt` command.
Open your terminal and run:
sudo apt remove teamviewer
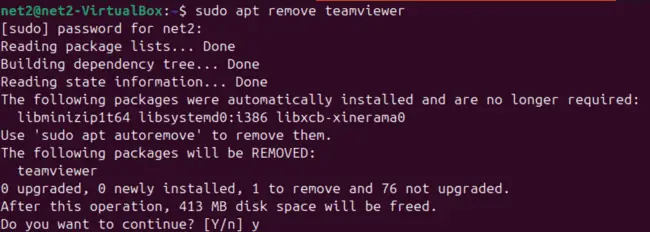
This command will uninstall the TeamViewer package. It might leave some configuration files behind; if you want to remove those as well, you could use `sudo apt purge teamviewer`, but `remove` is usually sufficient.
Conclusion
And there you have it! Installing TeamViewer on Ubuntu 24.04 is quite simple using the official `.deb` package. Just update your system, download the installer, use `apt install` to handle dependencies, and you’re ready to launch and connect. Whether for remote support, accessing your files, or collaborating, TeamViewer is a handy tool to have available on your Linux desktop.
Frequently Asked Questions (FAQ)
Q1: Is TeamViewer free to use on Ubuntu?
TeamViewer offers a free license for personal, non-commercial use. If you intend to use it for business purposes, providing professional support, or within a corporate environment, you are required to purchase a commercial license. The software will often detect commercial usage patterns and may restrict connections if it suspects unlicensed commercial activity.
Q2: Will TeamViewer work with Wayland display server on Ubuntu 24.04?
TeamViewer has been improving its compatibility with Wayland, which is the default display server in newer Ubuntu versions. However, historically, some features (like capturing certain parts of the screen or interacting with specific windows) might work more reliably under the traditional Xorg (X11) session. If you encounter issues with screen sharing or control under Wayland, you might consider logging into an “Ubuntu on Xorg” session from the login screen as a troubleshooting step.
Q3: How do I update TeamViewer after installing it via the .deb package?
When you install the TeamViewer `.deb` package, it usually adds a TeamViewer repository to your system’s software sources. This means that when you run your standard system updates (`sudo apt update && sudo apt upgrade`), `apt` should automatically detect and install any new versions of TeamViewer released through that repository. So, keeping TeamViewer updated is typically as simple as keeping your Ubuntu system updated.
Q4: What should I do if `sudo apt install ./teamviewer_amd64.deb` fails with dependency errors?
While `apt install ./` is generally good at handling dependencies, sometimes issues can occur. If you see dependency errors:
- Run Fix Broken Installs: Try running `sudo apt –fix-broken install`. This command attempts to resolve unmet dependencies for already configured packages.
- Ensure System is Updated: Double-check that your system is fully updated (`sudo apt update && sudo apt upgrade`) before attempting the installation again.
- Check Architecture: Make sure you downloaded the correct package (amd64 for 64-bit systems, i386 for 32-bit) for your Ubuntu installation. Use `uname -m` to check your architecture (`x86_64` means 64-bit).
- Manual Dependency Installation: Note the specific missing dependencies mentioned in the error message and try installing them manually using `sudo apt install `. Then, attempt the TeamViewer installation again.
Q5: Are there security considerations when using TeamViewer on Linux?
Yes, as with any remote access software, security is crucial. Key considerations include:
- Strong Passwords: Always use strong, unique passwords for your TeamViewer account (if you create one) and consider enabling two-factor authentication (2FA).
- Temporary Passwords: Be cautious about who you share your temporary session password with. Regenerate it regularly if needed.
- Whitelist/Blacklist: Utilize TeamViewer’s features to restrict access only to specific Partner IDs (whitelist) if applicable.
- Keep Updated: Ensure both TeamViewer and your Ubuntu system are always up-to-date to patch security vulnerabilities.
- Exit When Not Needed: Close TeamViewer when you are not actively using it to minimize potential attack surfaces.
Use TeamViewer responsibly and be aware of potential phishing attempts asking for your ID and password.
If you like the content, we would appreciate your support by buying us a coffee. Thank you so much for your visit and support.