The ‘useradd’ command is a fundamental tool in Linux system administration used to create new user accounts. Similar to the ‘usermod’ command, ‘useradd’ affects multiple system files when creating a new user account,
including /etc/shadow, /etc/passwd, /etc/gshadow, /etc/login.defs, and /etc/group. Here’s a comprehensive overview of these critical system files:

The ‘useradd’ command also handles permissions and ownership settings for the user’s home directory, which can be automatically created and populated with default files during account creation.
The basic syntax of the useradd command in Linux is:
useradd [options] username
Read: Mastering User and Group Management in Linux: A Comprehensive Guide for IT Administrators
Creating a Basic User Account in Linux
To add a new user account, simply run the useradd command with a unique username that will be used to log into the system.
Let’s create a new user called net2man:
sudo useradd net2man

After creating a username, the account is initially in a locked state. To make it usable, you’ll need to set a password using the ‘passwd’ command:

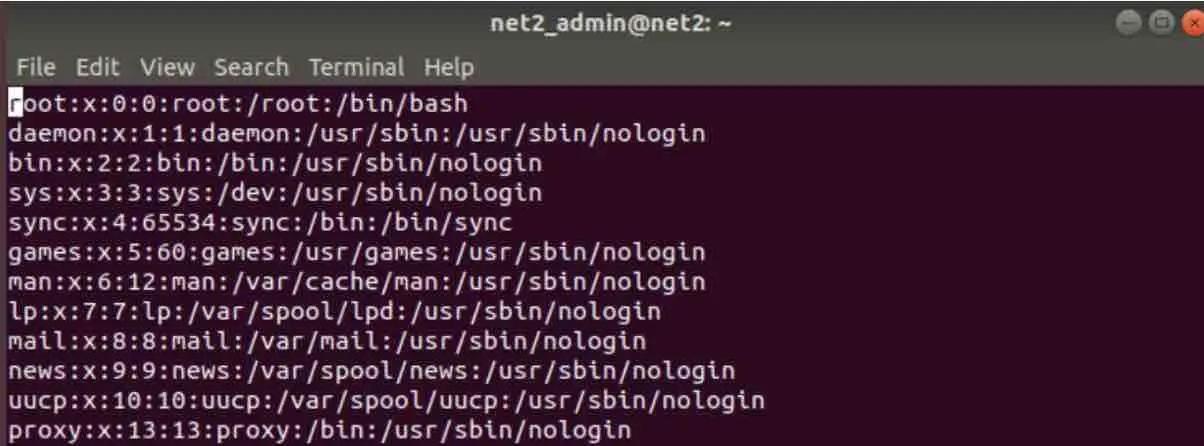
To verify the user creation, you can examine the /etc/passwd file which stores user account details:

At the end of the file, you’ll find the entry for our new user net2man:

Each user entry contains 7 fields separated by colons. Let’s examine each field:
1. The Username
![]()
This is the login name created with the useradd command, which the user will use to access the system. Username length should not exceed 32 characters.
2. The Password Field
![]()
The ‘x’ character indicates that the user has a password. The actual encrypted password is stored in the /etc/shadow file for security. Here’s what you’ll see in the shadow file:
![]()

Read: Generating Secure Passwords on Linux: PWGen, Custom Scripts, and Other Tools
3. The User ID (UID)
![]()
Each user account receives a unique User Identification Number (UID). System accounts typically have UIDs in the range of 1-99; for example, the daemon user has a UID of 1, while the root user has a UID of 0:
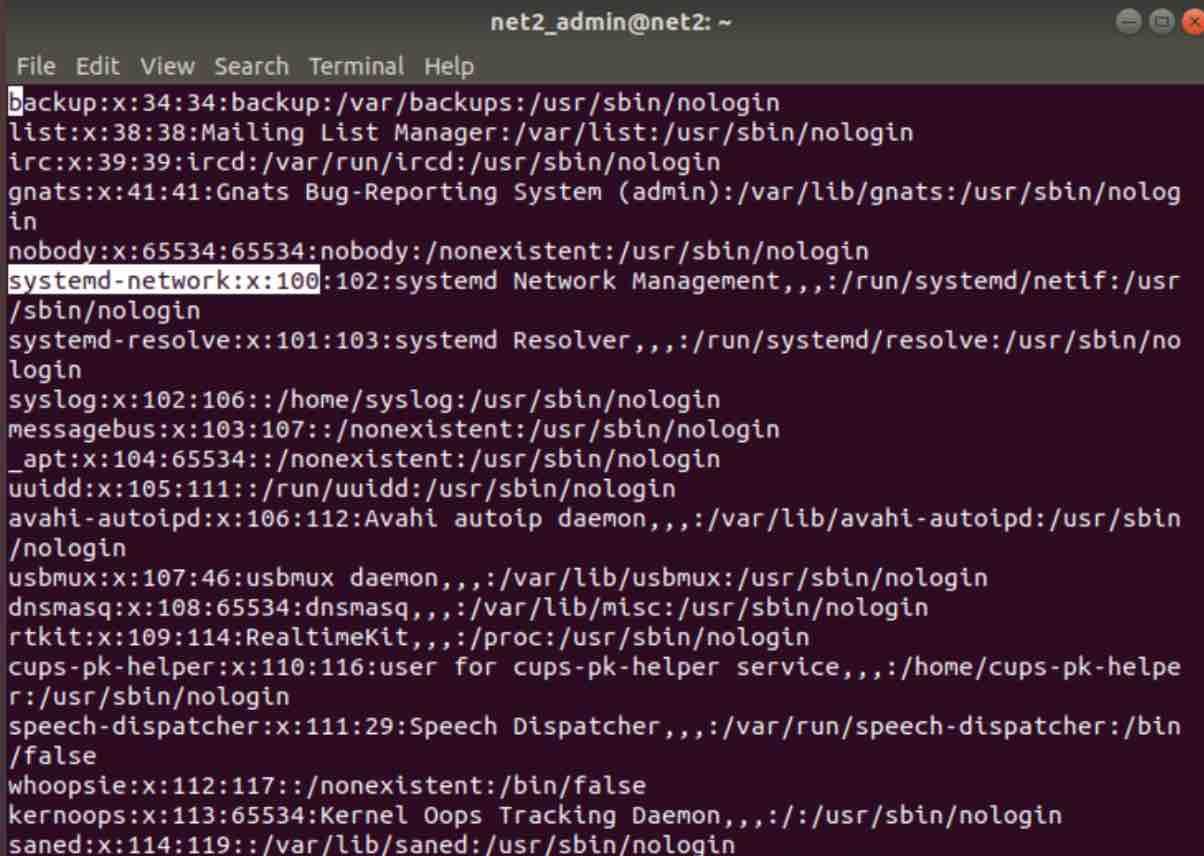
System entities generally use the UID range 100-999, such as system-network with a UID of 100:
4. The Group ID (GID)
![]()
This shows the primary group ID to which the user belongs. Group information is stored in the /etc/group file.
5. User Information
![]()
This field can store additional user information such as full name, address, or email. While initially empty, you can populate it using the usermod command with the -c option:
![]()
After adding the information, the field is updated:
![]()
6. User Home Directory
![]()
This field defines the path to the user’s home directory.
7. User’s Shell
![]()
This field specifies the default shell assigned to the user.
Read: Using the Bash Shell on Ubuntu
Creating a User with Custom UID: The -u Option
When creating a new user, you can specify a custom User ID (UID) rather than accepting the automatically assigned one. Use the -u option to define a specific UID for your new user:
sudo useradd -u 714 net2user

To verify that the custom UID was assigned correctly:

The output confirms that uid=714 has been assigned to net2user. Ensure the UID you choose isn’t already in use by another user account.
Adding Users to Multiple Secondary Groups: The -G Option
Users can belong to multiple groups simultaneously. To add a new user to additional secondary groups, use the -G option with comma-separated group names (no spaces between groups):
sudo useradd -G rootusers,superusers net2master
![]()
This command adds the user net2master to both the rootusers and superusers groups and their primary group.
Specifying a Primary Group ID: The -g Option
Similar to custom UIDs, you can also specify a primary Group ID when creating a user with the -g option:
sudo useradd -g 1004 net2master

This creates a user named net2master with primary group ID 1004.
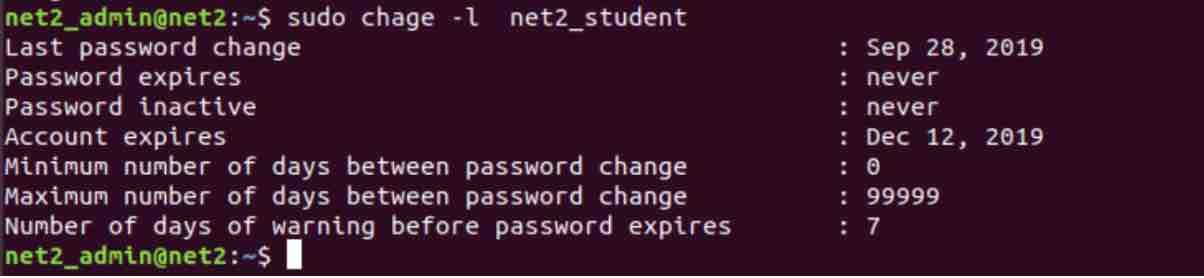
Creating Temporary User Accounts with Expiration Dates: The -e Option
For temporary users like students or contract workers, you can set an account expiration date. By default, user accounts never expire (value 0). To set an expiration date in YYYY-MM-DD format, use the -e option:
sudo useradd -e 2019-12-12 net2_student

To verify the account expiration date, use the chage command:
sudo chage -l net2_student
Read: How to create a Sudo user on Ubuntu
Creating Users Without Home Directories: The -M Option
Sometimes system administrators need to create user accounts without assigning home directories. For such users, use the -M option:
sudo useradd -M net2_user

As shown in the output, the home directory for this user doesn’t exist.
Read: Linux directories explained
Adding User Information and Comments: The -c Option
When creating a user, you can include additional information like full name, department, or contact details using the -c option. This information is stored in the /etc/passwd file:
sudo useradd -c “net2 lab” net2_lab

Verifying in the /etc/passwd file shows the added information:
![]()
Specifying a Custom Home Directory: The -d Option
By default, user home directories are created as /home/username. You can specify a different location using the -d option:
sudo useradd -d /home/net2lady_folder net2lady
![]()
Checking the /etc/passwd file confirms the custom home directory:
![]()
Setting Password Expiration Period: The -f Option
You can specify how many days after a password expires before the account is permanently disabled. By default, passwords never expire (value -1). Setting this value to 0 disables the account immediately after password expiration.
Here we’re setting a 30-day period after which the password will expire:

Frequently Asked Questions about the useradd Command
What’s the difference between useradd and adduser commands?
The useradd command is a low-level utility that creates user accounts with minimal default settings. The adduser command (available on Debian-based systems) is a more user-friendly frontend that sets up reasonable defaults and prompts for additional information during account creation.
How do I create a user with sudo privileges?
First create the user with useradd, then add them to the sudo group with: sudo usermod -aG sudo username
Can I create multiple users with similar settings at once?
The useradd command doesn’t directly support creating multiple users in a single command. For batch user creation, you would need to create a script that loops through a list of usernames.
What happens if I don’t set a password for a new user?
The account remains locked until a password is set with the passwd command. Users cannot log in to locked accounts.
How do I troubleshoot issues with user creation in Linux?
Check system logs (/var/log/auth.log or journalctl output) for error messages. Verify that you have sufficient permissions and that the user doesn’t already exist. Ensure the UID and GID values you’re specifying aren’t already in use.
If you like the content, we would appreciate your support by buying us a coffee. Thank you so much for your visit and support.