If you’re working with Python, you’ve probably heard about virtual environments. They’re absolutely essential for keeping your projects organized and avoiding nasty dependency conflicts.
Think of them as little sandboxes for your Python projects – each one has its own Python interpreter and its own set of installed packages. This guide is based on years of experience battling (and winning!) the dependency wars, so let’s dive in!
Why You Need Virtual Environments (No, Seriously!)
Imagine you’re working on two projects: Project A needs version 1.0 of a library called “AwesomeLib,” and Project B needs version 2.0. If you install both versions globally (i.e., system-wide), they’ll clash. Project A might break because it gets version 2.0, or Project B might break because it gets version 1.0. It’s a mess! I’ve been there, pulling my hair out trying to figure out why a perfectly good project suddenly stopped working. Virtual environments solve this by isolating your project’s dependencies.
From an IT admin’s perspective, this is crucial for maintaining system stability. Global package installations can inadvertently break system tools that rely on specific Python versions or libraries. Virtual environments prevent this by keeping project-specific dependencies separate from the system-wide Python installation.
Read: How to create a Modern Python Development Environment
Understanding the Core Concept: Isolation
The key to understanding virtual environments is the idea of isolation. Each virtual environment is a self-contained directory that houses:
- A Specific Python Interpreter: You can have environments with Python 3.7, 3.8, 3.9, etc., even if your system’s default Python is different.
- Independent Packages: Packages installed within an environment do not affect your system’s Python installation or other virtual environments.
- Project-Specific Each project has its own dependencies.
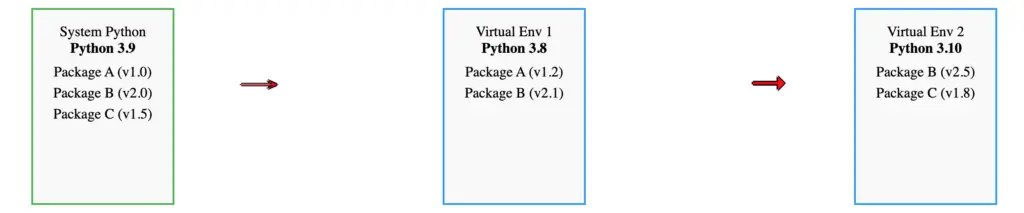
This isolation prevents conflicts and ensures that each project has exactly the dependencies it needs, and only those dependencies.
The Tools of the Trade: venv, virtualenv, pipenv, and poetry
There are several excellent tools for managing virtual environments in Python. Let’s break them down:
1. venv (The Built-in Standard)
venv is the recommended way to create virtual environments, and it’s built into Python 3.3 and later. It’s lightweight and easy to use. It creates a directory containing a copy (or symlinks) of the Python interpreter, the standard library, and various supporting files.
Creating a venv Environment
Let’s say you’re starting a new project called “MyProject.” Here’s how to create a virtual environment for it:
    # Navigate to your project directory
    cd MyProject

    # Create the virtual environment (named 'venv' here - you can choose a different name)
    python3 -m venv venv
This command creates a directory called venv (or whatever name you chose) inside your project directory. This directory is your isolated environment.
Activating the Environment
Before you can use the environment, you need to activate it. Activation modifies your shell’s environment variables so that the python and pip commands point to the versions inside the virtual environment, not the system-wide versions.
On macOS and Linux:
source venv/bin/activate
On Windows (PowerShell):
.\venv\Scripts\Activate.ps1
On Windows (cmd):
venv\Scripts\activate.bat
Once activated, your terminal prompt will usually change to show the name of the active environment (e.g., (venv)). This is a visual reminder that you’re working inside the environment.
user@host:~/MyProject$ source venv/bin/activate
(venv) user@host:~/MyProject$
Installing Packages
Now that your environment is active, you can install packages using pip. These packages will be installed only within the virtual environment.
    # Install the 'requests' library
    pip install requests
Deactivating the Environment
When you’re finished working in the environment, you can deactivate it:
deactivate
This restores your shell’s environment variables to their original state.
Listing Packages
pip list
pip list
This displays a comprehensive list of packages and their corresponding versions that have been installed within your virtual environment.
Generating a requirements.txt File
The requirements.txt file is crucial for replicating your project’s environment on another machine or by another developer. It lists all the packages (and their versions) that your project depends on.
pip freeze > requirements.txt
This command takes the output of pip freeze (which lists all installed packages and their versions) and saves it to a file named requirements.txt.
Installing from a requirements.txt File
pip install -r requirements.txt
pip install -r requirements.txt
This command instructs pip to install all packages listed in the requirements.txt file, ensuring that your project has the correct dependencies. This is particularly useful when setting up a project on a new machine or collaborating with others.
2. virtualenv (The Predecessor to venv)
virtualenv is an older tool that predates venv. It’s still widely used, especially for Python 2 projects (though you should be migrating to Python 3!). It works similarly to venv, but it’s a separate package that needs to be installed.
    # Install virtualenv
    pip install virtualenv

    # Create an environment
    virtualenv my_env

    # Activate the environment (macOS/Linux)
    source my_env/bin/activate

    # Activate the environment (Windows - PowerShell)
    .\my_env\Scripts\Activate.ps1
      # Activate the environment (Windows - cmd)
     my_env\Scripts\activate.bat
The main difference is that you install virtualenv globally, but it still creates isolated environments like venv.
Read: How to Set Environment Variables in Docker
3. pipenv (The High-Level Workflow Tool)
pipenv is a more sophisticated tool that combines package management (like pip) and virtual environment management (like venv) into a single workflow. It automatically creates and manages virtual environments for your projects, and it uses a Pipfile and Pipfile.lock to manage dependencies more precisely.
Installation
pip install pipenv
pip install pipenv
Creating a Project with pipenv
Instead of creating a virtual environment explicitly, pipenv does it for you when you install your first package.
    cd MyProject
    pipenv install requests
This command does several things:
- It creates a virtual environment for your project (if one doesn’t already exist).
- It installs the requests library into that environment.
- It creates a Pipfile, which lists your project’s dependencies.
- It creates a Pipfile.lock, which provides a deterministic build by specifying the exact versions of all dependencies (and their sub-dependencies).
Activating the pipenv Shell
pipenv shell
pipenv shell
This command activates the virtual environment associated with your project. Similar to activating a venv environment, this modifies your shell so that you’re using the Python interpreter and packages within the virtual environment.
Exiting the pipenv Shell
exit
exit
This command deactivates the virtual environment activated by pipenv shell and returns you to your original shell environment.
Running a Command Without Activating
pipenv run python my_script.py
pipenv run python my_script.py
This is a handy way to run a command (in this case, python my_script.py) within the project’s virtual environment without explicitly activating the shell. pipenv handles the environment setup for that single command.
Uninstalling Packages
pipenv uninstall requests
pipenv uninstall requests
This command removes the requests package from your project’s virtual environment and updates the Pipfile and Pipfile.lock accordingly.
Understanding Pipfile and Pipfile.lock
The Pipfile is a human-readable file that specifies your project’s *intended* dependencies. You can specify version ranges (e.g., “requests >= 2.20.0”).
        # Example Pipfile
        [[source]]
        url = "https://pypi.org/simple"
        verify_ssl = true
        name = "pypi"

        [packages]
        requests = ">="

        [dev-packages]
        pytest = "*"
The `Pipfile.lock` is an automatically generated file that contains a *snapshot* of the *exact* versions of all packages (including sub-dependencies) that were installed when you last ran `pipenv install` or `pipenv update`. This ensures *deterministic builds* – everyone working on the project, and every deployment environment, will use the *exact* same versions.
        # Example Pipfile.lock (Partial - it's usually much longer)
        {
            "_meta": {
                ...
            },
            "default": {
                "requests": {
                    "hashes": [
                        "sha256:..."
                    ],
                    "version": "==2.28.1"
                },
                ...
            },
            "develop": {
                "pytest": {
                    "hashes": [
                       "sha256:..."
                    ],
                    "version": "==7.1.3"
                }
            }
        }
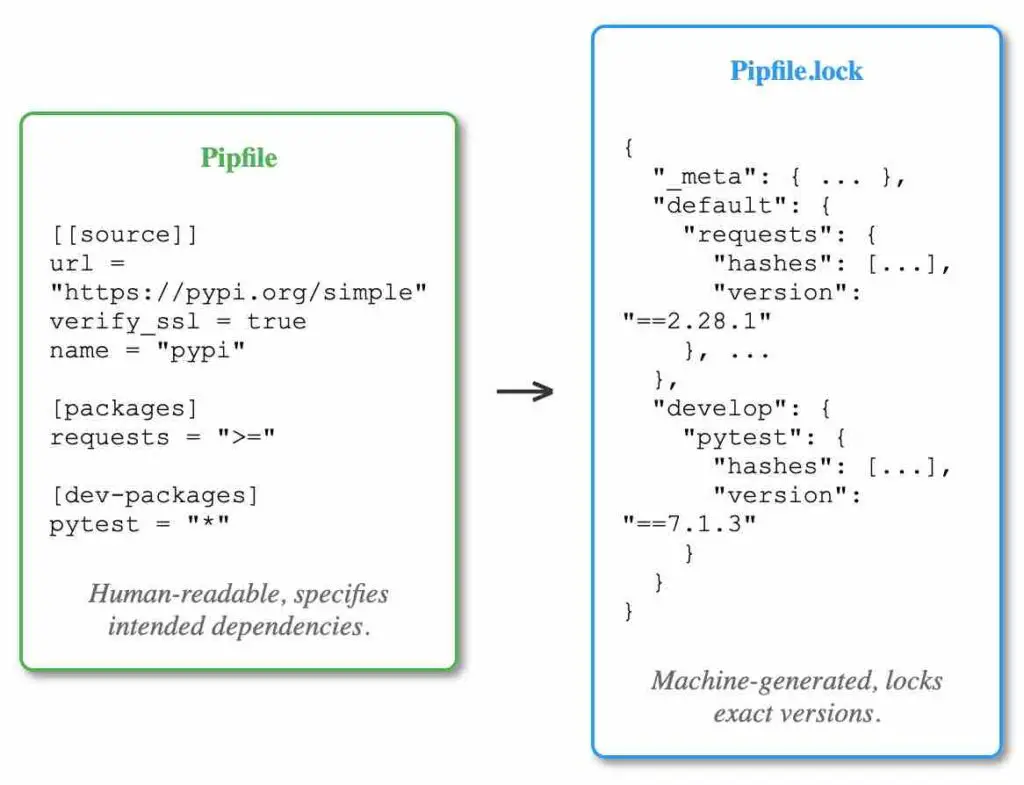
Pipfile.lock is a big advantage of pipenv. It ensures that everyone working on the project uses the exact same versions of all packages, preventing “it works on my machine” problems.
Read: How to install pip on Ubuntu 18.04 or Ubuntu 20.04
4. poetry (Modern Dependency Management)
poetry is another modern dependency management tool, similar in spirit to pipenv. It also uses a pyproject.toml file to manage project metadata and dependencies. It’s gaining popularity for its ease of use and powerful features.
Installation
pip install poetry
pip install poetry
Initializing a Project with poetry
cd MyProject

poetry init
cd MyProject
poetry init
This command interactively guides you through creating a pyproject.toml file, asking for information about your project.
Adding Dependencies
poetry add requests
poetry add requests
This adds the requests library as a dependency and updates the pyproject.toml file. poetry also creates a virtual environment automatically (if one doesn’t exist) and installs the package into it.
Activating the poetry Shell
poetry shell
poetry shell
This command activates the virtual environment that Poetry has created for your project. Like with venv and pipenv, this makes the environment’s Python and packages available in your current shell session.
Exiting the poetry Shell
exit
exit
This command deactivates the Poetry shell, returning you to your system’s default Python environment.
Running Commands within the Environment
poetry run python my_script.py
poetry run python my_script.py
Just like pipenv, poetry allows you to run commands within the project’s virtual environment without explicitly activating it. This is very convenient for running scripts, tests, or other tools.
Removing Dependencies
poetry remove requests
poetry remove requests
This command removes the requests library from your project’s dependencies and updates the pyproject.toml file. The package is also uninstalled from the virtual environment.
Understanding pyproject.toml
The `pyproject.toml` file is a central configuration file used by modern Python tools (including `poetry`, but also tools like `flake8`, `black`, and `mypy`). It replaces older files like `setup.py`, `requirements.txt`, and others, providing a single, standardized way to configure your project.
        # Example pyproject.toml (with Poetry)
        [tool.poetry]
        name = "my-project"
        version = "0.1.0"
        description = "My awesome project"
        authors = ["Your Name <your.email@example.com>"]

        [tool.poetry.dependencies]
        python = "^3.8"
        requests = "^2.28.1"

        [tool.poetry.dev-dependencies]
        pytest = "^7.1.3"

        [build-system]
        requires = ["poetry-core>=1.0.0"]
        build-backend = "poetry.core.masonry.api"
- [tool.poetry]: General project metadata (name, version, description, authors).
- [tool.poetry.dependencies]: Your project’s *main* dependencies (required for running the project).
- [tool.poetry.dev-dependencies]: Dependencies needed for development (testing, linting, etc.).
- [build-system]: Specifies how to build your project (usually using Poetry itself).
- Version Constraints: Notice the `^` character. This indicates *compatible* versions. `^3.8` means “any version from 3.8.0 up to (but not including) 4.0.0”. `^2.28.1` means “any version from 2.28.1 up to (but not including) 2.29.0”. This is based on *semantic versioning* (SemVer).
poetry and pipenv offer very similar workflows. The choice often comes down to personal preference. Both improve upon venv and requirements.txt by using lock files for greater reproducibility.
Comparison of Virtual Environment Tools
| Feature | venv | virtualenv | pipenv | poetry |
|---|---|---|---|---|
| Built-in (Python 3.3+) | Yes | No | No | No |
| Ease of Use | Basic | Basic | High | High |
| Dependency Management | pip + requirements.txt | pip + requirements.txt | Pipfile + Pipfile.lock | pyproject.toml |
| Automatic Environment Creation | No | No | Yes | Yes |
| Lock File Support | No (use pip freeze) | No (use pip freeze) | Yes (Pipfile.lock) | Yes (part of pyproject.toml) |
| Environment Activation | source venv/bin/activate (Linux/macOS) venv\Scripts\Activate.ps1 (Windows PowerShell) | source venv/bin/activate (Linux/macOS) \Scripts\Activate.ps1 (Windows PowerShell) | pipenv shell | poetry shell |
| Run Command Without Activation | Not directly supported | Not directly supported | pipenv run | poetry run |
Managing Multiple Python Versions with pyenv
Sometimes, you need to work with different Python versions (e.g., 3.7 and 3.9). venv creates environments based on the Python interpreter you use to run it. So, if you have Python 3.7 and 3.9 installed, you can do:
    # Create a Python 3.7 environment
    python3.7 -m venv venv37

    # Create a Python 3.9 environment
    python3.9 -m venv venv39
Using pyenv to manage multiple Python versions
pyenv is a powerful tool that allows you to easily install and switch between multiple Python versions on your system. It’s not a virtual environment tool itself, but it works beautifully with virtual environment tools.
With pyenv, you can install various Python versions (e.g., 3.7.10, 3.8.5, 3.9.2) without affecting your system’s default Python. Then, you can use venv, virtualenv, pipenv, or poetry to create virtual environments based on those pyenv-managed Python versions.
Installing pyenv
The installation process for pyenv varies depending on your operating system. Refer to the official pyenv documentation for detailed instructions. Here’s a general outline:
macOS (using Homebrew):
 brew update

brew install pyenv
Linux (using the installer):
curl https://pyenv.run | bash
After installation, you’ll need to add pyenv to your shell’s initialization file (e.g., `~/.bashrc`, `~/.zshrc`). The installer usually provides instructions on how to do this.
Installing Python Versions with pyenv
    # List available Python versions
    pyenv install --list

    # Install a specific version
    pyenv install 3.9.13

    # Install another version
    pyenv install 3.10.6
Setting a Global Python Version
    # Set the global default Python version
    pyenv global 3.9.13
This sets the default Python version used when you run `python` outside of any specific project directory.
Setting a Local Python Version (Per Project)
    # Navigate to your project directory
    cd MyProject

    # Set the local Python version for this project
    pyenv local 3.10.6
This creates a `.python-version` file in your project directory, specifying that this project should use Python 3.10.6. When you’re inside this directory (or any subdirectory), pyenv will automatically use the specified version.
Using pyenv with venv
Once you’ve set a local Python version with pyenv, you can create a venv environment using that version *without* having to specify the full Python path:
    # (Inside your project directory with pyenv local set)
    python -m venv .venv
Because pyenv has already set up the environment to use the correct Python version, you can simply use `python`. This is much cleaner than having to remember and type `python3.9` or `python3.10`.
Using pyenv with pipenv/poetry
pyenv integrates seamlessly with pipenv and poetry. When you run `pipenv install` or `poetry install` inside a project that has a `.python-version` file (created by `pyenv local`), these tools will automatically create a virtual environment using the correct Python version. For poetry, but it’s worth noting that a lock file (poetry.lock) also exists behind the scenes.
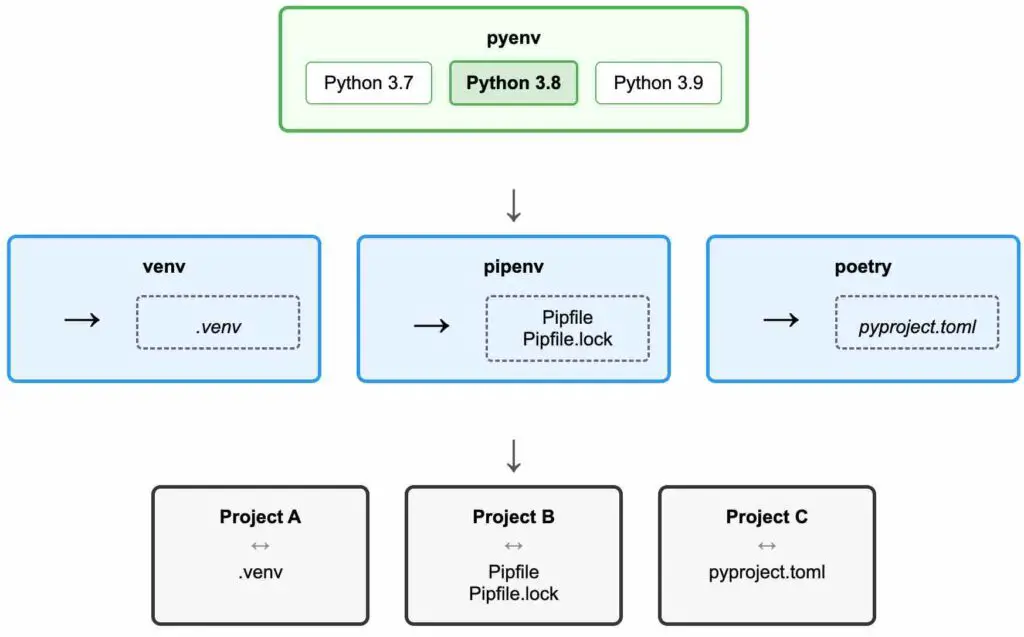
high-level conceptual representation of how pyenv, venv, pipenv, and poetry relate to different Python projects.
Advanced Usage
Using Virtual Environments with Docker
Docker containers provide another layer of isolation, encapsulating your entire application and its dependencies (including the Python interpreter and virtual environment) into a portable, reproducible unit. You can create a Docker image that includes a virtual environment, ensuring consistency across different environments (development, testing, production).
A typical `Dockerfile` for a Python project using a virtual environment might look like this:
        # Use an official Python runtime as a parent image
        FROM python:3.9-slim-buster

        # Set the working directory in the container
        WORKDIR /app

        # Copy the requirements file into the container
        COPY requirements.txt .

        # Create and activate a virtual environment
        RUN python -m venv /venv
        ENV PATH="/venv/bin:$PATH"

        # Install dependencies
        RUN pip install --no-cache-dir -r requirements.txt

        # Copy the rest of the application code
        COPY . .

        # Run the application (replace with your actual command)
        CMD ["python", "my_app.py"]
- FROM python:3.9-slim-buster: Starts from an official Python base image.
- WORKDIR /app: Sets the working directory inside the container.
- COPY requirements.txt .: Copies your `requirements.txt` file into the container.
- RUN python -m venv /venv: Creates a virtual environment inside the container.
- ENV PATH=”/venv/bin:$PATH”: Activates the virtual environment by modifying the `PATH` environment variable.
- RUN pip install …: Installs the dependencies into the virtual environment.
- COPY . .: Copies your entire project into the container.
- CMD [“python”, “my_app.py”]: Specifies the command to run when the container starts.
Integrating Virtual Environments with IDEs
Most popular Python IDEs (VS Code, PyCharm, etc.) provide built-in support for virtual environments. This allows you to easily:
- Select the Python interpreter associated with a specific virtual environment.
- Run and debug your code within the environment.
- Install packages directly into the environment from within the IDE.
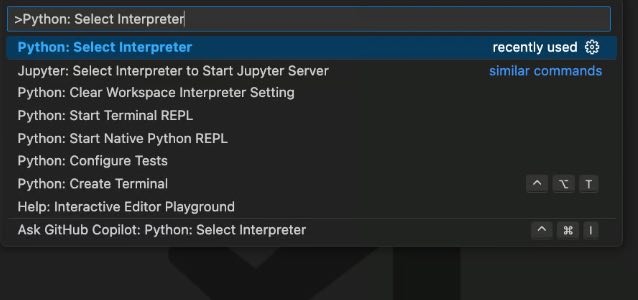
VS Code:
- Open the Command Palette (Ctrl+Shift+P or Cmd+Shift+P).
- Type “Python: Select Interpreter” and select it.
- Choose the interpreter associated with your virtual environment (it will usually be listed with the environment name).
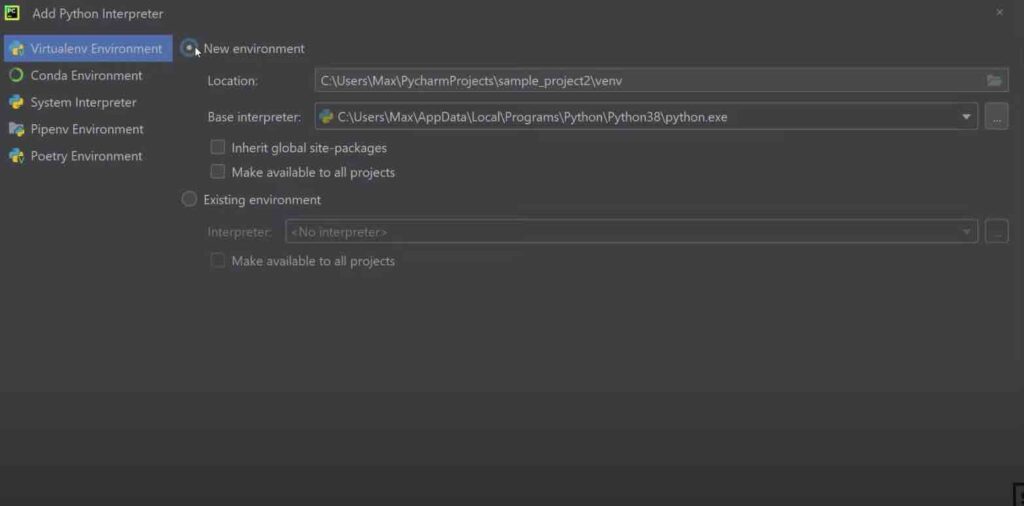
PyCharm:
- Go to File > Settings (or PyCharm > Preferences on macOS).
- Navigate to Project: [Your Project Name] > Project Interpreter.
- Click the gear icon and choose “Add…”.
- Select “Conda Environment” or “Virtualenv Environment” (depending on what you’re using) and choose the appropriate environment.
Customizing Virtual Environment Creation
With `venv`, you can customize the environment creation process using command-line options:
- `–system-site-packages`: Gives the virtual environment access to the system-wide `site-packages` directory. This is generally not recommended, as it can lead to dependency conflicts. It’s better to keep environments fully isolated.
- `–copies`: On some systems (especially Windows), `venv` uses symlinks by default. The `–copies` option forces it to copy files instead, which can be more reliable in some cases.
- `–prompt`: Specifies a custom prompt for the activated environment. For example, `python3 -m venv –prompt=myproject venv` will create an environment with the prompt `(myproject)`.
Environment Variables Within Virtual Environments
You can set environment variables specifically for your virtual environment. This is useful for configuring your application without hardcoding values (like API keys or database credentials) into your code. One common way to do this is by creating a `.env` file in your project root.
Example `.env` file:
    DATABASE_URL=postgres://user:password@host:port/database
    API_KEY=your_secret_api_key
    DEBUG=True
You can then use a library like `python-dotenv` to load these variables into your application:
pip install python-dotenv
Then in your Python code:
        import os
        from dotenv import load_dotenv

        load_dotenv()  # Load environment variables from .env file

        database_url = os.getenv("DATABASE_URL")
        api_key = os.getenv("API_KEY")
        debug_mode = os.getenv("DEBUG", "False") == "True" # Default to False

        print(f"Database URL: {database_url}")
        print(f"API Key: {api_key}")
        print(f"Debug Mode: {debug_mode}")
Best Practices and Pro Tips
- Always Use Virtual Environments: Make it a habit. Every project gets its own environment.
- Name Environments Clearly: Use descriptive names (e.g., myproject-
- Name Environments Clearly: Use descriptive names (e.g.,
myproject-venvor.venv). I like using.venvto keep it hidden and consistent across projects. - .gitignore Your Environment: Add your virtual environment directory (e.g.,
venv/) to your project’s.gitignorefile. You don’t want to commit the environment to version control! - Use a `requirements.txt` (or equivalent): Always generate a
requirements.txtfile (or usePipfile/pyproject.toml) to track your dependencies. This is crucial for collaboration and reproducibility. - Regularly Update Packages: Use
pip list --outdatedto check for outdated packages and update them withpip install --upgrade. Be mindful of breaking changes, though! - Test in a Clean Environment: Before deploying, create a fresh virtual environment from your
requirements.txtfile and run your tests to ensure everything works as expected. - Document your Environment Setup Make sure to document your virtual environment in README.md file.
Package Versioning (Semantic Versioning – SemVer)
Understanding package versioning is crucial when working with Python and virtual environments. Most Python packages follow Semantic Versioning (SemVer), which uses a three-part version number: MAJOR.MINOR.PATCH.
- MAJOR version: Increases when you make incompatible API changes (breaking changes). If you upgrade to a new major version, you may need to modify your code.
- MINOR version: Increases when you add functionality in a backward-compatible manner. You should generally be able to upgrade to a new minor version without breaking your code.
- PATCH version: Increases when you make backward-compatible bug fixes. These are usually safe to upgrade.
Example: `requests 2.28.1`
- Major: 2
- Minor: 28
- Patch: 1
Specifying Version Ranges
In your requirements.txt, Pipfile, or pyproject.toml, you can specify version ranges to control which versions of your dependencies are allowed:
| Specifier | Meaning | Example (with requests) |
|---|---|---|
| `==` | Exact version | `requests==2.28.1` |
| `>=` | Greater than or equal to | `requests>=2.20.0` |
| `<=` | Less than or equal to | `requests<=2.30.0` |
| `>` | Greater than | `requests>2.28.1` |
| `<` | Less than | `requests<3.0.0` |
| `~=` | Compatible release (recommended) | `requests~=2.28.0` (allows 2.28.x, but not 2.29.0) |
| `^` (caret) | Compatible release (Poetry/Pipenv) | `requests^2.28.1` (allows 2.x.x, but not 3.0.0) |
| `*` (star/wildcard) | Any version | `requests=*` (or just `requests`) – Generally not recommended |
The `~=` (tilde-equals) and `^` (caret) specifiers are particularly useful. They allow for patch and minor updates (depending on the context), but prevent major updates that might break your code. `pipenv` and `poetry` use the caret (`^`) operator by default.
Troubleshooting Common Issues
- “ModuleNotFoundError” after activating:Double-check that you’ve actually activated the environment and that you installed the package into the environment. It’s easy to forget the activation step or accidentally install packages globally.
- “pip” command not found:Make sure your environment is activated. If you’re on Windows, you might need to add the environment’s
Scriptsdirectory to your PATH manually (but activation should do this for you). Double-check your activation command. - Dependency Conflicts:If you encounter conflicts, try creating a fresh environment and reinstalling your dependencies from scratch. If you’re using
pip, consider switching topipenvorpoetryfor better dependency resolution. These tools use lock files to ensure consistent installations. - Inconsistent behavior between environments:If your code works in one environment but not another (even with the same
requirements.txt), it’s likely due to differences in sub-dependencies. Usepip freezeto compare the exact versions of all installed packages (including sub-dependencies) in both environments.# In environment 1 pip freeze # In environment 2 pip freezeThis will help you pinpoint the discrepancy. Consider using
pipenvorpoetryfor more robust dependency locking, which prevents these inconsistencies. - Error installing packages with native extensions: Some Python packages require compiling native code (C/C++). If you encounter errors during installation (often with messages about missing header files or compilers), you might be missing required system libraries or build tools. The specific solution depends on the package and your operating system. Consult the package’s documentation for instructions, which often include platform-specific setup steps. Common issues and solutions:
- Windows: You may need to install the “Microsoft Visual C++ Build Tools.”
- macOS: You may need to install the Xcode Command Line Tools (`xcode-select –install`).
- Linux: You may need to install development packages for your distribution (e.g., `build-essential` on Debian/Ubuntu, `gcc` and `python3-devel` on CentOS/Fedora).
Virtual environment not activating correctly:On Windows, ensure you are using the correct activation script for your shell (e.g., Activate.ps1 for PowerShell, activate.bat for cmd). On macOS/Linux, make sure you are using source to activate the environment. Check for typos in the path to the activation script.
Windows (PowerShell):
.\\Scripts\Activate.ps1
Windows (cmd):
.\\Scripts\activate.bat
macOS/Linux:
source /bin/activate
“Old” packages still accessible after activating a new environment:If you can still import packages that you didn’t install in your active virtual environment, you might havePYTHONPATHorPYTHONUSERBASEenvironment variables set that are interfering. These variables can cause Python to look for packages in locations outside the virtual environment. Unset or modify these variables if they are not needed. You can check their values with:
# macOS/Linux
echo $PYTHONPATH
echo $PYTHONUSERBASE

# Windows (PowerShell)
$env:PYTHONPATH
$env:PYTHONUSERBASE

# Windows (cmd)
echo %PYTHONPATH%
echo %PYTHONUSERBASE%
- Slow environment creation:If using
venvorvirtualenv, consider using the--copiesoption to copy files instead of symlinking them. This can resolve slowness, especially on some network file systems or on Windows.python3 -m venv --copies myenv - Permission errors when trying to create an environment:Ensure the user running the environment creation command has write permissions in the target directory. If you’re creating the environment in a system-protected location, you may need administrator privileges (but it’s generally recommended to create virtual environments within your project directories, not in system locations).
- Issues with specific IDEs (VS Code, PyCharm, etc.):If your IDE isn’t recognizing your virtual environment, make sure you’ve selected the correct Python interpreter within the IDE’s settings. See the previous sections on IDE integration for specific instructions.
- Problems with `pipenv` or `poetry` after installation:If you’ve installed `pipenv` or `poetry` globally (using `pip install –user pipenv` or `pip install –user poetry`) and the commands aren’t found, you might need to add the user base’s `bin` directory to your
PATHenvironment variable. The user base directory is typically:- macOS/Linux:
~/.local/bin - Windows:
%APPDATA%\Python\Python3x\Scripts(where `3x` is your Python version, e.g., `39` for Python 3.9)
You’ll need to add this directory to your
PATHin your shell’s configuration file (e.g.,.bashrc,.zshrc, or your system’s environment variables on Windows). - macOS/Linux:
Frequently Asked Questions (FAQ)
- What’s the difference between `venv` and `virtualenv`?
venvis built into Python 3.3+ and is the recommended tool.virtualenvis an older, external package that works similarly but supports older Python versions.- Should I use `pipenv` or `poetry`?
- Both are excellent tools for modern Python development. Try both and see which one you prefer. They offer similar functionality, but with slightly different workflows.
- Can I use virtual environments with Anaconda?
- Yes, Anaconda has its own environment management system (`conda`), which is similar in concept to virtual environments but also handles non-Python packages. You *can* use `venv` or `virtualenv` within an Anaconda installation, but `conda` is generally preferred in that context.
- How do I share my environment with others?
- Use
pip freeze > requirements.txt(for `venv`/`virtualenv`) or the lock files generated bypipenv(Pipfile.lock) andpoetry(integrated intopyproject.toml). These files list your project’s dependencies, allowing others to recreate the environment. - What is the purpose of a virtual environment in Python?
- A virtual environment isolates your project’s Python interpreter and dependencies from other projects and the system-wide Python installation. This prevents dependency conflicts and ensures project reproducibility.
- How do I activate a specific `venv`?
- On macOS/Linux: `source /bin/activate`. On Windows (PowerShell): `.\\Scripts\Activate.ps1`. On Windows (cmd): `.\\Scripts\activate.bat`
- What does `pip freeze` do?
- `pip freeze` lists all installed packages and their versions in a format suitable for creating a
requirements.txtfile. - How to fix broken virtual environment?
- If the virtual environment encounters a problem or becomes corrupted, the most effective solution is usually to delete the corrupted environment and create a new one.
# If you're currently in the broken environment, deactivate it first

deactivate
# Remove the broken environment directory. Be very careful with this command!
rm -rf /path/to/broken/venv # macOS/Linux
rmdir /s /q path\to\broken\venv # Windows - What is the difference between Pipfile and requirements.txt ?
Pipfileandrequirements.txtserve similar purposes—listing project dependencies—but they have key differences:- requirements.txt (Used by pip):
- Simple list of packages and (optionally) their versions.
- Doesn’t distinguish between direct dependencies and sub-dependencies.
- Can lead to non-deterministic builds (different environments over time) if versions aren’t pinned precisely.
- Pipfile (Used by Pipenv):
- Distinguishes between “default” (main) and “develop” (e.g., testing) dependencies.
- Uses a
Pipfile.lockto *lock* down the exact versions of *all* dependencies and sub-dependencies, ensuring deterministic builds. - More modern and designed to improve upon the limitations of
requirements.txt.
- requirements.txt (Used by pip):
- What is Semantic Versioning (SemVer)?
- SemVer is a versioning scheme (MAJOR.MINOR.PATCH) where MAJOR changes are incompatible, MINOR changes are backward-compatible features, and PATCH changes are backward-compatible bug fixes.
- How do I update packages in a virtual environment?
- Use `pip list –outdated` to see outdated packages, and `pip install –upgrade ` to update a specific package. For `pipenv`, use `pipenv update `. For `poetry`, use `poetry update `.
- Can I have nested virtual environments?
- While technically possible, it’s generally not recommended to nest virtual environments. It can lead to confusion and unexpected behavior. If you need different environments for different parts of a project, it’s better to create separate, independent environments.
- Why does creating virtual environments improves security?
-
- Dependency Isolation Virtual environments isolate project dependencies, preventing conflicts and ensuring that a vulnerability in one project’s dependencies doesn’t affect other projects or the system itself.
- Reduced Attack Surface: By minimizing the number of globally installed packages, you reduce the potential attack surface of your system. Vulnerabilities in globally installed packages could be exploited by malicious code.
- Controlled Execution Environment: Virtual environments allow you to control the exact versions of packages used in a project, making it easier to audit and verify the security of your dependencies.
- Least Privilege Principle: By running applications within isolated environments, you adhere to the principle of least privilege. If a project is compromised, the damage is limited to that environment.
Conclusion
Virtual environments are an indispensable tool for any Python developer, from beginners to seasoned professionals. They provide a clean, organized, and reliable way to manage project dependencies and avoid conflicts. By embracing virtual environments and the best practices outlined in this guide, you’ll be well on your way to becoming a more efficient and effective Python programmer. So go forth and create some isolated awesomeness!
If you like the content, we would appreciate your support by buying us a coffee. Thank you so much for your visit and support.