If you’re running an Ubuntu server, you know that security is job one. Password-based logins for SSH are convenient, but they’re a major vulnerability. A much more secure approach is to use SSH key-based authentication.
This guide will walk you through setting it up, step by step, for Linux, macOS, and Windows clients. We’ll also cover some advanced topics like managing multiple keys and using PuTTY.
1. An Overview of Secure Shell (SSH): The Foundation of Remote Access
Secure Shell (SSH) is the standard way to connect to a remote Linux server’s command line. It provides an encrypted connection, protecting your username, password, and any data you transmit. This encryption is what makes SSH secure, unlike older protocols like Telnet.
Key Uses of SSH:
- Remote Command-Line Access: Get a shell prompt on the remote server.
- Secure File Transfer: Copy files securely between your local machine and the remote server (using tools like
scpandsftp, which are built on top of SSH). - Tunneling: Create secure connections for other applications (we won’t cover this in detail here, as it’s outside the scope of this specific chapter).
Read: How to Install and Secure OpenSSH on Ubuntu 24.04: Complete Step-by-Step Guide
2. SSH Key-based Authentication: Why It’s Superior to Passwords
Traditional SSH access relies on passwords. You type your username and password, and the server verifies them. The problem is that passwords can be:
- Guessed: Short or simple passwords are easy to guess.
- Brute-forced: Attackers can try thousands of passwords per second.
- Stolen: Through phishing, keyloggers, or database breaches.
Key-based authentication uses cryptography to eliminate these risks. It relies on two keys:
- Private Key: This key stays on your client machine (the computer you’re connecting from). It’s like your secret identity. Never share it.
- Public Key: This key is placed on the server (the Ubuntu system you’re connecting to).
When you connect, a cryptographic “handshake” happens. The server uses the public key to verify that you possess the corresponding private key – without the private key ever being transmitted over the network.
Read: Generating Secure Passwords on Linux: PWGen, Custom Scripts, and Other Tools
Key Types and Recommended Sizes
Several key types are available for SSH authentication:
- RSA: The most widely compatible option. Use at least 3072 bits for good security.
- Ed25519: Modern, secure, and generates shorter keys. Recommended if all your systems support it.
- ECDSA: Offers good security with smaller key sizes, but less widely used than RSA.
For most users, Ed25519 is the best balance of security and convenience, with RSA as a fallback for older systems.

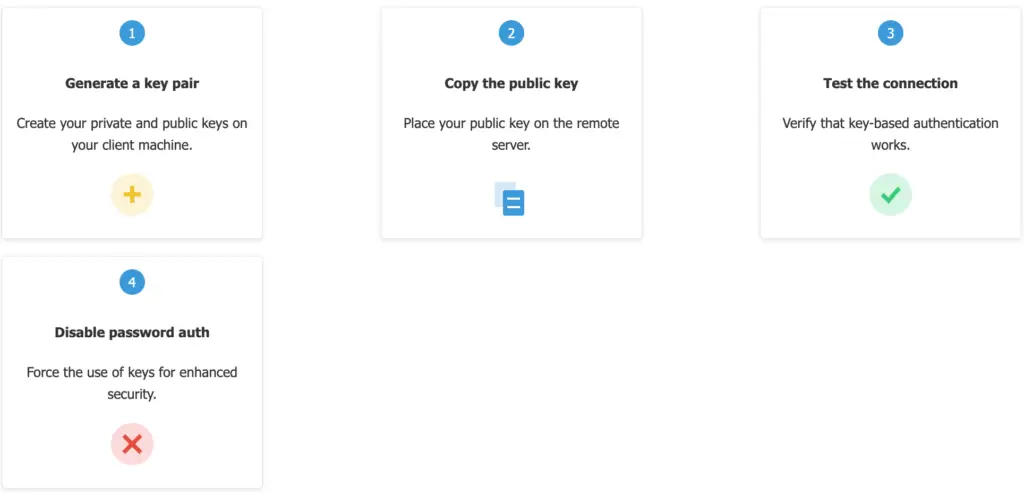
3. Setting Up Key-based Authentication: The Four Key Steps
Here’s the overview of the process:
- Generate a key pair: You do this on your client machine.
- Copy the public key: You place the public key on the server.
- Test the connection: Make sure key-based authentication works.
- Disable password authentication: (Highly recommended!) This forces the use of keys, making your server much more secure.
Read: Securing Your Data: A Practical Guide to Encryption, Integrity, and Signatures in Linux
4. Installing and Starting the SSH Service: Making Your Server Ready
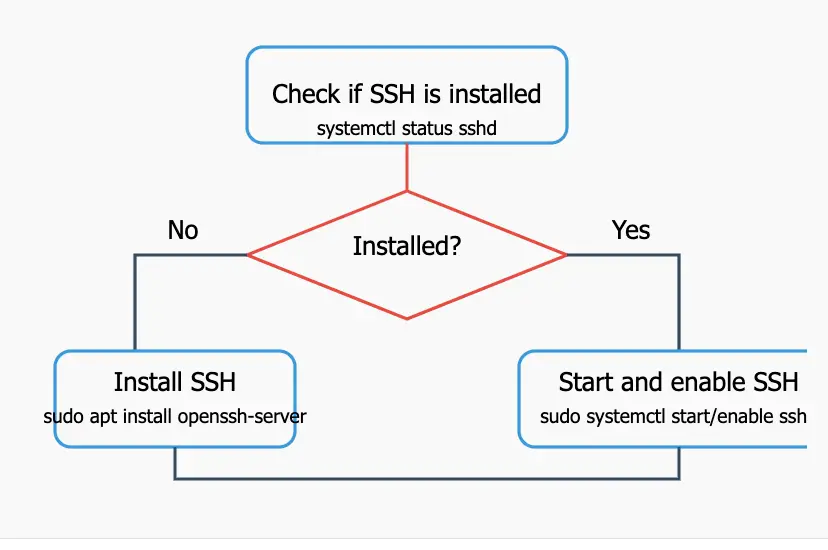
Before you can connect to your Ubuntu server with SSH, you need to make sure the SSH server software (the sshd daemon) is installed and running.
- Check if it’s installed and running:
systemctl status sshdIf it shows “active (running)”, you’re good to go.
- Install
sshd(if needed): Use theaptpackage manager:sudo apt update # Make sure your package lists are up-to-date sudo apt install openssh-server - Start and enable
sshd:sudo systemctl start sshd sudo systemctl enable sshdsystemctl startstarts the service immediately.systemctl enablemakes it start automatically when the system boots.
5. SSH Key-based Authentication from Linux and macOS Clients: The Standard Approach
These steps are performed on your client machine (Linux or macOS).
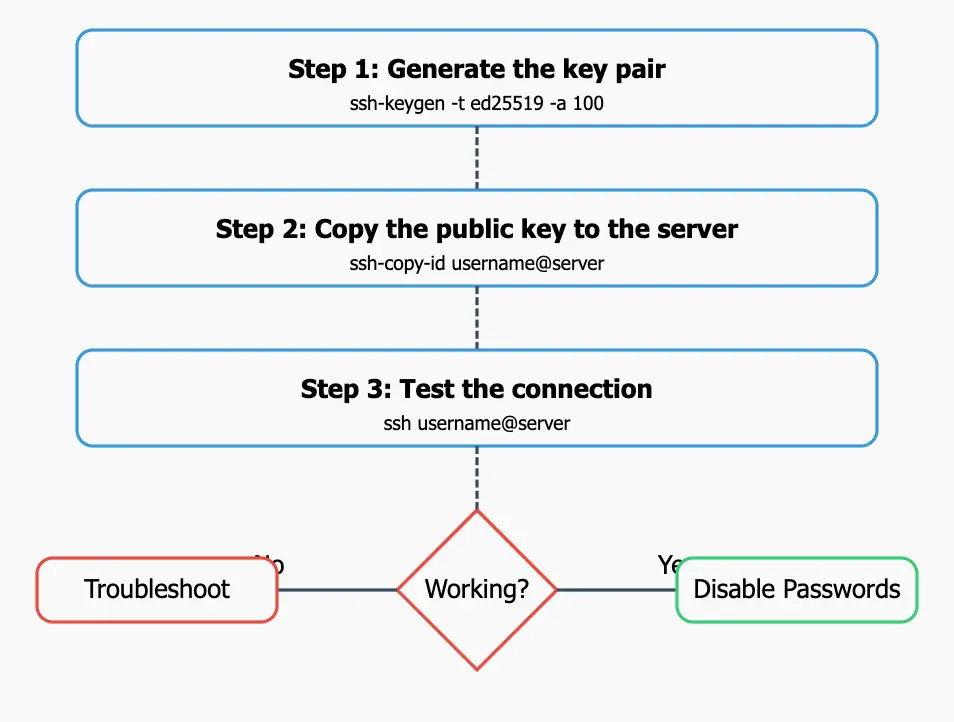
- Generate the key pair: Use the
ssh-keygencommand:ssh-keygen -t ed25519 -a 100For older systems that don’t support Ed25519:
ssh-keygen -t rsa -b 3072- Default location: Press Enter to accept the default location for the key files (
~/.ssh/id_ed25519or~/.ssh/id_rsafor the private key, and corresponding.pubfile for the public key). - Passphrase (highly recommended): You’ll be asked to enter a passphrase. This encrypts your private key file. If someone steals your private key file, they still can’t use it without the passphrase. Choose a strong passphrase!
- You’ll get a confirmation and some information (key fingerprint, randomart).
- Default location: Press Enter to accept the default location for the key files (
- Copy the public key to the server: The easiest way is with the
ssh-copy-idcommand:ssh-copy-id <username>@<remote_host>- Replace
<username>with your username on the remote Ubuntu server. - Replace
<remote_host>with the server’s hostname or IP address. - You will use your password for the last time.
ssh-copy-iddoes the following:- Connects to the server (using your password, this one time).
- Creates the
~/.sshdirectory on the server (if it doesn’t exist). - Appends your public key to the
~/.ssh/authorized_keysfile on the server.
Alternative method (if ssh-copy-id isn’t available):
# View your public key cat ~/.ssh/id_ed25519.pub # Copy the output to clipboard, then on the server: mkdir -p ~/.ssh echo "paste-your-public-key-here" >> ~/.ssh/authorized_keys chmod 700 ~/.ssh chmod 600 ~/.ssh/authorized_keys - Replace
- Test the connection:
ssh <username>@<remote_host>You should be logged in without being asked for your account password (you will be asked for your key passphrase, if you set one).
Read: How to Secure Your Linux System with 10 Proven Firewalls
6. Managing Multiple Keys: Keeping Things Organized
If you connect to multiple servers, you might have multiple key pairs.
- Specify the key with
-i:ssh -i ~/.ssh/my_other_private_key <username>@<other_server> - Use an SSH config file (
~/.ssh/config): This is the recommended approach for managing multiple keys and hosts. Create this file if it doesn’t exist. Here’s an example:Host work HostName server1.example.com User myuser IdentityFile ~/.ssh/id_rsa_work Host home HostName 192.168.1.100 IdentityFile ~/.ssh/id_rsa_homeNow you can connect with
ssh workorssh home, and the correct keys and usernames will be used automatically.
7. SSH Key-based Authentication from Windows 10 Clients: Using PowerShell
Modern versions of Windows 10 include a built-in OpenSSH client, so you can often use the same commands as on Linux/macOS.
- Open PowerShell: Search for “PowerShell” in the Start menu.
- Generate keys (if needed):
ssh-keygen -t ed25519 -a 100Follow the prompts similar to Linux/macOS.
- Copy the public key to the server:View your public key:
Get-Content $env:USERPROFILE\.ssh\id_ed25519.pubMethod 1: Manually append to authorized_keys
- Copy the output from the command above
- Log into your server with password authentication
- Run these commands on the server:
mkdir -p ~/.sshecho "paste-your-public-key-here" >> ~/.ssh/authorized_keyschmod 700 ~/.sshchmod 600 ~/.ssh/authorized_keys
Method 2: Using scp (if installed)
scp $env:USERPROFILE\.ssh\id_ed25519.pub username@server:~/temp.pubThen on the server:
mkdir -p ~/.ssh
cat ~/temp.pub >> ~/.ssh/authorized_keys
rm ~/temp.pub
chmod 700 ~/.ssh
chmod 600 ~/.ssh/authorized_keys
Read: An introduction to Windows PowerShell for beginners
8. SSH Key-based Authentication using PuTTY: The Classic Windows Approach
PuTTY is a popular, free SSH client for Windows. It uses its own key format (.ppk), so you’ll need PuTTYgen.
- Download and install PuTTY and PuTTYgen.
- PuTTY version 0.76 or newer is recommended for current security standards.
- Generate a key pair (if needed) using PuTTYgen:
- Run PuTTYgen.
- For “Type of key to generate,” select ED25519 or RSA with at least 3072 bits.
- Click “Generate”.
- Move your mouse to create randomness.
- Enter a passphrase.
- Save the private key (e.g.,
mykey.ppk). - Copy the public key from the text box in PuTTYgen.
- Import an existing key (if you already have SSH keys):
- Run PuTTYgen.
- Click “Load” and navigate to your existing private key (e.g.,
id_rsa). - Save the key as .ppk format.
- Copy the public key to the server:Method 1: Using PuTTY itself
- Connect to your server using PuTTY with password authentication.
- Create or edit the authorized_keys file:
mkdir -p ~/.sshnano ~/.ssh/authorized_keys - Paste the public key (right-click to paste in PuTTY).
- Press Ctrl+X, then Y to save in nano.
- Set permissions:
chmod 700 ~/.sshchmod 600 ~/.ssh/authorized_keys
Method 2: Using PSCP (comes with PuTTY)
- Save the public key to a file on your computer.
- Use PSCP to upload it:
pscp mykey.pub username@server:/tmp/ - Log into the server.
- Append the key to authorized_keys:
mkdir -p ~/.sshcat /tmp/mykey.pub >> ~/.ssh/authorized_keysrm /tmp/mykey.pubchmod 700 ~/.sshchmod 600 ~/.ssh/authorized_keys
- Configure PuTTY:
- Run PuTTY.
- Enter the hostname/IP address.
- Go to Connection -> SSH -> Auth.
- Browse for and select your
.ppkprivate key file. - (Optional) Save the session for later use.
- Click “Open” to connect.
9. Installing the Public Key for a Google Cloud Instance: Streamlining GCP Access
If you’re using Google Cloud Platform (GCP), you can add your public key to your project’s metadata. This makes the key available to all your Compute Engine instances.
- Go to the GCP Console: Compute Engine -> Metadata.
- Click “SSH Keys”.
- Click “Edit”.
- Click “Add item”.
- Paste your entire public key (including the
ssh-rsaorssh-ed25519part and the comment at the end). The username will be extracted and automatically associated. - Click “Save”.
10. SSH Key Rotation: Maintaining Strong Security
As a security best practice, consider rotating your SSH keys periodically (every 6-12 months):
- Generate new key pairs
- Add the new public keys to your servers
- Test connectivity with the new keys
- Remove the old public keys from authorized_keys
- Securely backup your new private keys
This process helps mitigate the risk of compromised keys and follows the principle of regular credential rotation.
11. Summary: Secure and Efficient Remote Access
SSH key-based authentication is essential for securing your Ubuntu servers. This guide has covered:
- Why key-based authentication is more secure than passwords.
- The steps to generate keys and copy the public key to the server.
- How to use
ssh-keygenandssh-copy-idon Linux/macOS. - How to use PowerShell and PuTTY on Windows.
- How to manage multiple keys.
- How to add keys to Google Cloud instances.
- Disabling password authentication (covered below).
Disabling Password Authentication (Final, Crucial Step):
Once you’ve confirmed that key-based authentication is working, disable password authentication on the server. This forces all connections to use keys.
- Edit the SSH server configuration file:
sudo nano /etc/ssh/sshd_configNote: This file is
sshd_config(server config) and notssh_config(client config). - Make these security changes:
PasswordAuthentication no
ChallengeResponseAuthentication no
The second setting disables keyboard-interactive authentication, which is another form of password authentication.
- Restart the SSH service:
sudo systemctl restart sshd - Verify the changes took effect:
sudo sshd -T | grep -E 'password|challenge'You should see both settings showing “no”.
WARNING: Before you do this, double-check that your key-based authentication is working. If you make a mistake, you could lock yourself out of your server! It’s recommended to keep a second SSH session open when making these changes.
Troubleshooting SSH Key Authentication
If you’re having issues with SSH key authentication:
- Check server logs:
sudo journalctl -u sshdThis will show error messages that can help identify the problem.
- Check permissions: Incorrect permissions are a common issue. On the server:
chmod 700 ~/.ssh chmod 600 ~/.ssh/authorized_keys - Enable verbose SSH output:
ssh -vv username@serverThis provides detailed information about the connection process.
FAQ
- Q: What’s the difference between
id_rsaandid_rsa.pub?A:id_rsais your private key. Keep it secret!id_rsa.pubis your public key. This is the one you copy to servers. - Q: I lost my private key. What do I do?A: You’ll need to generate a new key pair and add the new public key to any servers you need to access. There’s no way to recover a lost private key.
- Q: I’m getting a “Permission denied (publickey)” error.A: This usually means one of the following:
- The public key isn’t correctly installed in
~/.ssh/authorized_keyson the server. - The permissions on
~/.sshorauthorized_keysare wrong. - You’re using the wrong username.
- You’re not specifying the correct private key (if you have multiple).
- Password authentication is disabled, and key-based authentication isn’t set up correctly.
- The public key isn’t correctly installed in
- Q: How can I copy my private key to another client machine?A: Use a secure method like
scp(Secure Copy) or a physically secure USB drive. Never email your private key. - Q: What’s a passphrase, and do I need one?A: A passphrase encrypts your private key file. It’s highly recommended for extra security.
- Q: What’s the difference between
sshd_configandssh_config?A:sshd_configconfigures the SSH server.ssh_configconfigures the SSH client. - Q: How do I change permissions on the
~/.sshdirectory andauthorized_keysfile?A: Use thechmodcommand:- For the
~/.sshdirectory (700 allows read/write/execute for the owner only):chmod 700 ~/.ssh - For the
authorized_keysfile (600 allows read/write for the owner only):chmod 600 ~/.ssh/authorized_keys
- For the
- Q: How can I verify the fingerprint of a remote server before connecting?A: The first time you connect to a server via SSH, you’ll usually be shown the server’s host key fingerprint and asked if you want to continue connecting. It’s crucial to verify this fingerprint against a trusted source (e.g., by contacting the server administrator directly) to ensure you’re not connecting to an imposter server (a “man-in-the-middle” attack).
- Q: How do I connect using an SSH agent?A: Using an SSH agent (like
ssh-agent) is a more advanced topic. It allows you to load your private key (and enter your passphrase) once, and then the agent handles authentication for subsequent SSH connections. This avoids having to type your passphrase repeatedly.eval "$(ssh-agent -s)" # Start the agent and set environment variables ssh-add ~/.ssh/id_rsa # Add your private key to the agent
If you like the content, we would appreciate your support by buying us a coffee. Thank you so much for your visit and support.