Are you exploring alternatives to mainstream email services like Gmail? If you want to convert your Ubuntu system into a fully functional mail server, you’ve landed on the right page. This tutorial is designed to guide you through setting up a Postfix mail server on your Ubuntu machine, followed by testing its capabilities using Thunderbird.
While these instructions are tailored for Ubuntu 22.04, they are generally applicable to Debian or Mint distributions as well.
What are SMTP Servers and How They Work ?
SMTP, which stands for Simple Mail Transfer Protocol, is the foundational technical standard that mail servers use for sending, receiving, and relaying outgoing email messages between senders and recipients. It’s the engine that powers email transmission across the internet.
This protocol enables seamless data exchange between different computers and servers, regardless of their underlying hardware or software. Think of it this way: just as standardized envelope addressing helps the postal service deliver mail accurately, SMTP standardizes email transmission, allowing for efficient and reliable email delivery across diverse systems.
It’s essential to recognize that SMTP is a protocol for mail delivery, not retrieval. It’s like the postal service dropping a letter into your physical mailbox; you still need a way to collect and read that letter. Similarly, SMTP delivers emails to the mail servers of email providers. To retrieve and read these emails from the server, different protocols (like IMAP or POP3) come into play.

Every networking protocol has a defined procedure for how data is exchanged. SMTP specifies the method for transferring email data between an email client (like Thunderbird or Outlook) and an Ubuntu mail server. An email client is essentially the software or web application a user interacts with to access, send, and manage their emails.
Users don’t directly interface with mail servers; these are specialized computers optimized for the tasks of sending, receiving, and forwarding emails.
Read: How to fix Bluetooth connection issues on Ubuntu 22.04
The Significance of Employing an SMTP Server in Ubuntu 22.04
When communicating through email, it’s paramount that your messages are dispatched securely and arrive promptly at their destination. Without an SMTP server, your email simply won’t make it to the intended recipient. When you hit “Send,” your email is converted into a string of code, which is then transmitted to the SMTP server.
This server’s job is to interpret that code and facilitate the message’s delivery. If an SMTP server doesn’t process the message, it remains untranslated and undelivered. Furthermore, the SMTP server validates that the email originates from an active, legitimate account, which is a key mechanism in protecting your inbox from spam.

The SMTP protocol also ensures that if an email cannot be delivered, it’s returned to the sender (bounced back) with details explaining the failure—perhaps an invalid sender email address or rejection by the recipient’s mail server. Whether your organization is small, medium, or large, operating your own email server offers significant advantages.
Join me as I walk you through all the essential steps to install and configure an SMTP Server using Postfix on your Ubuntu system.
Read: Troubleshooting Audio Issues (Crackling, No Sound) on Ubuntu 24.04 with PipeWire
Configuring a Fully Qualified Domain Name (FQDN)
A Fully Qualified Domain Name (FQDN) is the unique, complete domain name for a specific computer or host on the internet. It’s composed of two main parts: the hostname and the domain name. For instance, mail.company.com could be an FQDN. Here’s a straightforward guide to setting up an FQDN on your Ubuntu machine:
- Launch your terminal and execute the following command to discover your current domain name (if any):
hostname –f
- To find your IP address, you can use the
ifconfigcommand. If it’s not installed, you’ll need to install thenet-toolspackage first. Type:sudo apt-get install net-tools ifconfig
- Make a note of your IP address from the output.
- Next, open the
/etc/hostsfile using a text editor like nano. This file is used for mapping IP addresses to hostnames.sudo nano /etc/hosts
- Add a new line in the
/etc/hostsfile with the following format:IP_address FQDN hostname. ReplaceIP_addresswith the IP you noted,FQDNwith your desired fully qualified domain name (e.g.,mail.yourdomain.com), andhostnamewith your machine’s short hostname (e.g.,mail).
For example, if you want to add a hostname net2host with an FQDN like net2host.yourdomain.com and an IP address of 180.0.2.10, you would add this line to your /etc/hosts file:
180.0.2.10 net2host.yourdomain.com net2host6. Save the changes to the file (Ctrl+O, then Enter in nano, followed by Ctrl+X to exit). Verify your FQDN setup by running the hostname –f command again. It should now display the FQDN you configured.
Read: How to Fix WIFI not working on Ubuntu 22.04
Refreshing Your System’s Repositories
Before we jump into installing new software, it’s always a good practice to ensure your Ubuntu system’s package lists and existing packages are up-to-date. You can do this by running these commands in your terminal:
sudo apt update
sudo apt upgrade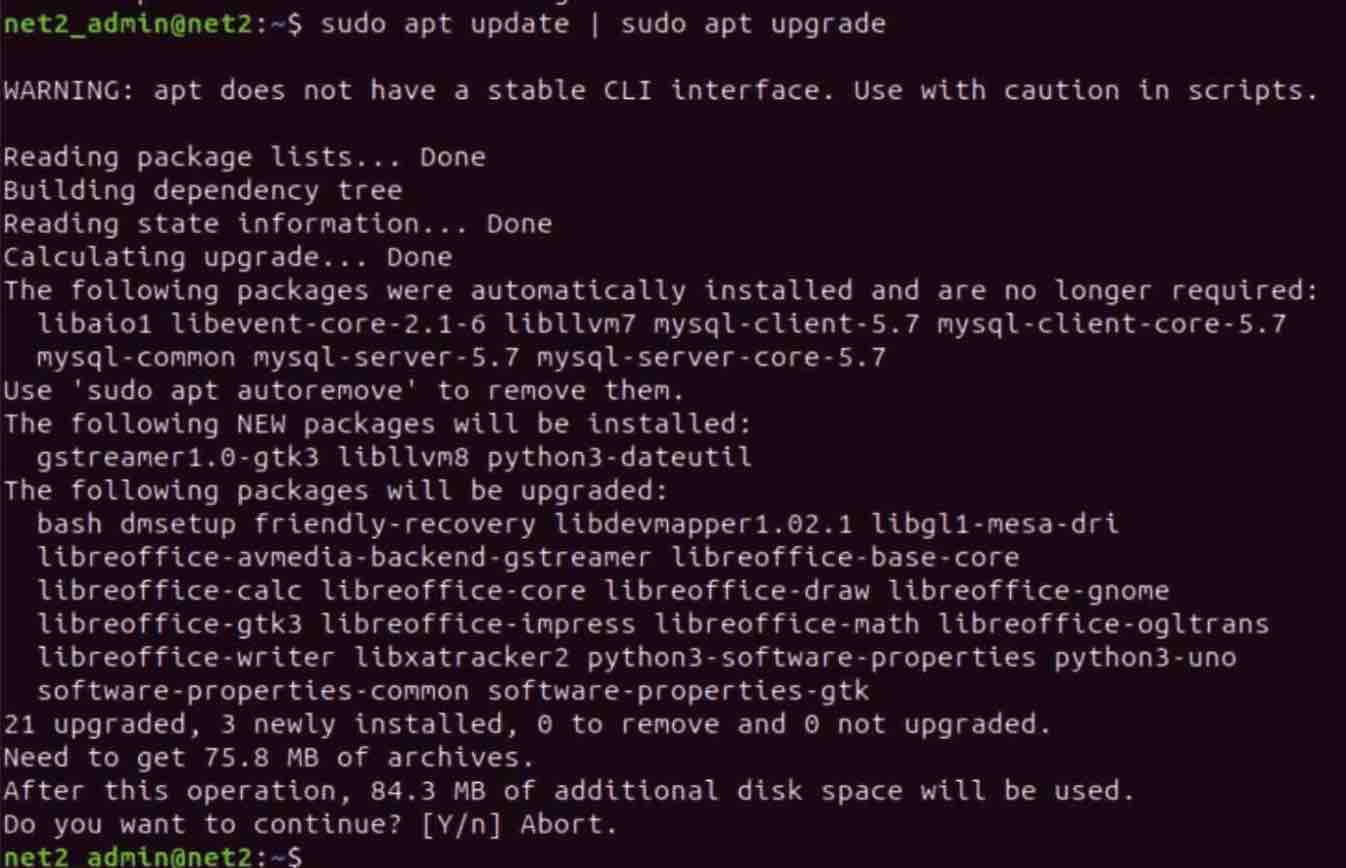
Installing the Postfix Mail Server
Postfix is a powerful and flexible mail transfer agent (MTA) that handles the transmission and reception of emails. To install Postfix on your Ubuntu system, open your terminal and enter the following command:
sudo apt-get install postfix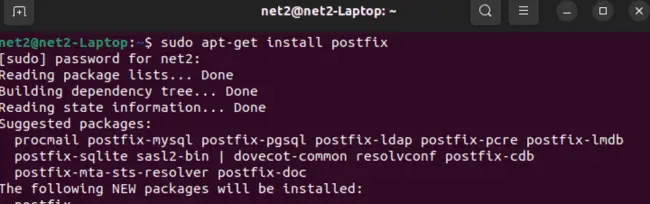
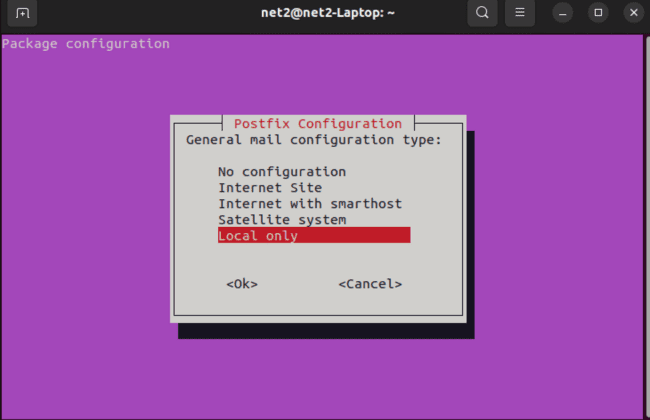
This command will initiate the installation process, and you’ll soon see a configuration window appear, like the one below:
Configuring Your Mail Server in Ubuntu 22.04
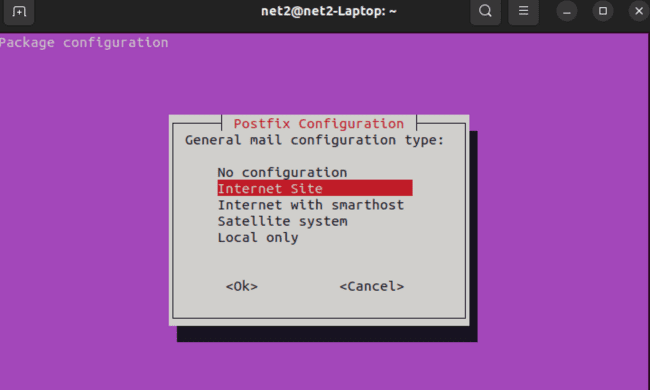
During the Postfix installation, you’ll be guided through a series of interactive prompts to configure your mail server. For this tutorial, I recommend using the following responses. Let’s break down each option:

To give you a visual, here’s how these settings might look summarized during the configuration:

If you ever need to revisit and adjust these configurations after the initial setup, you can easily do so by executing the following command. The prompts will reappear, pre-filled with your previously entered answers, allowing you to make changes as needed.
sudo dpkg-reconfigure postfixVerifying Postfix Service Status
To confirm whether your Postfix mail server is up and running correctly, use the command below in your terminal:
sudo systemctl status postfix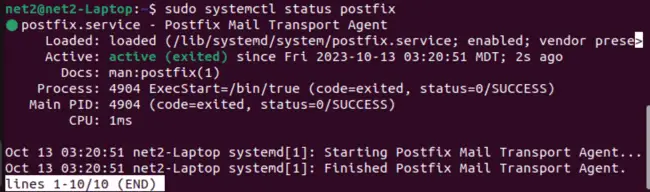
As shown in the example output above, Postfix is active and functioning on our Ubuntu 22.04 system. You should see “active (running)” in the status.
Configuring the Firewall for Postfix
To ensure that your firewall doesn’t block Postfix and allows it to send and receive mail, you need to add a rule for it. If you’re using UFW (Uncomplicated Firewall), which is common on Ubuntu, use the following command to allow Postfix traffic:
sudo ufw allow 'Postfix'This command tells UFW to permit traffic on the necessary ports for Postfix (SMTP, SMTPS, submission).

Testing Postfix Locally – Using Your Ubuntu Local SMTP Server
Now, let’s perform a local test to see how Postfix handles emails. First, we’ll ensure Postfix is configured for “Local only” if you primarily want to handle mail for local users or test without external delivery. Re-run the configuration tool:
sudo dpkg-reconfigure postfixIn the “General type of mail configuration” prompt, you can select “Local only” if that’s your current testing goal. For broader testing, “Internet Site” is usually preferred.
After any reconfiguration, it’s good practice to check the Postfix service status again:
sudo systemctl status postfix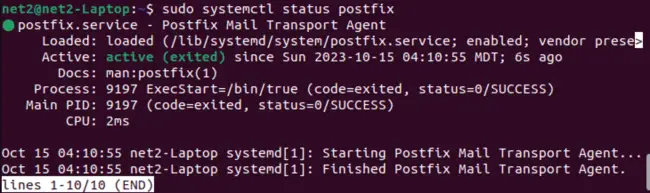
Next, open a new terminal session and use telnet to connect to your local SMTP server on port 25:
telnet localhost 25
Port 25 is the standard port for SMTP.
Once connected, issue the EHLO command to greet the server:
ehlo localhost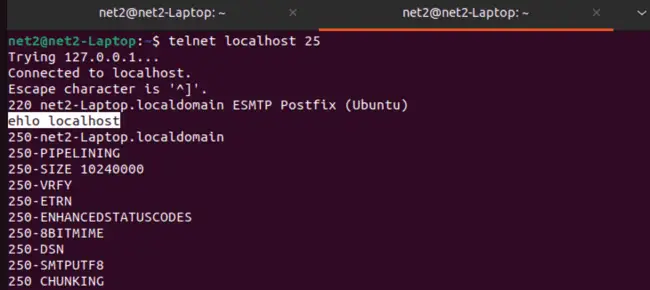
Now, specify the sender’s email address:
mail from: <net2test@net2.com>(Note: The email address used here is an example; you can use any sender address for local testing.)

You should receive a “250 Ok” response if the command is accepted:

Next, specify the recipient. For local delivery, use a local system user:
rcpt to: <net2@localhost>Replace net2 with your actual Linux username on the Ubuntu machine.

Then, type the DATA command to indicate you’re ready to send the email content:
DATA
Now, you can enter the email headers and body. Start with the subject:
subject: net2test

Hi there this is net2
(Note: Press Enter after the subject line to create a blank line before the body of the email.)

Finally, to signal the end of the email data and send it, type a single period (dot) . on a new line and press Enter. Do not type “quit” or “:q” here, as shown mistakenly in the original image; just a dot is needed.
.
After the email is queued (you should see a “250 Ok: queued as …” message), you can type quit to exit the telnet session.
Now, let’s locate this sent message. For local delivery, Postfix typically stores mail in the /var/mail/ directory (or sometimes /var/spool/mail/). The file will be named after the recipient user (e.g., /var/mail/net2).
Navigate to this directory using your file explorer or the terminal. In the example, it’s shown as computer/var/mail:

Open the file corresponding to the recipient user and scroll to the end to find your test message:
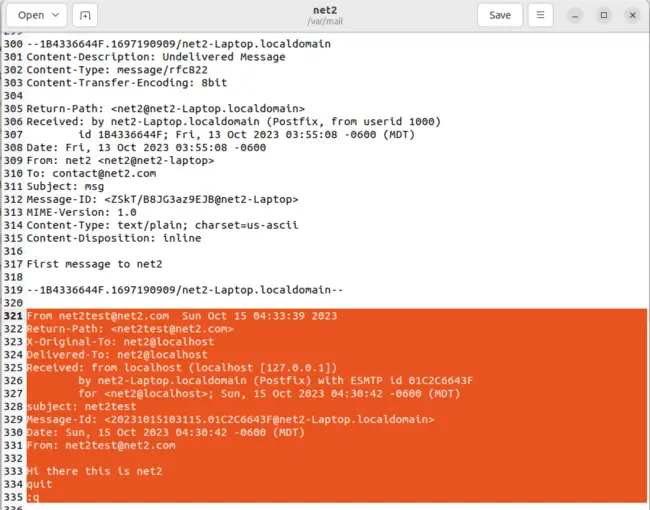
You should see the subject and body of the email you sent earlier. This confirms Postfix is handling local mail delivery correctly.
Preparing Dovecot for Mozilla Thunderbird Email Client Usage
Dovecot is an open-source Mail Delivery Agent (MDA) that functions as an IMAP and POP3 server. It’s renowned for its strong focus on security. Dovecot’s primary role is to manage local mail directories and allow users to access and retrieve their mail using email clients like Thunderbird. It supports common mailbox formats such as mbox and Maildir.
In our setup, Dovecot will receive incoming mail from Postfix for delivery to user mailboxes. However, for this to happen securely, Dovecot needs to authenticate users connecting via SMTP (when Postfix is configured to use SASL authentication via Dovecot) or when users connect via IMAP/POP3 to retrieve mail.
To install the necessary Dovecot packages for IMAP and POP3 functionality, use the command below:
sudo apt-get install dovecot-imapd dovecot-pop3d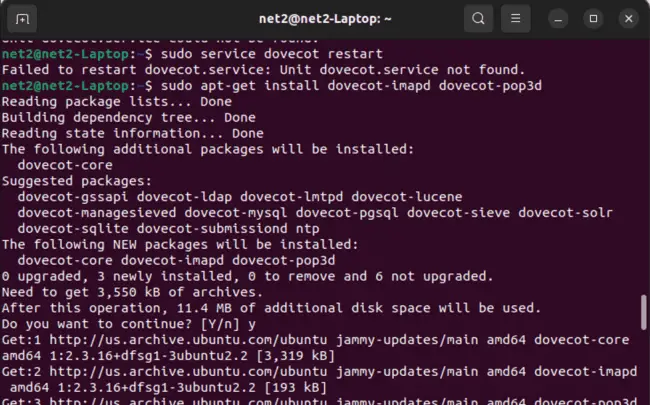
Once the installation is complete, you should restart the Dovecot service to apply any default configurations:
sudo service dovecot restartYou can also check its status with sudo systemctl status dovecot.
Verifying Dovecot Operation
Let’s quickly test if Dovecot is listening for IMAP connections. We’ll use telnet again, this time connecting to the IMAP port (143):
telnet localhost 143Once connected (you should see an `* OK [CAPABILITY…] Dovecot ready.` message), you can try logging in. The commands are typically prefixed with a tag (e.g., `a`, `b`, `c`).
First, attempt to log in (replace “net2” with your Linux username and “yourpassword” with your actual password):
a login "net2" "yourpassword"If login is successful, you’ll get an `a OK Logged in` response.
Next, select your INBOX:
b select inboxThen, list available mailboxes/folders:
c list "" *This should show your INBOX and any other mail folders.
Finally, to log out from the IMAP session, use the logout command:
e logoutThen you can close the telnet connection (often by closing the terminal or using Ctrl+] and then `quit`).
Using Mozilla Thunderbird to Send and Receive Emails
Now that Postfix is handling mail transfer and Dovecot is providing IMAP/POP3 access, let’s configure Mozilla Thunderbird on your Ubuntu 22.04 system to connect to your local mail server. Follow these steps to send and receive emails locally.
(The following steps seem to repeat the Dovecot telnet test. I’ll integrate them into the Thunderbird setup context where it makes sense or assume these are preliminary checks before launching Thunderbird.)
Step 1: (Optional Pre-check via Telnet)
You can re-verify Dovecot’s IMAP service is running by connecting via telnet as described previously:
telnet localhost 143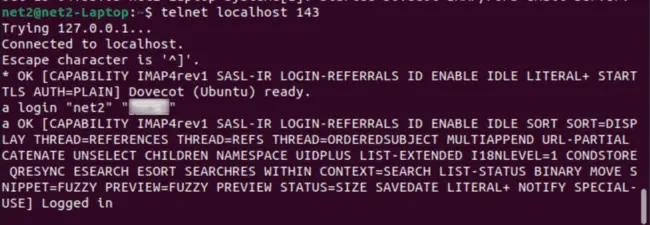
Step 2: (Optional Pre-check via Telnet – Select Inbox)
After logging in (e.g., `a login “user” “password”`), select the inbox:
b select inbox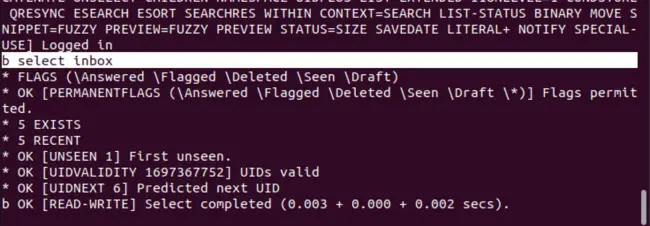
Step 3: (Optional Pre-check via Telnet – List Mailboxes)
Then, list mailboxes. Ensure you use double quotes as shown:
c list "" *
Step 4: (Optional Pre-check via Telnet – Logout)
To log out from the telnet IMAP session:
e logout
Step 5: Launch Thunderbird & Account Setup
Now, let’s configure Thunderbird. Open Thunderbird from your Ubuntu application menu. If it’s the first time or you’re adding a new account, you might see a “Set Up an Existing Email Address” window. If not, you can usually go to File > New > Existing Mail Account... or find a similar option in the account settings.
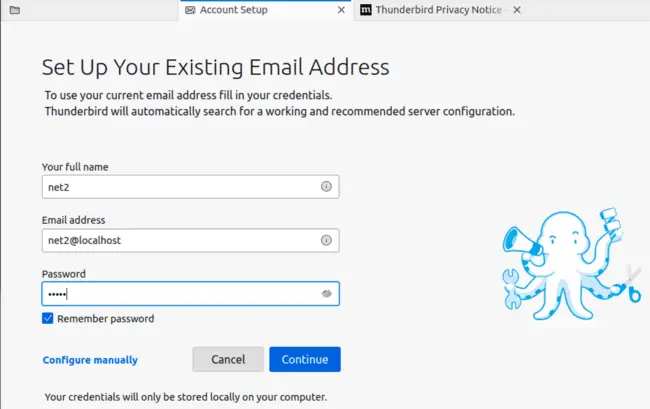
Step 6: Enter Your Credentials
In the account setup window, enter your details:
- Your name: The name you want displayed on outgoing emails (e.g., “Your Name”).
- Email address: Your local email address (e.g.,
yourusername@your FQDNoryourusername@localhostif configured that way, likenet2@net2host.yourdomain.com). - Password: Your Linux user password.
Click “Continue.” Thunderbird will try to auto-discover your server settings.
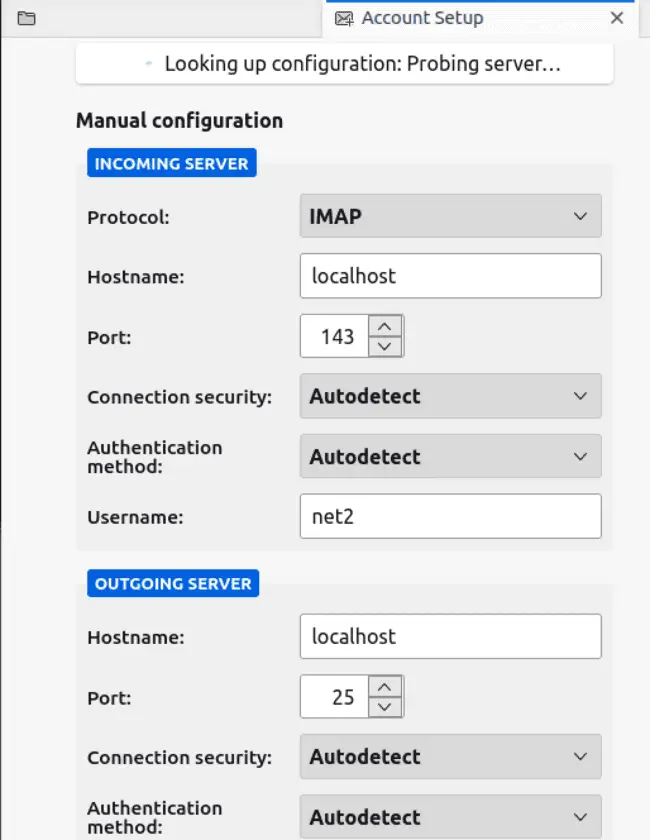
If auto-discovery fails or provides incorrect settings for a local server, you may need to click “Manual config” or “Configure manually.” You’ll then need to provide:
- Incoming Server (IMAP):
- Hostname:
localhost(or your server’s FQDN if connecting from another machine on the same network) - Port:
143(for IMAP) or993(for IMAPS/SSL) - Connection security:
NoneorSTARTTLS(if configured). For local testing,Nonemight be simpler initially. - Authentication:
Normal password - Username: Your Linux username (e.g.,
net2)
- Hostname:
- Outgoing Server (SMTP):
- Hostname:
localhost(or your server’s FQDN) - Port:
25(for SMTP) or587(for submission/STARTTLS) or465(for SMTPS/SSL) - Connection security:
NoneorSTARTTLS. - Authentication:
Normal password(orNo authenticationif Postfix is set to trust local connections) - Username: Your Linux username (e.g.,
net2)
- Hostname:
After entering the correct settings, click “Done” or “Re-test.”
Step 7: Account Creation Confirmation
If the settings are correct and Thunderbird can connect to Postfix (SMTP) and Dovecot (IMAP), your account will be created. You might see a warning about unencrypted connections if you selected “None” for security; accept this for local testing if you’re comfortable.
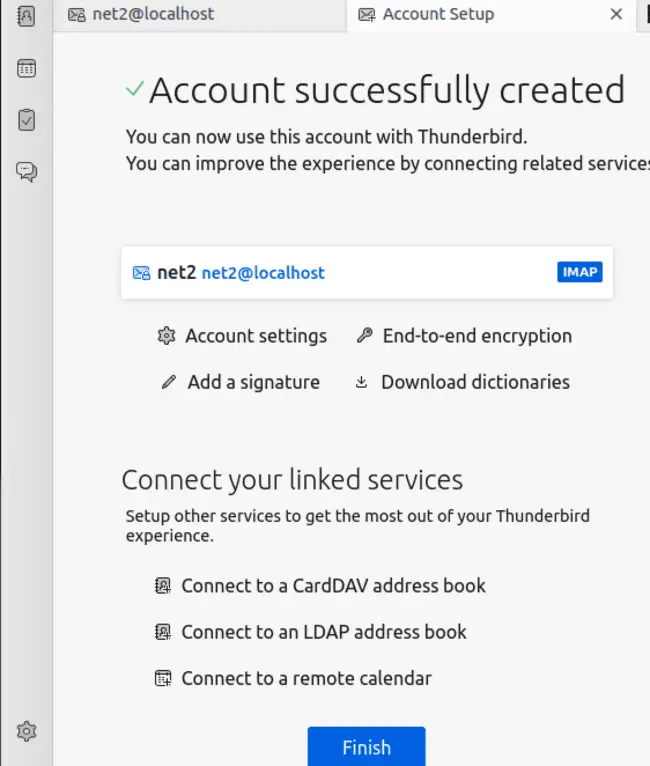
Click “Done” and confirm any subsequent dialog boxes (like security exceptions if using self-signed certificates or no encryption).
Step 8: Accessing Your Emails
You should now see your newly configured account in Thunderbird. If you sent a test email earlier using telnet to your local user, it should appear in your Inbox.
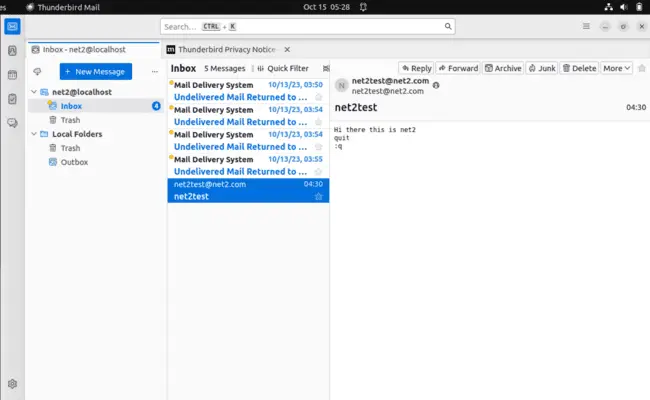
As you can see in the example, the email we created earlier via the command line test is now visible in Thunderbird. You can now try sending an email from Thunderbird to your local address (e.g., yourusername@localhost) to test outgoing and incoming mail flow through the client.
Conclusion: Your Ubuntu Mail Server Journey
In this detailed walkthrough, we’ve successfully navigated the process of establishing an SMTP server on Ubuntu 22.04. This empowers you to manage your own Ubuntu email server, offering an alternative to relying on conventional cloud-based services like Gmail. Understanding the core principles of SMTP servers and their crucial role in email communication is fundamental for ensuring secure, reliable, and efficient email delivery.
We’ve highlighted why having your own SMTP server is beneficial, particularly its capability to authenticate email origins and effectively manage delivery issues.
We’ve guided you through several key configuration stages, including setting up a Fully Qualified Domain Name (FQDN), ensuring your system repositories are current, and, most importantly, installing and configuring the Postfix mail server with appropriate settings for your needs.
Furthermore, we’ve covered how to verify the operational status of your Postfix server and how to adjust your firewall settings to permit mail traffic, preventing potential connectivity blockages.
We also demonstrated practical methods for testing Postfix functionality locally using tools like telnet, which helps you confirm that your server can manage emails correctly within your local environment.
To complement Postfix, we introduced Dovecot, a secure and robust Mail Delivery Agent (MDA). Dovecot is responsible for managing local mail storage and enabling users to access their emails via IMAP or POP3 protocols. We provided clear instructions for its installation and a simple method to test its functionality.
Finally, we brought it all together by guiding you through the setup of Mozilla Thunderbird, a popular email client, to connect to your newly established local mail server for sending and receiving emails. By diligently following these steps, you can create and manage your email account on your local machine, enjoying efficient and controlled email communication.
If you like the content, we would appreciate your support by buying us a coffee. Thank you so much for your visit and support.