As someone who’s managed Linux servers for years, I’ve come to appreciate the elegant simplicity of the Network File System (NFS).
When you’re working with multiple Linux or UNIX machines, being able to share directories seamlessly across your network isn’t just convenient—it’s essential for maintaining workflow efficiency and data consistency.
While Samba excels at Windows integration, NFS remains the go-to solution for Linux-to-Linux file sharing. It’s blazingly fast, has minimal overhead, and feels like a natural extension of the Linux filesystem. In this guide, I’ll walk you through everything you need to know about setting up and managing NFS on Ubuntu 20.04, based on my hands-on experience and best practices.
Understanding NFS Architecture: The Basics
Before diving into configuration, let’s understand what we’re working with. NFS operates on a client-server model:
- The NFS server hosts the shared directories and makes them available over the network
- NFS clients mount these shared directories, making them appear as if they were local filesystems
This architecture allows for centralized file storage while providing distributed access—perfect for environments where multiple systems need to work with the same files.
Setting Up an NFS Server on Ubuntu 20.04
Step 1: Installing the NFS Server Package
First, we need to install the NFS server package. I always recommend starting with a package list update:
sudo apt update
sudo apt install nfs-kernel-server
After installation, we need to enable and start the service:
sudo systemctl enable nfs-kernel-server
sudo systemctl start nfs-kernel-server
To verify that everything is running correctly, check the service status:
sudo systemctl status nfs-kernel-server
You should see output indicating that the service is active and running. If you encounter any issues, the status output will provide helpful debugging information.
Read: How to set up a UFW on Ubuntu 22.04
Step 2: Configuring Firewall Rules for NFS Traffic
One of the most common pitfalls I’ve encountered is forgetting to configure firewall rules. NFS requires several ports to be open, and missing even one can cause connectivity issues that are frustrating to diagnose.
If you’re using ufw (Ubuntu’s default firewall):
sudo ufw allow nfs
This single command allows all necessary NFS traffic through the firewall.
If you’re using firewalld (which offers more granular control):
sudo firewall-cmd --permanent --add-service=nfs
sudo firewall-cmd --permanent --add-service=rpc-bind
sudo firewall-cmd --permanent --add-service=mountd
sudo firewall-cmd --reload
Each of these services plays a crucial role in the NFS ecosystem:
nfsis the core file-sharing servicerpc-bindhandles Remote Procedure Call (RPC) registrationmountdmanages mount requests from clients
The --permanent flag ensures these rules persist across reboots, while --reload applies them immediately.
Pro Tip: If you’re in a cloud environment or using a hardware firewall, remember to configure those as well. At minimum, you’ll need to allow traffic on ports 2049 (NFS), 111 (rpcbind), and the port used by mountd (which can vary).
Read: Linux Firewall: The Complete Guide to IPtables, NAT, ip6tables and Network Security
Step 3: Creating and Defining NFS Shares
Now comes the part where we tell the NFS server which directories to share and who can access them. This is configured in the /etc/exports file:
sudo nano /etc/exports
The syntax for this file is straightforward but powerful:
/path/to/shared/directory client_specification(options)
Let’s look at some practical examples:
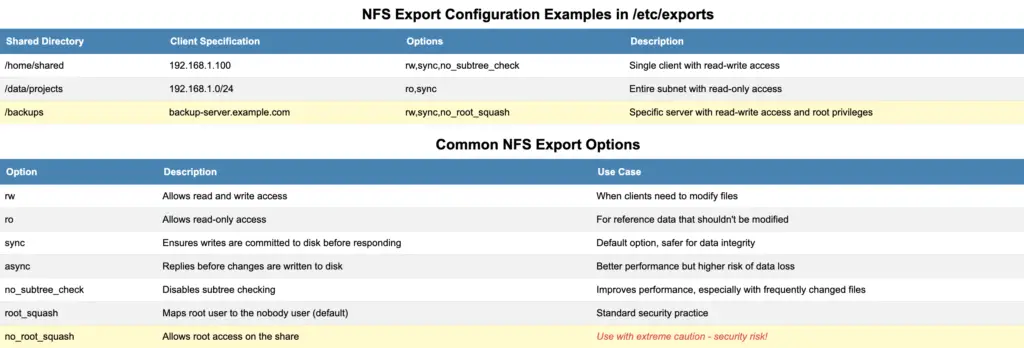
/home/shared    192.168.1.100(rw,sync,no_subtree_check)
/data/projects  192.168.1.0/24(ro,sync)
/backups        backup-server.example.com(rw,sync,no_root_squash)
In these examples:
/home/sharedis accessible by a single client with read-write permissions/data/projectsis accessible by an entire subnet with read-only permissions/backupsis accessible by a specific server with read-write permissions and root privileges
Read: How to manage permissions in Linux – Guide for beginners
Let’s break down some of the common options:
rw: Allows read and write accessro: Allows read-only accesssync: Ensures writes are committed to disk before responding to the clientno_subtree_check: Disables subtree checking, which can improve performanceroot_squash: Maps requests from root on the client to the nobody user (default)no_root_squash: Allows the root user on the client to have root access on the share
Security Note: Be extremely cautious with no_root_squash. I’ve seen this option cause security incidents when used improperly. Only use it when absolutely necessary and with trusted clients.
After defining your shares, tell the NFS server to apply the changes:
sudo exportfs -a
You can verify that your exports are properly configured by running:
sudo exportfs
This command displays all currently exported filesystems, which is a great way to confirm your configuration.
Accessing NFS Shares from Client Systems
Now that our server is set up, let’s switch perspective and look at how clients can access these shared directories.
Step 1: Installing NFS Client Software
On each client system, we need to install the NFS client package:
sudo apt update
sudo apt install nfs-common
This package provides all the necessary tools for mounting and working with NFS shares.
Step 2: Creating a Mount Point
Before mounting an NFS share, we need to create a directory to serve as the mount point:
sudo mkdir -p /mnt/nfs_share
The -p flag creates parent directories if they don’t exist, which is useful for creating nested mount points.
Step 3: Mounting the NFS Share
Now we can mount the remote share:
sudo mount -t nfs server_ip:/shared/directory /mnt/nfs_share
For example:
sudo mount -t nfs 192.168.1.50:/home/shared /mnt/nfs_share
After running this command, the contents of the remote /home/shared directory should be accessible at /mnt/nfs_share on your client system.
Troubleshooting Tip: If the mount fails, try using the -v flag for verbose output:
sudo mount -v -t nfs 192.168.1.50:/home/shared /mnt/nfs_share
This will provide additional information about what’s happening during the mount process, which can be invaluable for diagnosing issues.
Step 4: Testing the NFS Connection
After mounting, verify that you can access the share by listing its contents:
ls -la /mnt/nfs_share
Try creating, modifying, and deleting files (if you have write permissions) to ensure the share is functioning correctly.
Read: How to Manage Ubuntu Boot Services: List, Start, and Stop Systemd Services at Startup
Making NFS Mounts Persistent Across Reboots
Manually mounting NFS shares is fine for testing, but for production environments, you’ll want mounts to persist across system reboots.
Configuring /etc/fstab for Automatic Mounting
The /etc/fstab file controls which filesystems are mounted during system boot:
sudo nano /etc/fstab
Add a line for each NFS share you want to mount automatically:
server_ip:/shared/directory /mnt/nfs_share nfs options 0 0
For example:
192.168.1.50:/home/shared /mnt/nfs_share nfs rw,soft,intr,_netdev 0 0
Let’s examine these mount options:
rw: Read-write accesssoft: If the server is unavailable, operations will eventually timeoutintr: Allows interrupting operations if the server is unresponsive_netdev: Indicates that this is a network filesystem, ensuring it’s mounted after the network is up
The last two zeros are for dump and fsck order. For NFS shares, these should always be 0.
Pro Tip: After editing /etc/fstab, test your configuration without rebooting:
sudo mount -a
This command attempts to mount all filesystems specified in /etc/fstab that aren’t already mounted. If there are any syntax errors or other issues, you’ll find out immediately rather than at the next reboot.
Managing NFS Mounts
Unmounting an NFS Share
To unmount an NFS share when you no longer need it:
sudo umount /mnt/nfs_share
Note the spelling: it’s umount, not unmount. This is one of those Linux quirks that has tripped me up more than once.
If the unmount fails because the filesystem is busy, you can use the -f (force) option:
sudo umount -f /mnt/nfs_share
Or, if you need to be even more forceful, the -l (lazy) option:
sudo umount -l /mnt/nfs_share
A lazy unmount detaches the filesystem immediately but cleans up references only when they’re no longer busy. This can be useful when you need to unmount a share but can’t afford to wait for all processes to release it.
Using Cockpit for Graphical NFS Management
For those who prefer a graphical interface, Cockpit provides a web-based management tool that includes NFS functionality.
- Install Cockpit and its storage module:
sudo apt install cockpit cockpit-storaged
- Start and enable the Cockpit service:
sudo systemctl enable --now cockpit.socket
- Access Cockpit by navigating to
https://server_ip:9090in your web browser. - Go to the “Storage” section and find “NFS Mounts” to manage your NFS shares graphically.
The Cockpit interface is particularly useful for IT administrators who manage multiple servers and prefer a centralized management interface.
NFS Performance Optimization
After setting up NFS, you might want to optimize its performance based on your specific use case. Here are some tips I’ve found helpful:
Tuning Read/Write Buffer Sizes
You can adjust the rsize and wsize options when mounting an NFS share to optimize performance:
192.168.1.50:/home/shared /mnt/nfs_share nfs rw,soft,intr,rsize=32768,wsize=32768 0 0
These options control the maximum number of bytes used in read and write operations. Larger values can improve performance for large file transfers, but may use more memory.
Adjusting Timeouts
If you’re experiencing performance issues over unreliable networks, you can adjust the timeout values:
192.168.1.50:/home/shared /mnt/nfs_share nfs rw,soft,intr,timeo=15 0 0
The timeo option specifies the timeout value in tenths of a second. In this example, operations will timeout after 1.5 seconds.
Using the async Option
For maximum performance at the cost of slightly reduced data safety, you can use the async option on the server:
/home/shared 192.168.1.0/24(rw,async)
With async, the server replies to requests before changes are written to disk. This can significantly improve performance, especially for write-heavy workloads, but increases the risk of data loss if the server crashes.
Important: Always weigh the performance benefits against the potential risks when using async. For critical data, the default sync option is usually safer.
Troubleshooting Common NFS Issues
Even with careful configuration, issues can arise. Here are solutions to some common problems I’ve encountered:
“Permission Denied” Errors
If you’re getting permission errors when accessing NFS shares, check:
- File permissions on the server: Ensure the user on the client has appropriate permissions on the server.
- User ID mapping: If the UIDs on the client and server don’t match, you might need to use options like
all_squashor manually synchronize UIDs. - Export options: Verify that the client IP is correctly specified in
/etc/exportsand has the necessary permissions.
Connection Refused Errors
If you’re getting “connection refused” errors:
- Check the NFS service status:
sudo systemctl status nfs-kernel-server
- Verify firewall rules:
sudo ufw status
- Check that the export is actually being shared:
showmount -e server_ip
Stale File Handle Errors
“Stale file handle” errors typically occur when a file or directory on the server is deleted or moved while still being accessed by a client:
- Try unmounting and remounting the share:
sudo umount /mnt/nfs_share
sudo mount -t nfs server_ip:/shared/directory /mnt/nfs_share
- If that doesn’t work, reboot the client system.
Security Considerations for NFS
NFS was designed in a time when network security wasn’t as critical as it is today. Here are some important security considerations:
Use NFSv4 When Possible
NFSv4 includes security improvements over NFSv3, including support for Kerberos authentication. To specify NFSv4 when mounting:
sudo mount -t nfs4 server_ip:/ /mnt/nfs_share
Restrict Access by IP Address
Always specify exact IP addresses or subnets in your /etc/exports file, rather than using wildcards:
/home/shared 192.168.1.0/24(rw,sync)
This restricts access to only systems within the specified subnet.
Consider Using a VPN
For NFS shares that need to be accessed over the internet, consider using a VPN to encrypt the traffic. This adds a layer of security that NFS itself doesn’t provide.
Conclusion: Harnessing the Power of NFS
Network File System is a powerful tool that can significantly improve workflow efficiency in Linux environments. By following this guide, you should now have a solid understanding of how to set up, manage, and optimize NFS on Ubuntu 20.04.
Remember that NFS is most effective when used within a trusted network environment. For public-facing or high-security applications, consider additional security measures like VPNs or encrypted filesystems.
With proper configuration and management, NFS can provide a seamless, high-performance file sharing solution that feels like a natural extension of your local filesystem.
FAQ: Common Questions About NFS on Ubuntu
Q: What’s the difference between NFS and Samba?
A: NFS is optimized for Linux/UNIX systems and uses the NFS protocol, while Samba implements the SMB/CIFS protocol used by Windows. NFS is generally faster and more efficient for Linux-to-Linux file sharing, while Samba is better for Windows integration.
Read: How to install Samba on Ubuntu
Q: How do I view all available NFS shares on a server?
A: Use the showmount command:
showmount -e server_ip
This displays all exported directories on the specified server.
Q: Can I restrict NFS access to specific users?
A: Traditional NFS doesn’t have user-level authentication. It relies on IP-based access control and Unix permissions. For user-level authentication, you’d need to use NFSv4 with Kerberos, which is more complex to set up.
Q: How do I determine which version of NFS I’m using?
A: Check the mount options:
mount | grep nfs
If you see nfsv4 or nfs4, you’re using NFSv4; otherwise, you’re probably using NFSv3.
Q: Why would I choose hard over soft mounting options?
A: hard mounts ensure data integrity by retrying operations indefinitely if the server is unavailable. This prevents data loss but can cause processes to hang. soft mounts will timeout after a while, which can lead to data corruption but prevents hanging processes.
Q: How can I improve NFS performance?
A: Consider increasing rsize and wsize values, using the async option on the server side (with caution), and ensuring your network infrastructure can handle the traffic. Also, consider using NFSv4, which has better performance characteristics than NFSv3.
Q: Is NFS secure
If you like the content, we would appreciate your support by buying us a coffee. Thank you so much for your visit and support.