In Unix and Linux, there are many security built-in features. One such feature is related to files and who should be allowed to manipulate them. Since everything is a file in Unix and Linux, a potential security threat can arise if incorrect file permissions are assigned to classified files, be it a directory, a device or a file. Each file on a system has access restrictions to control who can view, modify or execute a specific file. The root user or superuser can access all files on a system. Each user on a system has some restrictions on specific files. This is to prevent such users from carrying out unauthorized operations on important files.
In the guide you will learn how to handle permissions, manage ownerships and restrict access to files and directories.
File permission types
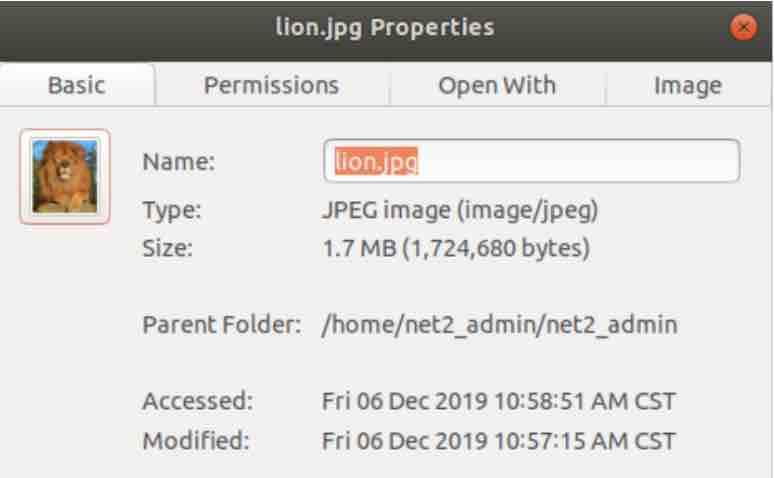
Before delving deeper into the realm of file permissions using the terminal, let us see a simple file access restriction using a graphical user interface.
Read: How to fix Broken Pipe Error in Linux
Using GUI
If you select a given file on your system and right-click on it , you will see the following pop-up :
Now click on the second tab which is entitled Permissions as shown below :
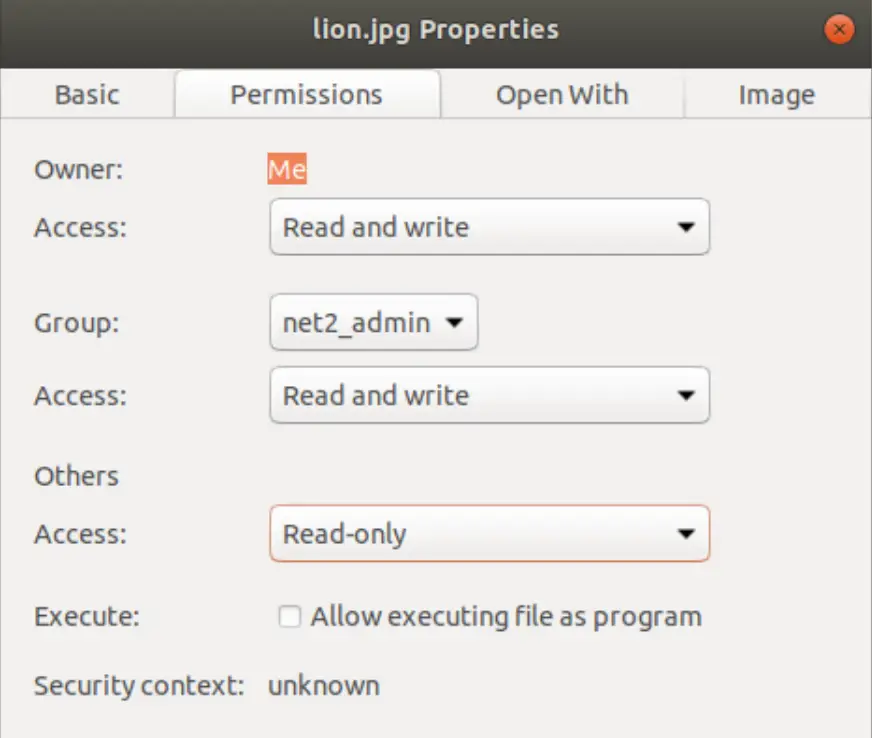
Linux file permissions
Read: How to fix EACCES: permission denied, access ;/usr/local/lib/node_modules
You can see that there are three types of user restrictions :
- Owner (the user who created the file)
- Group (the group the owner belongs to)
- Others (all other users)
For any of his files, the owner has the ability to grant specific permissions or to restrict access to groups or other users.
In the example above, the owner has the access “Read and write”. The members of the group net2_admin have also the same access type. Other users however have “Read-only” access which means that they can only read/open the file, but they cannot modify it.
The owner can open the drop-down menu for each access type and assign the permission he sees fit for the corresponding group/user.
Read: How to create a Sudo user on Ubuntu
Using the terminal
Using the command line, you can find the permission settings of a file with the ls command. Using ls alone however does not give any information about the type of access of a given file since by default, ls command lists the names of files. By using the -l option you would be able to see additional information on files. Let’s run the command below :
ls -l

In the snapshot above, we can see the following information on each line:
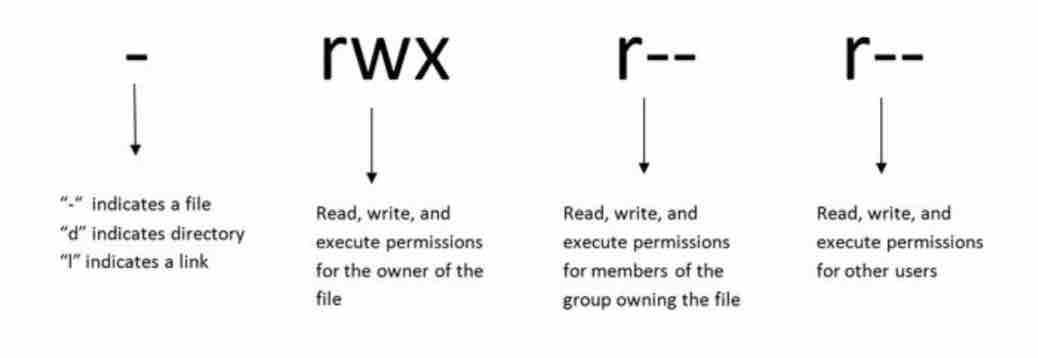
1 The first character is either a ‘-‘ or a ‘d’ where a ‘-’ refers to a file and ‘d’ refers to a directory (we can also have a symbolic link ‘l’).
2 The nine characters (rwxr–xr–x) indicate permission settings (-,r,w or x) where :
– The first three characters (rwx) designates the owner permissions
- The next set of three characters (r-x) designates the Group permissions
- The final set of three characters (r-x) designates all other Users permissions.
See following sections below for more details.
3 The owner of the file is specified in the next column.
4 The following column designates the file owner’s group.
5 Next we find the size of the file in bytes.
6 The date and time at which the file was last modified is shown in this column.
7 Finally the filename is specified in the last column.
Read: The architecture of Linux operating system
Permission types
For files : Each file (device, file) has basically three permission types:
read (r) – Read permission : when granted, the assignee (owner, user or group) can read the corresponding file content.
write (w) –Write permission : when granted, the assignee (owner, user or group) can modify the corresponding file.
execute (x) – Execute permission: allows the assignee (owner, user or group) to execute a file.
dash (-) : Unassigned permission : shows that a particular permission has not been granted.
For directories : Directories have permissions which restrict different actions than with regular files or devices (nodes) :
read (r) – Read permission : read allows or restricts assignees from viewing the contents of the corresponding directories i.e. ls command .
write (w) – Write permission : write allows or restricts assignees from creating or deleting new files in the directory.
execute (x) – Execute permission: execute allows or restricts assignees from changing into the corresponding directory, i.e. cd command.
Read: Linux directories explained
Let’s return to our snapshot above and try to decipher the permissions of the file lion.
![]()
This reads :
rw-rw-r–
This can be explained simply as follows:
owner = Read & Write (rw-)
group = Read & Write (rw-)
other users = Read (r–)
In other words: The file’s owner (net2_admin) has permission to both read and write to the file. The group,(net2_admin) has permission to both read and write to the file as well. All other users have permissions to only read it. Since it is It is not a program,neither the group or the owner or other users have permission to execute it.
You might want to compare this with the popup that we displayed earlier when we used GUI.
In a nutshell a permission -rwxr–r– can be explained as follows :
Read: A Beginner’s Guide to Symbolic Links in Linux
Modifying Permissions
The command chmod is used to modify permissions of files and directories with either letters or numbers. This might create security issues when incorrectly used . This is because some specific files have standard restrictive permissions in order not to allow unauthorized access. For instance some files that are accessed/used by the kernel do not have read/write permissions for normal users.
For example the file rsyslog.conf below :
![]()
Has the following permissions :
owner = Read & Write (rw-)
group = Read (r–)
other = Read (r–)
Whereas the file permissions below (shadow) does not allow other users to even read it :

Read: How to speed up Linux
Using chmod with numbers
The basic syntax of the command chmod is :
chmod {options} file_name
Where options can take on any of the values below :
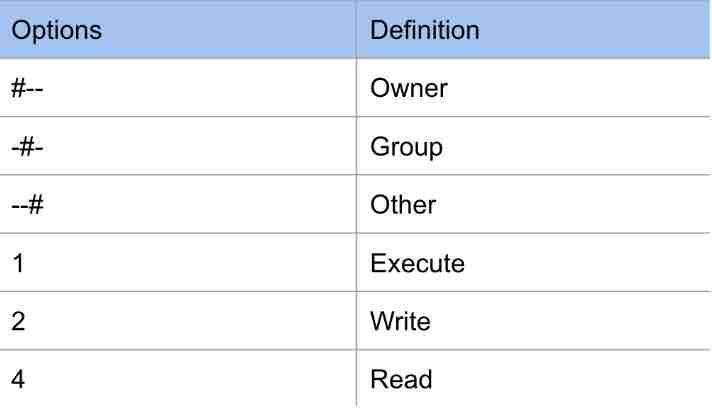
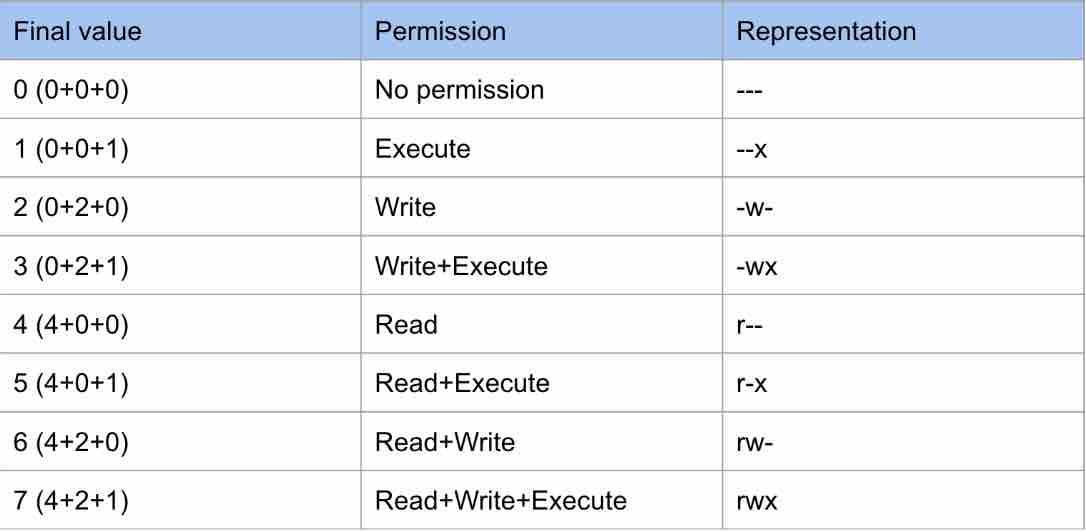
Since the owner, the group and other is represented by three numbers, you would need to read the appropriate values from the options column above which match the required type of access needed and then add them up.
Read: ‘usermod’command usage in Ubuntu/Debian : a beginner’s guide
Example 1 :
To clarify this, let’s study an example of a chmod command to assign the permission rw-r–r–:
chmod 644 lion.jpg

The 644 means the following :
6 : For the owner, we need a Read(4) + Write(2) permissions. These will add up to 6
4 : For the group, we require a Read(4) only permission. This will remain 4
4 : For other users, we require a Read(4) only permission. This will remain 4
Example 2 :
As a second example, let us assign the permission -rw-rw-rwx to our file lion.jpg :

chmod 667 lion.jpg
6 : For the owner, we need a Read(4) + Write(2) permissions. These will add up to 6
6 : For the group, we need a Read(4) + Write(2) permissions. These will add up to 6
7 : For other users, we require a Read(4) + Write(2) + Execute(1) permissions. These will add up to 7.
Read: How to fix 403 Forbidden Error
Example 3
Let’s consider another example in which we assign the permission rwxr–r– to the file lion.jpg :
chmod 744 lion.jpg

7 : For the owner, we require a Read(4) + Write(2) + Execute(1) permissions. These will add up to 7.
4 : For the group, we require a Read(4) only permission. This will remain 4
4 : For other users, we require a Read(4) only permission. This will remain 4
Example 4
To assign the permission r-x—w- to the file lion.jpg
chmod 502 lion.jpg

5 : For the owner, we require a Read(4) + Execute(1) permissions. These will add up to 5.
0 : For the group, we require no permissions.
2 : For other users, we require a Write(2) only permission. This will remain 2
The table below summarizes the additions of these values :
Using chmod with symbolic mode
Using symbolic mode is completely different from using numbers and is not so straightforward to implement for beginners. The syntax is the following :
[ugoa…][[+-=][rwxXstugo…]…]
[ugoa…] : This group of characters specifies the new permissions’ assignees or to whom should the new permissions apply:
– u : For the user
– g : For the group
– o : For others
– a : For all of the above (u+g+o)
[+-=] : This group of symbols are used to add or subtract permissions to the existing permissions as well as for setting permissions:
(+) : Used to add the permission to existing ones
(-) : Used to subtract the permission from existing ones
(=) : set the permissions to the desired value . The object will therefore have this single value as a permission.
[rwxXstugo] : This third and last group of symbols defines the permission to assign. There are additional values besides the rwx ones. These are:
– X : Used to assign execute permissions. This applies only if the file is :
– A directory
or
– if it had execute permissions already
– s : Sets the user ID (UID) or group ID (GID) on execution
– t : To save program text
– u : Permissions assigned (or granted) to the owner of the file (user who owns the file)
– g : Permissions assigned (or granted) to the users who are already members of the file’s group
– o : Permissions assigned (or granted) to the users who do not belong to either of the two preceding categories
Let’s study some examples to get the concept.
Example 1:
Say we want to grant execute permission to everyone (“other”) for file lion.jpg, we should write :
chmod o+x lion.jpg

where o stands for ‘others’ and the (+) says that we are adding a permission and finally, you guessed it, we are adding execute permission. This results in the new permission, rwx—–x instead of the previous one rwx—— .
Example 2:
Let’s consider the command :
chmod o-wx lion.jpg
Where we want to revoke wx permissions from everyone :

As you can see, the new permission results in rwx—— .
Example 3:
The following command
chmod ugo+rwx lion.jpg
Will grant all possible permissions to all:

The new permission is now rwxrwxrwx .
Adding multiple permissions
It is also possible to grant many permissions at once. For instance, the command :
chmod g+x,o+x lion.jpg
Will grant Execute permission to the group and also to other users.

Changing permissions recursively
The command chmod has an option ‘-R’ which enables users to assign permissions to a each file and directory within a specified directory. For instance :
chmod 777 -R /path_to_directory
To change the permission of only files within a given directory, you can use the command below :
find /path_to_directory -type f -print0 | xargs -0 chmod 644
To change the permission of directories only within a specified directory, run the command :
find /path_to_directory -type d -print0 | xargs -0 chmod 755
Note that the common permission for a file is 644 whereas that for a directory is 755.
Cloning permissions from one file to another
To copy the permissions of one file to another, you can use the reference option of the chmod command. As an example, let’s clone the permissions of file1 to file2 using the following command:
chmod –reference=file1 file2

As you can see in the snapshot above, the file tst.txt has now the same permission , .i.e. -w–wx-wx as the file lion.jpg after it initially had the value : rw-r–r–
Read: Ubuntu/Debian monitoring tools guide for system administrators
Changing file ownership
To change the owner of a file, you can use two commands: chown and chgrp. The chown allows to easily change the owner of a file whereas the chgrp enables users to change the group of file.
chown
The syntax of chown command is the following :
chown options User[.Group] File
User : Username or user ID (UID) of the new owner.
Group : New group’s name or group ID (GID).
File(s) : Name of one or more files or directories (or links).
If only the user is provided, it will become the owner of the file(s) and if the user specified is followed by a colon sign ‘:’ .i.e ‘user:’ , it will become the owner of the file(s) and the user’s login group will take ownership of the file(s).
If however both user and group are provided .i.e. user:group, the user and group ownership of the file(s) is changed to the specified user and group ownership respectively.
If the group is prefixed with a colon : .i.e. ‘:group’ and user is omitted then only the group ownership of the file(s) is changed to the specified group.
Note that only the root user or a user with sudo privileges can change the owner of a file.
Read: How to use sudo without having to enter a password in Ubuntu
Changing the owner of a file
Let’s now take an example in which we change the owner of a file using chown simple command :
chown USER FILE
To change the ownership of a file with the name myfile to a new owner named net2_adm, run the command below:
chown net2_adm myfile
It is also possible to change the ownership of several files or directories. This can be achieved by space separating them. The command below for instance changes the ownership of a file with the name myfile and directory mydirectory to a new owner net2_adm:
chown net2_adm myfile mydirectory
As mentioned above, you can also specify the UID instead of the username.
Changing the group of a file
Changing the group of a file only can be done by using chown followed by a colon (:) and the name of the new group along with the file:
chown :new_group myfile
For instance the command below will change the group owner to normal_users of a file myfile:
chown :normal_users myfile
The group ownership can be changed using chgrp as shown further below.
Changing the owner and the group of a file
The command below will change the owner and the group of a file. Make sure not to input spaces though :
chown USER:GROUP FILE
As an example, let’s change the ownership of a file with the name myfile to a new owner net2_adm and group admins:
chown net2_adm:admins myfile
Changing file ownership recursively
The -R switch of chown allows you to recursively manage ownership through subdirectories and files. This is written as follows :
chown -R user:group directory
For instance the example below :
sudo chown -R net2_adm:admins documents
This will change the ownership of directory documents along with files and subdirectories therein to user net2_adm and group admins.
Cloning group and user ownerships
Much like chmod command, you can assign the same user and group ownership of a specified file to those of the provided reference file. The command goes as follows :
chown –reference=reference_file
For instance, the command below will assign the user and group ownership of the first_file to second_file :
chown –reference=first_file second_file
chgrp
While chown command allows you to change both user and group ownerships, the chgrp command is used to only change the group ownership.
The chgp command has the following syntax :
chgrp [options] new_group file(s)
Where new_group is the name of the new group or group ID (GID). If you want to use GID, you would need to prefix it with the + sign and file(s) is the name of one or several files.
For instance, to modify the group of the file my_file to admins, run the command below:
chgrp admins my_file
To consider multiple files, use the command as follows:
chgrp admins first_file first_directory second_directory second_file
As it was the case with chown, you can also recursively modify the group ownership of all files and subdirectories by using the -R option.
Conclusion
All users both beginners and advanced should grasp the concept of permissions in Linux and learn how to manage permissions and ownerships of Linux files and directories. This can be achieved by using basic commands like chmod, chown and chgrp.
You have seen how to modify permissions using Linux chmod command with both numbers and symbolics. You also have learned how to change file ownership using chown and chgrp.
We hope that this article has helped you better understand file permissions in Linux.
If you like the content, we would appreciate your support by buying us a coffee. Thank you so much for your visit and support.