Stellar Photo Recovery is a specialized software solution designed for restoring lost or deleted images, videos, and audio files.
This review examines its core functionalities, system compatibility, and advanced features, providing a detailed overview of its utility for various data loss scenarios. The software is engineered to support a broad spectrum of digital photo, audio, and video file formats, as well as compatibility with major camera brands and diverse external storage media.
1. Core Functionality and Features Overview
The primary operation of Stellar Photo Recovery involves scanning selected storage media to identify recoverable files. A critical feature includes the provision of a file preview before recovery, allowing users to verify data integrity. Furthermore, the software facilitates saving scan information, enabling users to pause and resume recovery operations at a later time without initiating a new scan.
Key Features:
- Deleted File Recovery: Recovers files that have been accidentally deleted.
- Recovery from Lost Drive/Unallocated Partition: Restores data from unallocated, uninitialized, unidentified, and RAW partitions on hard disks.
- Raw Recovery Support: Utilizes signature-based data searches on volumes and hard drives, particularly effective for severely corrupted storage.
- Deep Scanning: Provides a comprehensive file signature-based search to maximize recovery rates, especially for files not detected by standard scans.
- Specific File Search: Enables searching for specific file types within a logical drive or designated folder.
- Image Creation: Supports the creation of sector-by-sector images of hard disks and volumes, which can then be used for data recovery, mitigating further data loss from unstable drives.
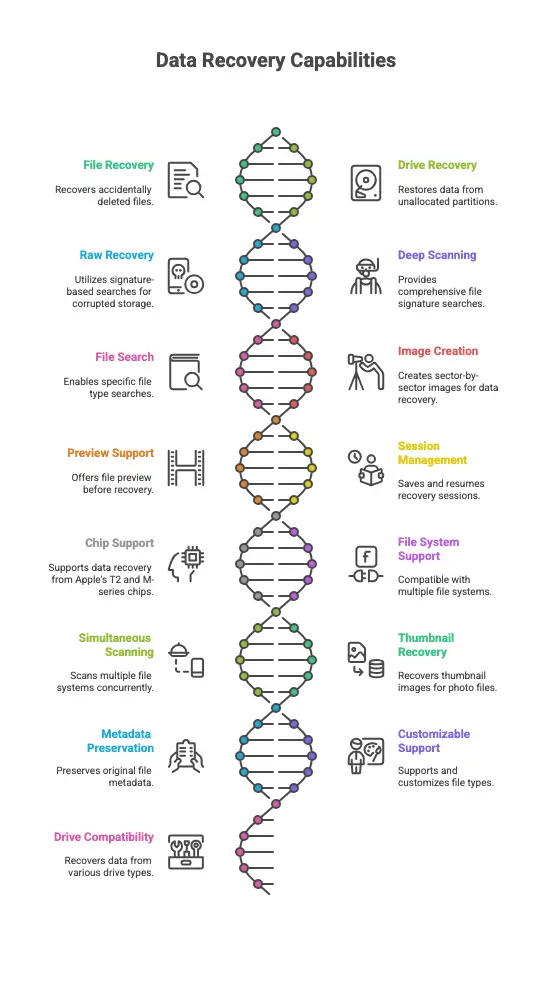
- Preview Support: Offers the ability to preview various file types prior to the recovery process.
- Save and Resume Recovery Session: Allows saving a recovery session to resume data restoration at a later stage, eliminating the need for rescanning.
- macOS Chip Support: Includes specific support for data recovery from systems equipped with Apple’s T2 security chips and M1, M2, M3, and M4 chip technology.
- Extensive File System Support: Compatible with multiple file systems:
- Windows: NTFS, FAT, FAT16, FAT32, and exFAT.
- CD/DVD: CDFS, UDF, and HFS+.
- Macintosh: HFS, HFS+, and APFS.
- Simultaneous File System Scanning: Supports concurrent scanning of multiple file systems for optimized scan results.
- Thumbnail Recovery: Enables the recovery of thumbnail images for various photo file formats.
- Metadata Preservation: Supports recovery of files with original date timestamp, camera model/name, resolution, and file name, where available.
- Customizable File Type Support: Supports over 100 default file types and allows for adding or editing custom file types.
- Broad Drive Type Compatibility: Recovers data from desktop and laptop hard drives, external hard drives, pen drives, memory cards, SSD drives, and SD cards.
Read: Stellar Repair for MySQL – Software Review
2. System Requirements and Installation
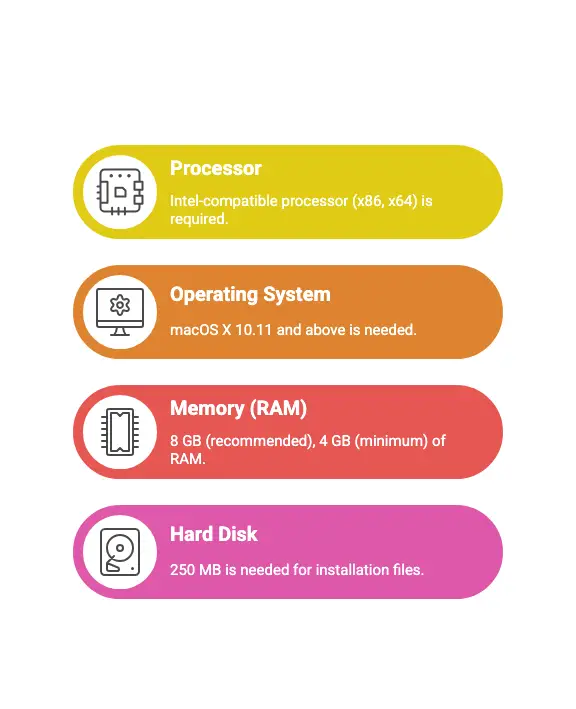
Prior to installation, users should ensure their system meets the specified minimum requirements.
2.1. Minimum System Requirements:
2.2. Installation Steps for macOS:
- Unzip the StellarPhotoRecovery.dmg.zip file.
- Double-click the dmg file to mount a virtual volume, StellarPhotoRecovery.
- Drag the StellarPhotoRecovery application from the mounted virtual volume to the Applications folder.
- To launch, double-click StellarPhotoRecovery in the Applications folder.
- Accept the License Agreement. The main software window will be displayed.
Note: To uninstall the software, drag and drop Stellar Photo Recovery from the Applications folder to Trash.
2.3. User Interface Overview:
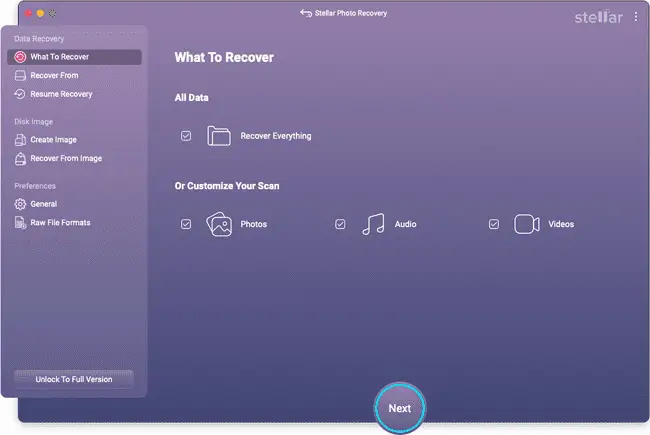
Stellar Photo Recovery features a straightforward graphical user interface. Upon launch, the “What To Recover” screen is presented, offering data recovery options:
- All Multimedia Files: Recovers all photos, audio, and videos from the selected drive.
- Customize Your Scan: Allows selection of specific data types for recovery:
- Photos: For deleted or lost photos.
- Audio: For deleted or lost audio files.
- Videos: For deleted or lost video files.

The interface guides users through scanning, previewing, selecting, and saving recovered files. It also supports scanning previously saved scan information or disk image files. Key navigational elements include:
- StellarPhotoRecovery Menu: Provides information about the software.
- Help Menu: Access to help topics, purchasing options, support contact, and knowledgebase articles.
- More Tools Menu: (Accessible via three vertical dots) Offers additional utilities like Video Repair and Photo Repair (available in Professional, Premium, and Technician editions) and a Compare Editions feature.
3. macOS Specific Permissions for Recovery
For data recovery on macOS systems, specific permissions are required to ensure the software can fully access and recover lost data.
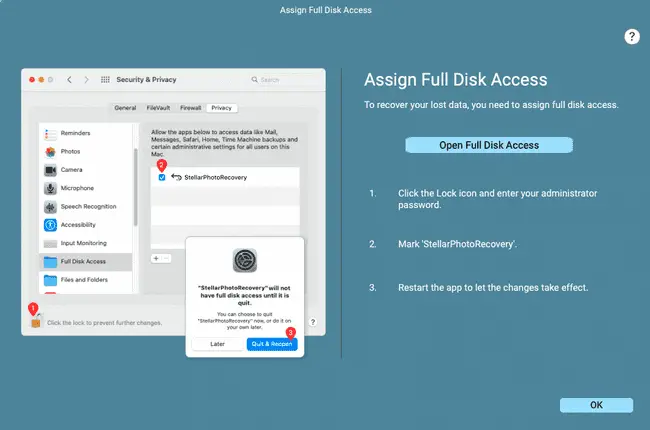
3.1. Assigning Full Disk Access:
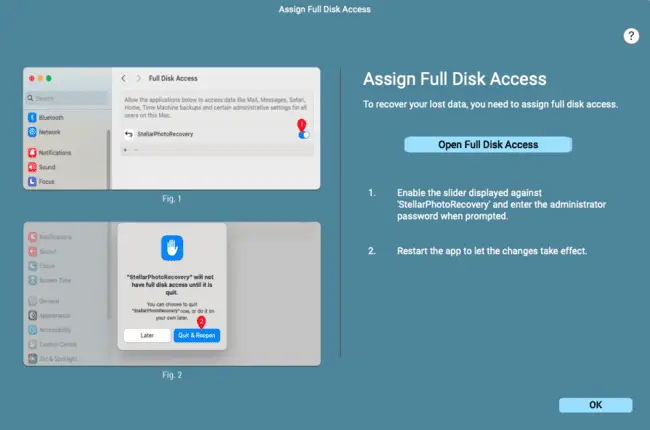
Granting Full Disk Access is crucial for the software to scan and recover data from all locations on a macOS system.
Steps for macOS Ventura (Version 13):
- Click Open Full Disk Access within the software.
- In the Privacy & Security window, navigate to Full Disk Access under the Privacy option.
- Enable the slider for ‘Stellar Photo Recovery’ and input the administrator password.
- Click Quit & Reopen when prompted.
Steps for macOS Version 12.6 & 11.7:
- Click Open Full Disk Access.
- In the Security & Privacy window, go to the Privacy tab.
- Click the lock icon at the bottom and enter your administrator password.
- Select Full Disk Access from the left pane and mark ‘Stellar Photo Recovery’.
- Click Quit & Reopen when prompted.
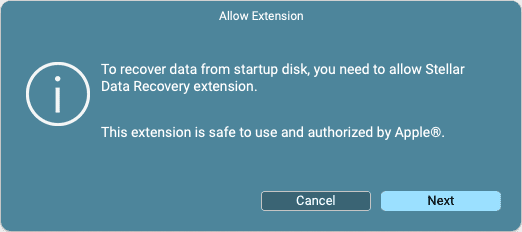
3.2. Recovering from System Disk: Kernel Extension (KEXT) and System Integrity Protection (SIP)
On macOS High Sierra and above (including Catalina, Mojave, and Big Sur), recovery from the system drive necessitates allowing macOS to load an extension signed by Stellar Photo Recovery. This extension is authorized by Apple and facilitates necessary system functionality for data access.
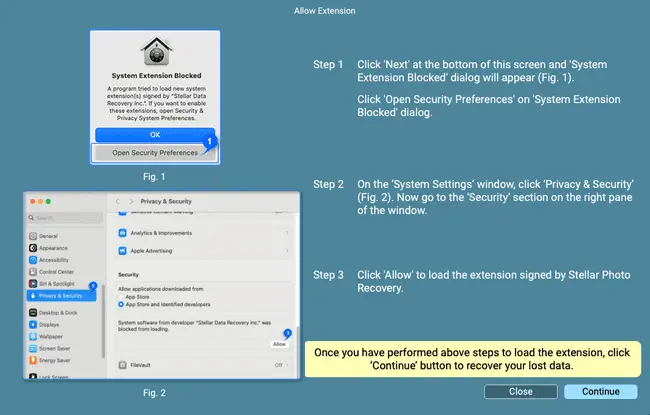
Procedure to Allow Extension (for T2 chip security macOS – Kernel Extension KEXT):
- When prompted by Stellar Photo Recovery to “Allow Extension” during a system disk scan, click Next.
- Follow the on-screen instructions, clicking Next to proceed.
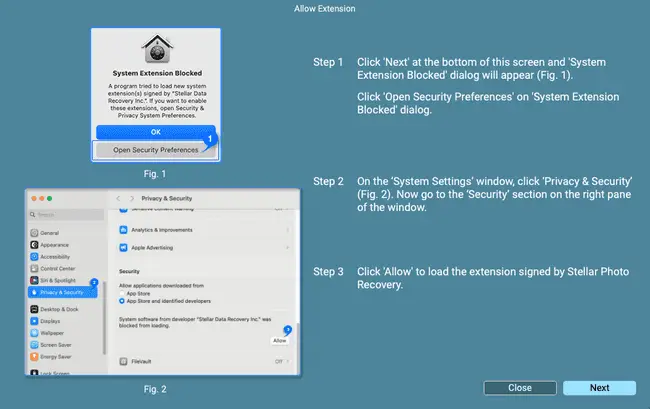
- When the “System Extension Blocked” dialog box appears, click Open Security Preferences. Note: If “Open Security Preferences” is not selected, manual access to Security & Privacy settings may be required. (Refer to section 3.2.1).
- In the Security & Privacy window, click the lock icon and authenticate with Touch ID or administrator credentials.
- Click Allow to enable macOS to load the Stellar Photo Recovery extension.
- Close the Security & Privacy window and click Continue in Stellar Photo Recovery to resume the scan.
Note: For M1, M2, M3, and M4 chip technology macOS, performing a Deep Scan for system volumes may require disabling System Integrity Protection (SIP) for the first time. The document provides KEXT enabling steps, and SIP procedures would be analogous if needed, typically involving macOS Recovery Mode.
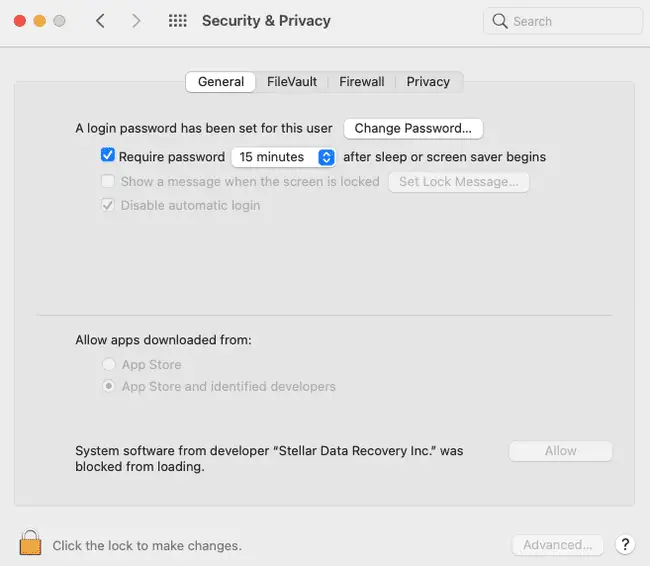
3.2.1. Manual Access to Security & Privacy Settings:
If initial prompts are missed:
- Click the Apple icon () and select System Preferences.
- Choose Security & Privacy.
- Proceed from Step 5 of the “Procedure to Allow Extension” above.
Read: Stellar Repair for Outlook review: A Comprehensive Solution for PST File Issues
4. Detailed Recovery Scenarios and Advanced Capabilities
Stellar Photo Recovery supports a range of recovery scenarios, from standard volume recovery to complex situations involving damaged or encrypted drives.
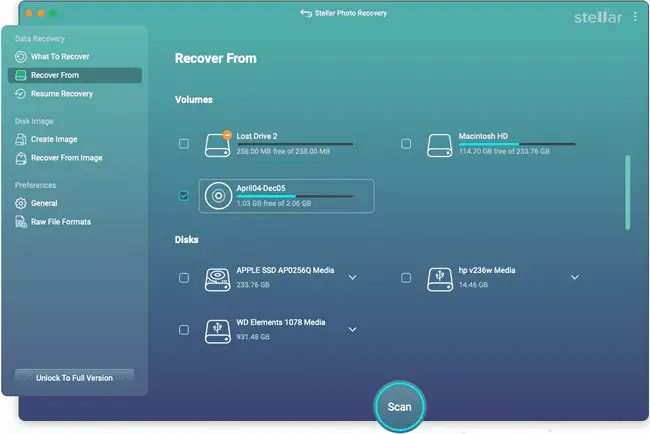
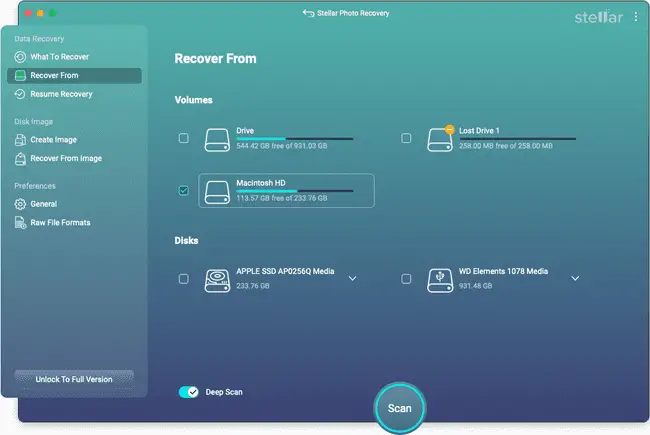
4.1. Recovering from Existing Volumes:
This method recovers data from healthy or accessible hard drive volumes and external storage media, supporting HFS, HFS+, APFS, NTFS, FAT, FAT16, FAT32, and exFAT file systems.
Steps:
- Launch Stellar Photo Recovery.
- From “What to Recover,” select desired data types (Photos, Audio, Videos) or “All
- Multimedia Files.” Click Next.
- On the “Recover From” screen, select the target volume.
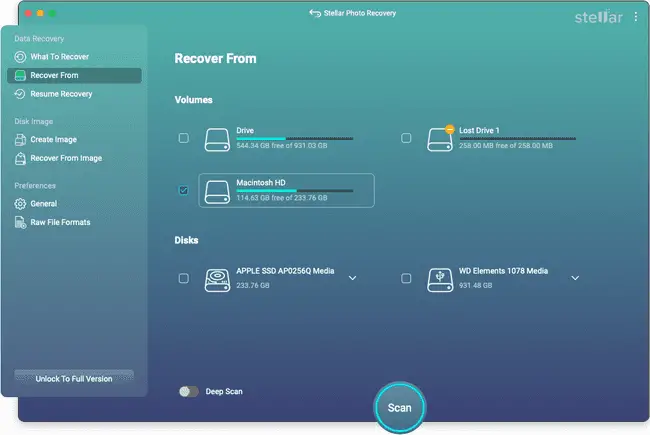
- (Click the ℹ️ icon for volume info.)
- (Optional) Enable Deep Scan for comprehensive scanning if supported by the media.
- Click Scan.
 (For macOS system drives, initial extension allowance may be required, refer section 3.2).
 - (Optional) Click ⏹️ Stop to abort scanning.
- Upon scan completion, a dialog box displays found files. Click OK.
4.2. Recovering from Lost Drives/Unallocated Partitions:
This addresses scenarios where a partition becomes unallocated or RAW due to missing drive letters, accidental deletion, or file system corruption, making data inaccessible. The function employs Raw Recovery.
Steps:
- Launch Stellar Photo Recovery.
- Select data types from “What to Recover.” Click Next.
- On “Recover From,” select Lost Drive.
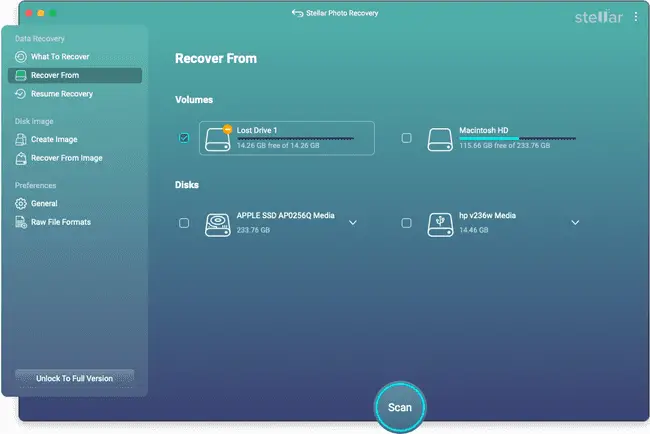 (Multiple unallocated spaces are listed as Lost Drive 1, Lost Drive 2, etc.; select one).
 - Click Scan.
 (Click ℹ️ for info on lost volume, ⏹️ to stop).
 - Upon scan completion, a dialog box displays found files.
4.3. Recovering from CD/DVD:
The software can scan and recover data from corrupted optical media, including photos, audio, and videos.
Steps:
- Launch Stellar Photo Recovery.
- Select data types from “What to Recover.” Click Next.
- On “Recover From,” select the connected CD/DVD drive
 .
. - Click Scan. (Click ⏹️ to stop).
- Upon scan completion, a dialog box displays found files. Click OK.
4.4. Disk Image Operations:
Disk images (DMG files) are mirror copies of storage devices, useful for recovering data from unstable drives by performing recovery on the image rather than the original source.
4.4.1. Creating a Disk Image:
Applicability: This feature is available only in the Professional, Premium, and Technician editions.
Images can be created for hard disks, logical volumes, and removable media. The DMG file will match the source size, requiring sufficient destination space.
Steps:
- Launch Stellar Photo Recovery.
- From the Side Panel, click the 💿 icon to select Create Image
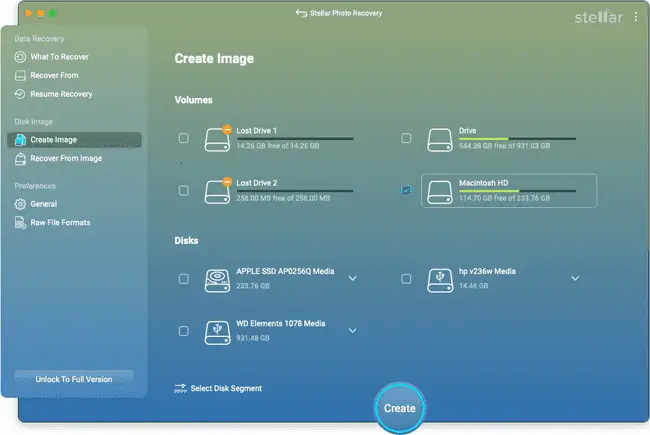 .
. - Select the drive or partition. To image the entire source, click Create. To image a segment, click Select Disk Segment, define the range, and click Apply.
- Specify destination and name in “Creating Media Image to Save” dialog. Click Save.
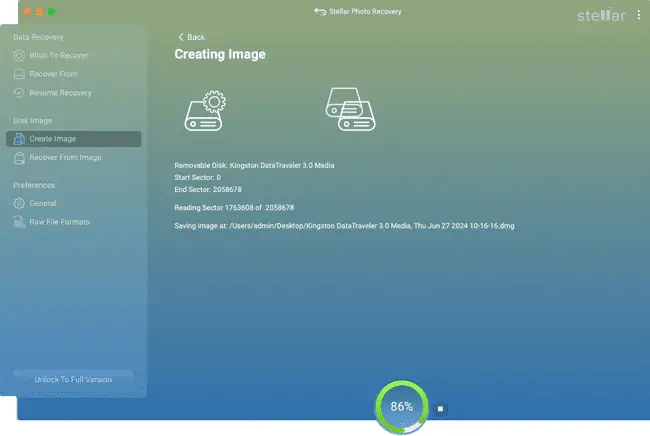 (macOS system drives may require initial extension allowance, refer section 3.2).
 - After image creation, click Scan to initiate recovery from the image. (Click ⏹️ to stop scan).
- Upon scan completion, a dialog box displays found files. Click OK.
Tip: Save scan information files and hard disk images at distinct locations with descriptive names for easy retrieval.
4.4.2. Recovering Data from a Disk Image:
Applicability: This feature is available only in the Professional, Premium, and Technician editions.
Recovery can be performed on previously created disk images using the Load Image option.
Steps:
- Launch Stellar Photo Recovery.
- From the Side Panel, click the 💿 icon, then select Recover From Image
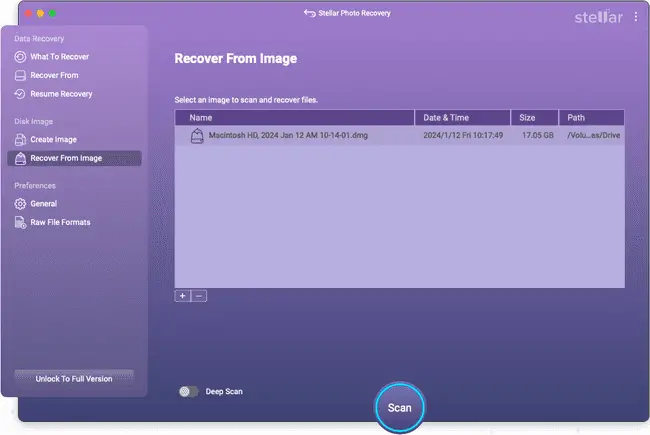 .
. - Select the desired image from the list. (Use ➕ Add if not listed, ➖ Remove to delete from list).
- Click Scan. (macOS system drives may require initial extension allowance, refer section 3.2). (Click ⏹️ to stop scan).
- Upon scan completion, a dialog box displays found files. Click OK.
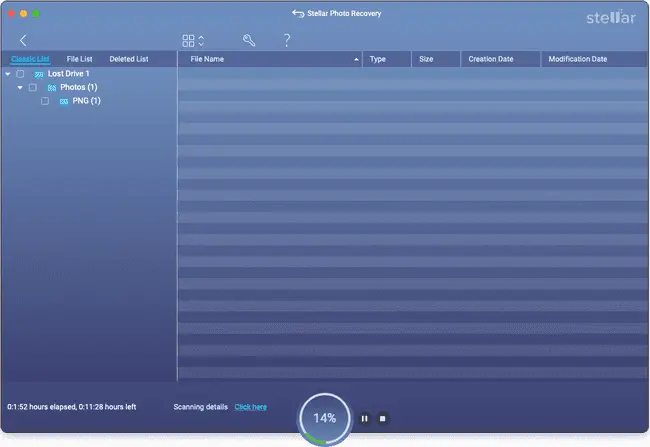
4.5. Deep Scan Functionality:
The Deep Scan option is designed for comprehensive data recovery from severely corrupted volumes or external drives. It searches for lost files based on file signatures, maximizing the recovery of deleted or lost data not found by quick scans.
Steps:
- After a quick scan completes, select the “Click Here” option at the bottom of the preview window to start Deep Scan, or initiate it directly from the “Recover From” screen
 .
. - A scanning process screen will display. (Click ⏹️ Stop to abort).
- Click “Click here” for scan details.
- Upon Deep Scan completion, a dialog box displays found files.
Note: Deep Scan can be performed on previously saved images (DMG) or volumes listed in the ‘Search Lost Volume’ window.
4.6. Other Specialized Recovery Features:
- Memory Card Recovery: Recovers media from damaged, corrupted, or inaccessible memory cards, including various SD cards, Compact Flash, XQD, and more, supporting all major brands.
- Encrypted Drive Recovery: Retrieves media files from BitLocker encrypted drives, volumes, and partitions. Users select the encrypted drive, click ‘Scan’, and enter the BitLocker password. Supports major HDD/SSD/flash drive brands.
- Metadata and Thumbnail Recovery: Recovers files while preserving original metadata (date, camera model, resolution, file name) and supports thumbnail recovery for photos.
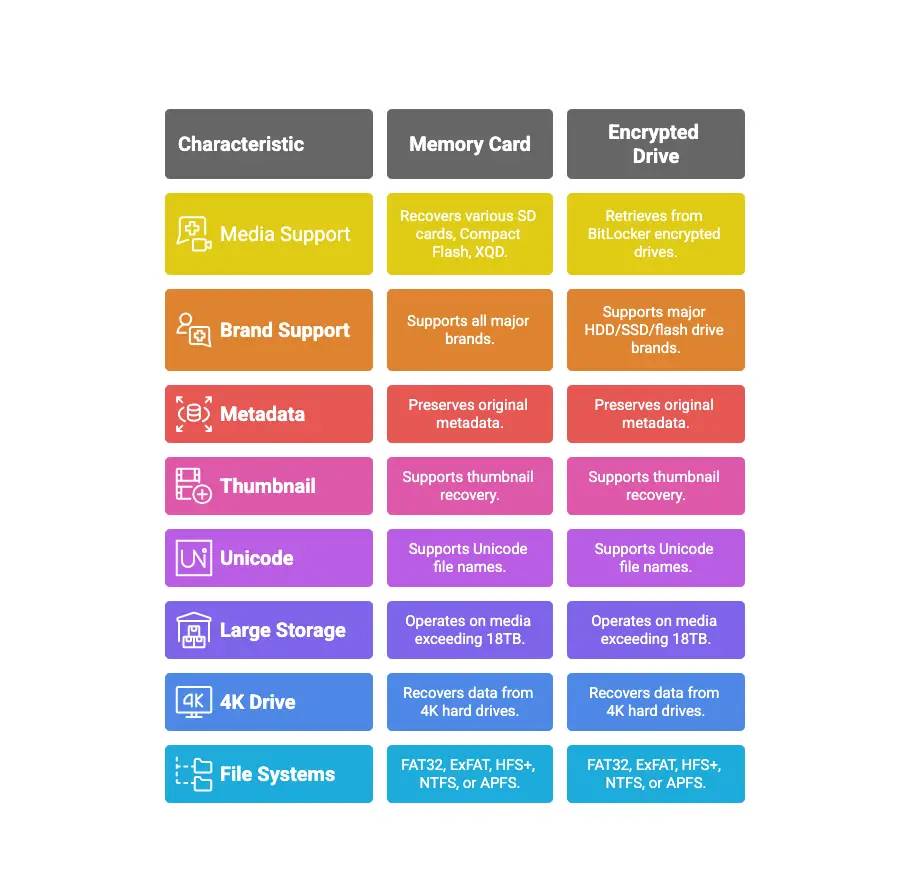
- Unicode File Recovery: Supports the recovery of files with Unicode characters in their names.
- Large Storage & 4K Drive Support: Operates effectively on media sizes exceeding 18TB and recovers data from 4K hard drives (4096-byte sectors) configured with FAT32, ExFAT, HFS+, NTFS, or APFS file systems.
5. Managing Scan Results and Saving Data
Efficient management of scan results and precise file saving are integral to the recovery process.
5.1. Previewing Scan Results:
The software displays found files and folders in a tree structure. Users can preview files before recovery.
Scan Result Views:
- Classic List: Files/folders are listed as found on the disk.
- File List: Files/folders are categorized by type (e.g., Audio, Video).
- Deleted List: Displays only deleted and raw files.
Note: Preview limits apply: up to 10 MB in the demo version, and up to 100 MB in the full version.
Steps to Preview:
- Expand the tree structure and select a folder in the left pane.
- Double-click a file in the right pane to open its preview window.
Searching for Specific Files:
- Click the 🔍 Search button, type the file name, and press Enter.
- Use the ➡️ Find Next Arrow for additional matches.
5.2. Saving Scan Information and Resuming Recovery:
Scan results can be saved to resume recovery at a later point without rescanning the drive.
Steps to Save Scan Information:
- In the “Scan Results” window, click ⬅️ Back or close the application.
- Confirm saving the scan information by clicking Yes when prompted.
- Specify the location and name for the scan information file. Click Save.
Note: A complete scan before saving is recommended for comprehensive recovery.
Steps to Resume Previously Saved Scan Information:
- Launch Stellar Photo Recovery.
- Click the 💿 icon and select Resume Recovery
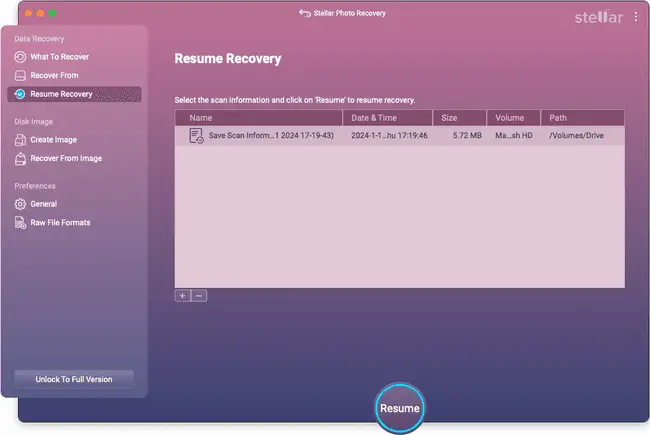 .
. - Select the desired saved scan file from the list (use ➕ Add if not listed, ➖ Remove to delete from list).
- Click Resume. (macOS system drives may require initial extension allowance, refer section 3.2).
- Upon process completion, a dialog box displays found files. Click OK.
5.3. Saving Recovered Files:
After selection, recovered files can be saved to a chosen destination.
Steps:
- From the tree view (or Classic/File/Deleted List), select files/folders for recovery.
- To save all files: Check the root node in the left pane, then click Recover.
- To save an individual folder: Select the folder in the left pane, then check the folder or desired files within it. Click Recover.
- To recover an individual file: Right-click the file in the right pane and select Recover.
- To recover files of a specific type: Go to File List tab, check desired types, then click Recover.
- In the “Recover” dialog box, click Browse to select the destination.
- Click Save. Choose to overwrite, rename, or skip if destination files have identical names.
- Files will be recovered and saved to the specified location.
6. Software Customization: Preferences
Users can adjust various software preferences to optimize the recovery experience, including preview settings, interface themes, language, and file format handling.
Steps to Set Preferences:
- Launch Stellar Photo Recovery.
- On the side-bar, select General settings or Raw File Formats options
 .
. - Adjust settings as required within these sections.
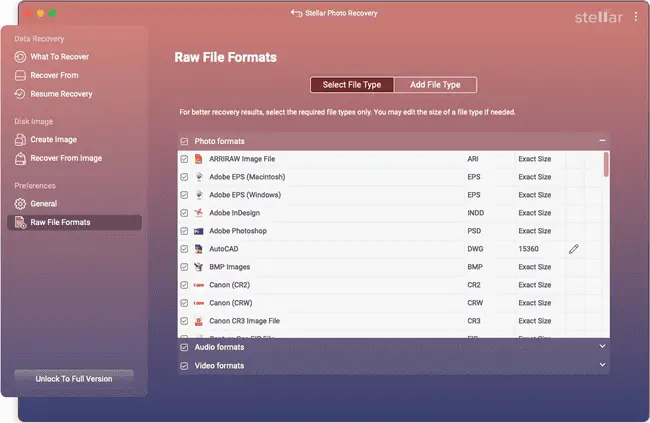
6.1. Raw File Formats Customization:
This allows selection of specific file types for signature-based searches during Deep Scans, potentially accelerating the process and improving results for desired formats.
Steps to Select a File Type:
- Launch Stellar Photo Recovery.
- From the toolbar, select the ⚙️ icon and choose the required file format.
- Select desired file types from the displayed list.
Note: Selecting only required file types can enhance scanning speed and recovery accuracy. File type sizes can also be edited if necessary.
7. Supported File Formats: Comprehensive Listing
Stellar Photo Recovery software offers extensive support for a wide array of camera/image, audio, and video file formats, ensuring broad compatibility for various media recovery needs.
| Camera/Image File Formats | Audio File Formats | Video File Formats |
|---|---|---|
| Canon (CR2 /CRW) | RPS | MOV |
| EPSON (ERF) | AU | AVI |
| Fujifilm (RAF) | OGG | ASF |
| Kodak (K25 /KDC /DCR) | WAV | WMV |
| Konica Minolta (MRW) | MP3 | MP4 |
| Mamiya (MOS) | AIFF | M4V |
| Mamiya (MEF) | MIDI | 3GP |
| Nikon (NEF, NRW) | M4A | MPEG |
| Olympus (ORF) | M4P | DV |
| Panasonic (Raw) | WMA | 3G2 |
| Pentax (PEF) | RM | M4B |
| Sony (SR2, ARW, SRF) | RA | DIVX |
| Sigma (X3F) | ACD | OGM |
| DNG | AMR | MKV |
| DJVU | AT3 | ASX |
| PGM | CAFF | VOB |
| TGA | DSS | MOI |
| Adobe EPS (Mac) | IFF | MTS |
| Adobe EPS (Windows) | M4R | AJP |
| EIP | NRA | F4V |
| IIQ | SND | VID |
| SRW | OPUS | TOD |
| WPG | HDMOV | |
| BAY | MQV | |
| HEIC | SVI | |
| MXF movies | ||
| ANM | ||
| SFD | ||
| FLC |
Common file types such as JPEG, TIFF (Motorola and Intel), BMP, GIF, PNG, PSD, INDD, PSP, PCT, and JP2 are also supported.
8. Professional Editions and Repair Functionalities
Stellar Photo Recovery is available in Professional and Premium editions, offering enhanced capabilities beyond standard data recovery.
- The Professional version provides a complete photo restoration solution, encompassing both deleted photo recovery and the repair of damaged pictures.
- The Premium Edition extends this functionality to include the repair of unlimited corrupt, damaged, or distorted videos and photos from any device, making it a comprehensive utility for professional photographers, videographers, and video agencies.
Additionally, the software offers SMART information (Self-Monitoring, Analysis, and Reporting Technology) about storage drives, providing insights into their health and temperature to help prevent future data loss through proactive backup measures.
9. Edition Comparison and Pricing
Users can choose an edition based on their specific recovery and repair requirements. Below is a comparison of the features and typical pricing for each edition:

The Professional version offers enhanced photo restoration capabilities, including repair of damaged pictures. The Premium Edition extends this functionality further, providing comprehensive repair for unlimited corrupt, damaged, or distorted videos and photos, making it an invaluable utility for professionals in media creation and agencies involved in video production and editing.
Conclusion
In summary, Stellar Photo Recovery stands out as a highly robust and versatile solution for anyone grappling with lost or inaccessible digital media files. Its comprehensive feature set, encompassing deep scanning, extensive file format and drive type compatibility, and specialized support for macOS T2 and M-series chips, positions it as a leading choice in data recovery software.
Whether you need to restore accidentally deleted photos from a memory card, retrieve videos from a corrupted hard drive, or recover audio files from an encrypted partition, Stellar Photo Recovery offers a reliable and user-friendly experience. The ability to create disk images, save and resume scan sessions, and even repair damaged media in its advanced editions further enhances its value, making it an indispensable tool for both casual users and creative professionals. It provides a powerful pathway to reclaiming your cherished digital memories and critical work files.
If you like the content, we would appreciate your support by buying us a coffee. Thank you so much for your visit and support.