The ‘useradd’ command in linux is a popular tool used to create or add user accounts.Much like the command ‘usermod’, the ‘useradd’ command affects many files when it is invoked to create a new user account, namely, /etc/shadow, /etc/passwd, /etc/gshadow , /etc/login.defs, /etc/group. A complete list is shown below :

It will also handle ownerships and permissions on the home folder of the user account which can also be created and populated via the ‘useradd’ command.
The most basic syntax of the useradd command in linux is :
useradd [options] username [useradd Ubuntu]
Adding a new user account
In order to add a new user account, simply invoke the Ubuntu useradd command followed by a uniquely selected username which will be the user with which to log in into the system.
We will now add a new user called net2man:
sudo useradd net2man [ubuntu create user]

How to create user in linux | User creation in linux
Now you might wonder how to set the password for the newly created user net2man ? Since we only created the username, it is now in locked state. In order to unlock it, we would need to set a password for it. This is done as follows with the help of the ‘passwd‘ command :

How to change a user password in linux
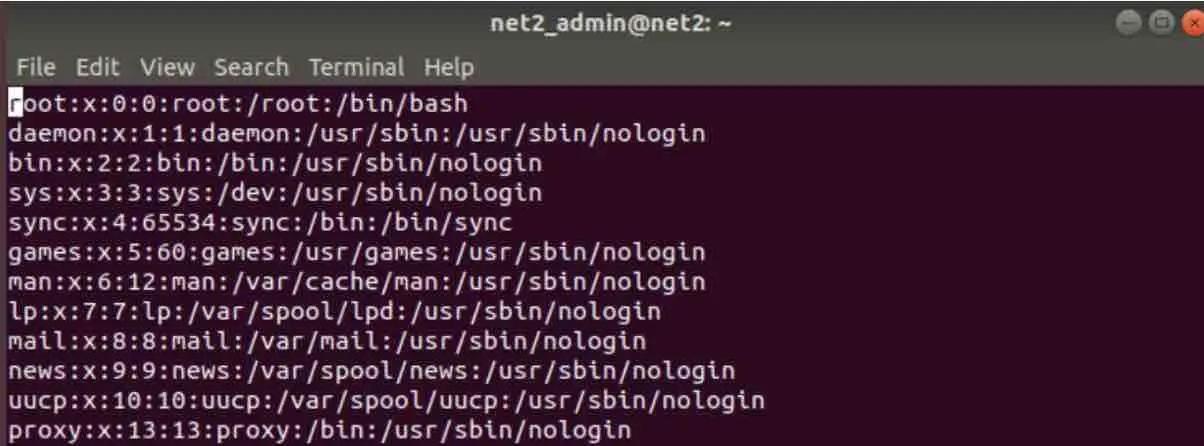
In order to see that this has been accounted for, open the file /etc/passwd which stores the users’ details as soon as they are created.

Now at the end of the file, we will find the entry for the user net2man:

As you can see above, the entry has 7 slots separated by a colon. Here is an explanation for each of these fields :
1 – The username :
![]()
This is the log-in name of the user that was created above with the useradd command. This is the user with which to log-in into the system.The length should not exceed 32 characters.
2 – The password :
![]()
The x character shown above tells that the user has a password. This password is stored in the file /etc/shadow in an encrypted form. If we open the file /etc/shadow, you will see the following :
![]()

3 – The user ID (UID) :
![]()
every time a user is created, it will have a unique UID or User Identification Number.Other technical user accounts have the UID range 1-99 reserved for them , for instance daemon has the UID of 1, whereas the root user has the UID of 0:
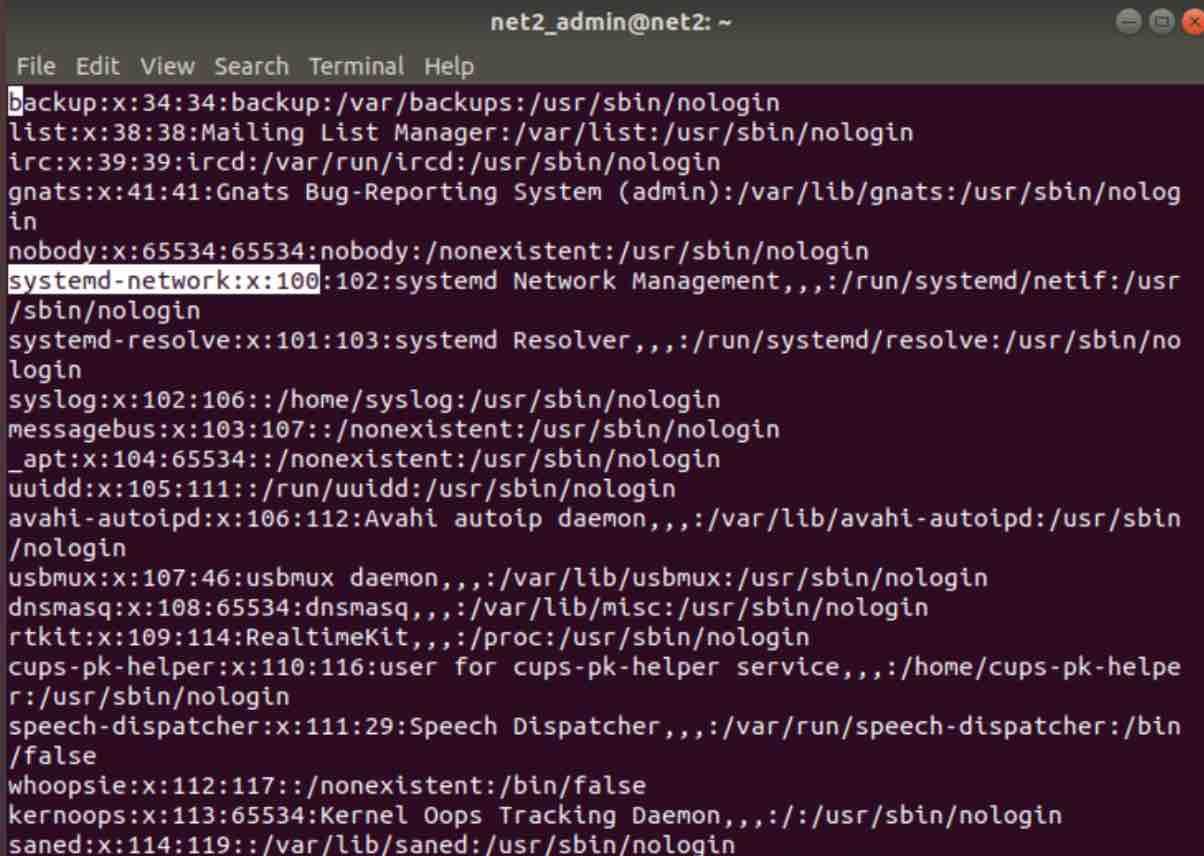
Other entities have the range 100-999 reserved for them, for example system-network has the UID of 100 :
4 – The group ID (GID) :
![]()
This is the group id to which the user belongs to. It is stored in the file /etc/group.
5 – User information :
![]()
In this field (empty above), extra information about the user is provided, for example address or email…this field can be populated using the usermod command with -c option as shown below :

which fills out the empty field above :
![]()
6 – User home directory :
![]()
this defines the home directory of the user.
7 – User’s shell:
![]()
here you will find the users’ shell.
User creation with ID: -u option
When a new user is created, it will have a unique user identification number or UID. This UID will be assigned by default which means that we had no choice in specifying it .Using the -u option, we have the possibility to define a custom UID as follows:
sudo useradd -u 714 net2user

How to add a user in linux
Now to check this has worked, proceed as follows :

where you can see that the uid=714 has been assigned to the test user net2user. You need to make sure beforehand though that the uid is not used by any other existing user.
Adding Users to Multiple Groups: -G option
A user can belong to more than one group. In order to add a user to other groups, the -G option should be used with each group name separated by a comma (without spaces) as follows :
sudo useradd -G rootusers, superusers net2master

where here we are assigning the test user net2master to two groups : rootusers and superusers for instance.
User creation with GID: -g option
Much like the UID, we can also specify a group id whenever we want to create a new user. This is possible using the -g option as shown below :
sudo useradd -g 1004 net2master

where we have created a new user named net2master which has the group id = 1004
User with Account Expiry Date: -e option
Sometimes users need temporary accounts in the system, for example students or visiting technicians . Administrators, in this case, have to set an expiry date for such users. When a user is added, by default, its expiry data is 0 which means it will never expires. In order therefore to set an expiry date (YYYY-MM-DD format), the -e option should be used as follows :
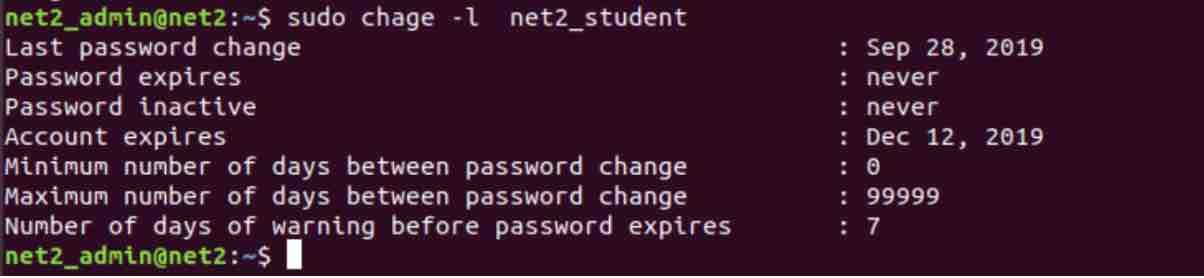
sudo useradd -e 2019-12-12 net2_student

in order to check that the account is indeed temporary with the expiry date as has been set above, run the command below :
sudo chage -l net2_student
You may be interested to read: How to create a Sudo user on Ubuntu
User addition without home directory: -M option
Sometimes it is convenient for system administrators to add users without assigning them a home directory. The default home directory will then be root for such users.
Let us then add a user without specifying a home directory using the -M option :
sudo useradd -M net2_user

as you can see the home directory of the new test user does not exist.
User creation with specific information: -c option
When creating a new user. it is convenient to add some extra information like the address, the phone or the full name. This will be visible in the file /etc/passwd file as was shown above. Let us add some information to a new user :
sudo useradd -c “net2 lab” net2_lab

and if we open the file /etc/passwd, we will see this information for the user net2_lab :
![]()
Changing a user home directory: -d option
The default home directory of the test user net2man is , as we saw above, /home/net2man/. Now we have the possibility to define this value using useradd when we create a new user with the -d option as follows :
sudo useradd -d /home/net2lady_folder net2lady
![]()
our new test user net2lady has now been created. In the file /etc/passwd, we can see its default home directory :
![]()
User creation with a password expiry date : -f option
After the account is permanently disabled, we can specify the number of days after a password is no longer applicable, i.e. expires.
When a user is created, its password never expires, i.e. it is set to -1. As soon as the password has expired however, a value of 0 disables the user account altogether.
For the test user below, we will define a period of 30 days as the password expiry date:

If you like the content, we would appreciate your support by buying us a coffee. Thank you so much for your visit and support.