By Joana Almeida – Python has become a popular language in recent years. Its flexibility, with its ease of learning and use, makes it very appealing to newbie and professional SQL programmers alike.
Structured Query Language (SQL) has become a staple in database technology. The most commonly used Relational DataBase Management Systems (RDBMS) today, such as MySQL, PostgreSQL, Microsoft’s SQL Server, and Oracle, all use SQL to manipulate their databases. Do note that although they all use SQL as their base query language, they are not all equal. Queries for a specific database will likely need slight alterations to function in other databases.
Given their popularity, it’s no wonder that both Python and SQL are commonly used together, be it for Data Analysis, Scientific Analysis, and even Software Development. In his article, we’ll review how to use SQL in Python, from creating a database to manipulating its information. Let’s get started!
Read: The problem of concurrent calls trying to reach the same tables on SQL servers
Setting Up
Before learning how to use SQL in Python, we’ll have to set up our development environment.
The first step is to install both Python and a database to use it. You’ll want to download a Python and SQL database version and install both. For the purposes of this demonstration, we’ll be using the widely adopted MySQL Community Server, which is free!
It’s not over yet! We’ll use a library to help us communicate with the database by constructing SQL queries in Python. MySQL has documentation to help you set up the connector.
If you’re using the Package Installer for Python (PIP), you can install the connector by writing the following line in your command console:
pip install mysql-connector-python
Read: How to use Yield in Python
Using SQL with Python
Now that we have our environment set up, it’s time to get our hands dirty and start coding!
Before anything else, we need to import our recently installed connector to help us connect to our MySQL Server and create further queries afterward.
import mysql.connector
Read: Can Your Enterprise choose Python for Software Development?
1. Connect to a MySQL Server
Time to make our first step and connect to our server. To do so, we’ll need a connection:
|
import mysql.connector try: |
|---|
Remember to change the connection’s properties based on the setup of your SQL server.
So, what’s happening here?
The try … except block is used to contain code that is prone to errors (in this case, the establishment of our connection). The except part will run when an error of the specified type occurs and immediately halt the execution of the try block. If no error occurs, the code inside the try block is run, the except part is ignored, and the code continues executing as normal.
Read: How to create a Modern Python Development Environment
2. Creating a Database
Now that we’ve established a connection to our server, it’s time to start playing with it. Time to create a Python SQL database!
We’ll be expanding on the code set in part 1.
|
import mysql.connector try: # —– NEW —– except mysql.connector.Error as err: |
|---|
This is where SQL knowledge starts to matter: we’ve just used our first SQL query in Python.
Read: How to Use and Connect MariaDB GUI and Command Line Clients
| CREATE DATABASE library |
|---|
This is a simple query to create a database. Our example will revolve around the management of a library, so we’re aptly naming its library.
Let’s establish exactly what this database will contain:
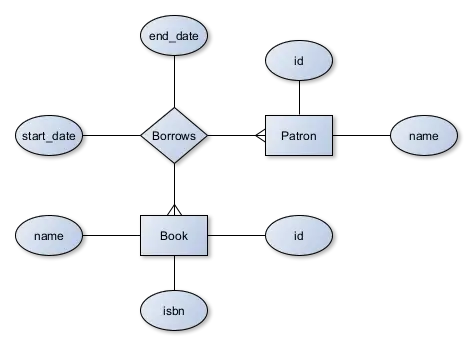
Since this is a starting example, we’re not looking for a complex database. You can easily expand on this starting set with the concepts we’ll teach you.
For now, we’ll have two entities (Patron and Book, each represented by a table) and a relationship (Borrows, also represented by a table). A book can be borrowed by many patrons (although ideally one at a time, which is why we’re setting up dates for the borrowing period), and patrons can borrow any number of books throughout their membership.
Read: 6 Reasons why you Should Learn Python
3. Executing Queries
Time to get a Python SQL query going! We’re going to create two functions that will help us connect to the database and execute queries to avoid repeating ourselves in the following steps.
|
def get_db_connection(host_name, user_name, user_password, database_name): return connection |
|---|
This should be self-explanatory, since it’s very close to what we had before when creating a connection to our server. However, this time we’re adding a database_name to connect directly to a specific database.
|
def execute_query(connection, query): |
|---|
We need a cursor, provided by our connection, to execute our queries. Then we commit the query to permanently propagate the changes it makes to our database. Standard SQL procedure.
Read: How to use the logging module in Python
4. Creating Tables
Time to fill the database with something! In this case, we’re starting with the tables we’ve defined previously: Patron, Book and Borrows.
|
create_patrons = “”” create_books = “”” create_borrows = “”” connection = get_db_connection(“localhost”, “username”, “password”, “library”) # Establish a connection to the database |
|---|
Now all our tables are created! We can start filling them up with helpful information in the form of table entries.
Note: Many complications can arise from this simple setup when borrowing a book. As it stands, a patron borrowing a book at a certain date will not preclude the database from adding another entry for the borrowing of a said book when it’s not available. So be aware that this could do with a more complicated setup to ensure you can only borrow books currently not being borrowed. However, this goes beyond the purpose of this article.
Read: 8 Programming Languages that Every Teachie Should Master
5. Adding Entries
Time to populate the tables we’ve just created! Let’s add a few patrons and books to our library! We’ll also add some entries for borrowed books.
|
insert_patrons = “”” insert_books = “”” insert_borrows = “”” connection = get_db_connection(“localhost”, “username”, “password”, “library”) |
|---|
6. Reading Data
The information is now safely stored in our database. Time to read it! Information is only useful if it can be accessed after all! Let’s define a function to help us read from our database.
|
def read_query(connection, query): |
|---|
Pretty similar to our execute_query function. However, instead of committing, we’re reading the information our query has asked from the database using fetchall.
Read: How to Choose a Programming Language to Learn
Let’s test it out!
|
query_patrons = “”” connection = get_db_connection(“localhost”, “username”, “password”, “library”) for result in results: |
|---|
And the output of our example:
|
MySQL database connection was successfully established. |
|---|
7. Changing information
Information changes all the time, and databases should be updated accordingly. To do that, we only need to execute an UPDATE query. Let’s see it in action in a Python SQL example.
Miss Evelyn got married and changed her name. She comes to the library to change her record as well.
|
update_evelyn = “”” connection = get_db_connection(“localhost”, “username”, “password”, “library”) |
|---|
The WHERE clause is the determining factor when deciding which entries get updated. In this case, we’re updating a single entry with a specific id. Make sure you set your WHERE clause properly, or you’ll risk changing whole sections of your database without wanting to!
Read: 7 Tips to create a database for beginners
8. Deleting Entries
Sometimes information is no longer relevant, and must be deleted. That’s what the DELETE clause does.
Mister Terrence is moving and will no longer be a patron of our library, so the time has come to remove him from our records.
|
delete_terrence = “”” connection = get_db_connection(“localhost”, “username”, “password”, “library”) |
|---|
Remember that deleting an entry can have ramifications across your database. We’ve previously established that our foreign keys on the borrows table have the ON DELETE CASCADE clause, meaning that when we delete Mister Terrence, all bookkeeping related to the borrowed books will be deleted. If you want to prevent this from happening, you’ll need to define some other behavior when deleting entries.
The CRUD Framework
You now have the knowledge required to perform the 4 basic operations when managing data:
- Create
- Read
- Update
- Delete
From here on out, all your knowledge and further learning will expand on these 4 key principles. Remember that complex operations can often be partitioned into atomic operations from this CRUD framework. Always refer to it as your base.
Conclusion
Using databases can be extremely useful for maintaining records and keeping information. Manipulating them becomes necessary to make the most out of the information contained within, especially when dealing with a lot of it. No matter if you’re a newbie or a professional looking for a new skill set, we hope this article was useful in bridging the gap between knowing how to create and maintain a SQL database and Python coding!
Author bio:
Joana Almeida is a programmer, hobbyist game developer and tech writer for Distantjob.com. She has worked primarily as a software developer and video game programmer at consulting companies.
If you like the content, we would appreciate your support by buying us a coffee. Thank you so much for your visit and support.