When a web server refuses access to a specific webpage or web content, it presents the 403 Forbidden error. Various web servers may show distinct versions of the 403 Forbidden error.
This guide will provide insights into the nature of a 403 error and offer solutions to resolve it.
What Is the 403 Forbidden Error
The 403 Forbidden error occurs when a web server refuses access to a webpage for a user attempting to reach it through a web browser. The term “403 error” originates from the HTTP status code used by the webserver to indicate this type of error.
This error has various manifestations, and its denial of access can stem from different reasons. The upcoming sections elaborate on the diverse presentations of the error and the underlying causes for the web server’s access denial.
Read: What are DNS record types
Common 403 Error Messages
Similar to other errors, webmasters can customize the appearance of the 403 error, and its specific content varies based on the web server in use. Consequently, there exists a multitude of distinct 403 pages across various websites. Below are some prevalent 403 error messages:
- 403 Forbidden
- HTTP 403
- Forbidden
- HTTP Error 403 – Forbidden
- HTTP Error 403.14 – Forbidden
- Error 403
- Forbidden: You don’t have permission to access [directory] on this server
- Error 403 – Forbidden
- 403 Forbidden Error
- 403 Error
Read: 10 Windows 11 hidden features you need to know
403 Forbidden Error causes
The 403 Forbidden error is a consequence of access misconfiguration, particularly involving incorrect read, write, or execute permission settings for a file or directory. Several factors can contribute to encountering the 403 Forbidden error:
- Empty Website Directory:
- The absence of an index.php or index.html page in the website directory triggers the 403 error.
- Missing Index Page:
- If the homepage isn’t named index.html or index.php, the 403 error may manifest.
- Permission/Ownership Errors:
- Improper permission settings or ownership issues can result in the 403 error.
- Incorrect .htaccess File Settings:
- Corruption of the .htaccess file, which holds crucial configuration settings, is a potential cause of the 403 error.
- Malware Infection:
- The presence of malware in files can continually corrupt the .htaccess file, leading to the 403 error.
- Cached Outdated Webpage:
- Changes in the page link, deviating from the cached version, can trigger the 403 error.
- Faulty Plugin:
- Improperly configured WordPress plugins or their incompatibility might initiate the 403 error.
The subsequent section provides insights into various methods of resolving the 403 Forbidden error.
How to Fix the 403 Forbidden Error
To resolve the 403 Forbidden error, potential solutions vary for website visitors and webmasters. The subsequent strategies aim specifically at assisting webmasters encountering the 403 Forbidden error.
Check Website Directory
The occurrence of a 403 error may result from an empty website directory. Ensure that your content is appropriately located in the server’s designated directory. Depending on the server type, use the correct directory path:
– For Nginx: /var/www/vhosts/domain.com/httpdocs/
– For Apache: /home/username/public_html/
Create the specified directory if it does not already exist.
Read: How to password protect a folder in Windows 10
Add an Index Page
The default homepage for a website is usually index.html or index.php. If this page is absent, visitors may encounter a 403 Error. To resolve this, upload an index page to your httpdocs or public_html directory. If your homepage has a name other than index, you can either rename it or establish a redirect in your .htaccess file.
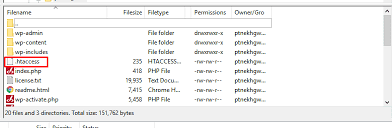
Caution: Editing the .htaccess file impacts server configuration and can alter your web server’s behavior. Although typically hidden, you can locate it in your public_html directory by enabling the Show Hidden Files option.
To set up a redirect for your homepage, follow these steps:
1. Log in to cPanel and go to your public_html directory.
Note: Alternatively, you can download and edit the .htaccess file locally using an FTP client instead of cPanel.
2. Right-click the .htaccess file and select Edit from the dropdown menu.
3. Redirect the index.php or index.html file to your current homepage by adding the following code snippet:
redirect /index.html /homepage.html
Replace homepage.html with the actual name of your page.
Check File and Directory Permissions
Each file and directory on your website is assigned permissions that regulate access. Incorrect permissions can trigger the 403 Forbidden error, specifying who can read or write to a particular file or directory. Permissions are denoted by numeric values, typically using:
– 755 for directories
– 644 for static content
– 700 for dynamic content
Note: Linux file permissions may involve numbers, letters, or words, indicating whether the file is assigned to the Owner, Group, or Both.
Use the chmod command to recursively modify file permissions, or opt for a graphical interface by employing an FTP client for changing file or directory permissions.
Read: How to manage permissions in Linux – Guide for beginners
Create a New .htaccess File
A 403 error can arise from an Incorrect .htaccess file setup, as this file governs high-level website settings. To determine if the .htaccess file is causing the 403 error, follow these steps:
1. Locate the .htaccess file using file management software (such as cPanel) or an FTP or sFTP client.
2. Right-click the .htaccess file and choose Download to create a local backup.
3. Delete the file by clicking Delete.
4. Visit your website. If the 403 error is no longer present, the .htaccess file is likely corrupt.
5. Generate a new .htaccess file by logging into your dashboard and navigating to Settings > Permalinks.
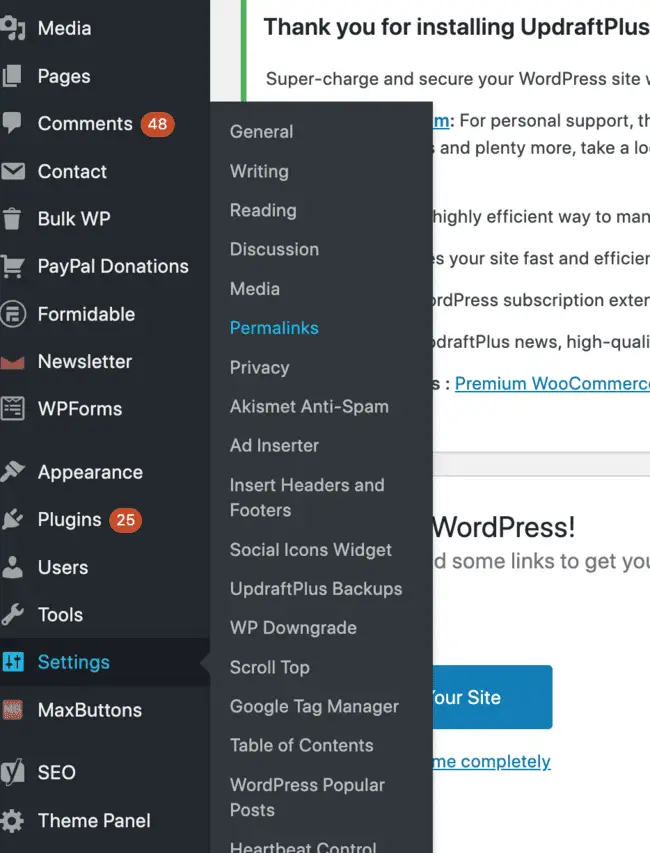
6. Without making any changes, click the Save Changes button to create a new .htaccess file.
Check your website to ensure the error has been resolved.
Enable Directory Browsing
Indicate the DirectoryIndex directive within the .conf file of the site (found in /etc/apache2/sites-available on Linux):
<Directory /usr/local/apache2/htdocs/listme>
Options +Indexes
</Directory>
Contact the Hosting Company
If all else fails to resolve the 403 Forbidden error, consider reaching out to your hosting company. They can investigate and identify any issues causing the problem.
Disable WordPress Plugins
Sometimes, a faulty or incompatible plugin might trigger a 403 Forbidden error. To troubleshoot, follow these steps:
– Log in to WP Admin and navigate to Plugins > Installed Plugins.
– Deactivate all plugins by selecting them, choosing “Deactivate” from the drop-down menu, and clicking Apply.
– Access your website again. If the 403 error is no longer present, it indicates a plugin might be causing the issue.
– Gradually enable one plugin at a time to identify the problematic one. Once found, either update, remove, or replace the plugin to resolve the issue.
Read: 8 Best WordPress SEO Plugins to Boost Your Rankings
Check the A Record
A potential cause of the 403 Forbidden error is a domain name directing to an incorrect IP address, where viewing permission is lacking. This situation may arise if the A DNS record of a migrated website still points to the old IP address. To verify if the domain A record is correctly pointing to the right IP address, follow these steps:
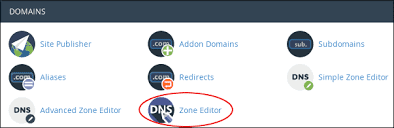
1. Log in to cPanel.
2. In the section ‘Domains’ , access DNS Zone Editor.
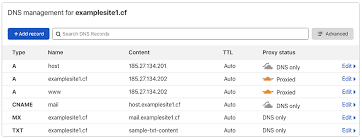
3. In the DNS records list, locate the record with the A label in the Type column.
4. Examine if the A record’s IP address in the Record column is accurate. If incorrect, click Edit to make the necessary changes.
5. Complete the process by clicking Update.
Revisit the website to confirm if the issue has been fixed.
Scan for Malware
The presence of malware on your web server could lead to the 403 Forbidden error. Malware may continuously inject unwanted lines into the .htaccess file, causing the error to persist even after generating a new .htaccess file.
Employ a security plugin to scan your web server for malware and take appropriate actions upon detection. Many plugins provide options for dealing with infected files, including deletion or restoration. Notable security plugins for WordPress include Sucuri, Wordfence, Defender, and more.
If you like the content, we would appreciate your support by buying us a coffee. Thank you so much for your visit and support.