Linux partition managers are robust tools that empower users to create, adjust, and oversee various partitions on their Linux-based systems. These partitions act as distinct segments of the hard drive that enable the storage of diverse types of data,
including operating systems, documents, media files, and more. By utilizing a partition manager, you can effortlessly create new partitions, delete old ones, or modify existing ones to better cater to your system requirements.If you’re a Linux user on the hunt for the top-notch partition managers, then you’ve come to the right place. In this article, we’ll highlight some of the best partition managers available in the Linux world. So, whether you’re a beginner or a pro, you’ll find some great options to choose from.
Read: How to read a Mac formatted drive on a Windows PC
Gparted
GParted is a commonly used partition manager for Linux systems, known for its user-friendly graphical interface. It is suitable for both beginners and advanced users, as it allows creation, deletion, and resizing of hard drive partitions with ease. The software supports a wide range of file systems including ext2, ext3, fat16, hfs+, jfs, ntfs, and xfs, providing users with flexibility in managing their partitions. GParted also allows easy modification of existing partition table entries. Installing GParted is straightforward, as it is usually found in the default package repositories of various popular Linux distributions.
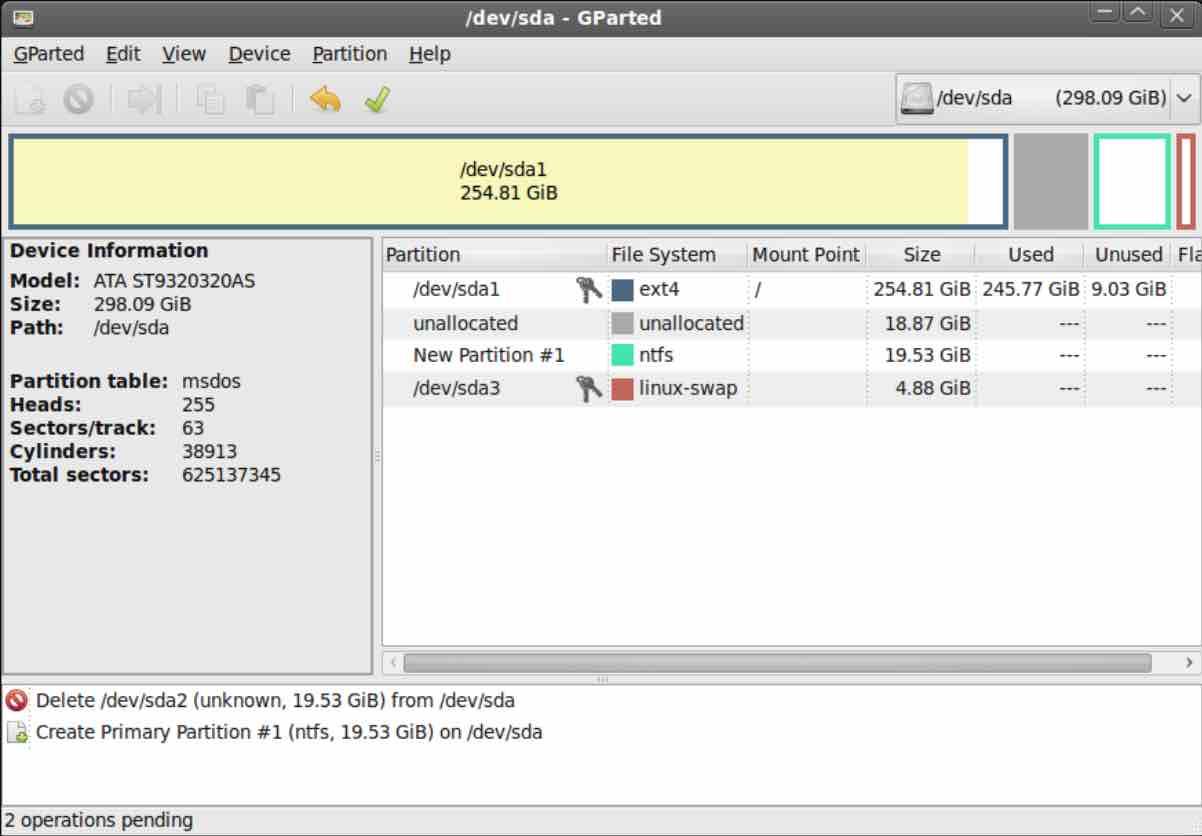
Once installed, the program can be accessed via the system menu or by entering the “gparted” command in the terminal. With GParted, you can have complete control over your partition management needs.
Read: Moving the Home folder to another partition in Ubuntu
KDE Partition Manager
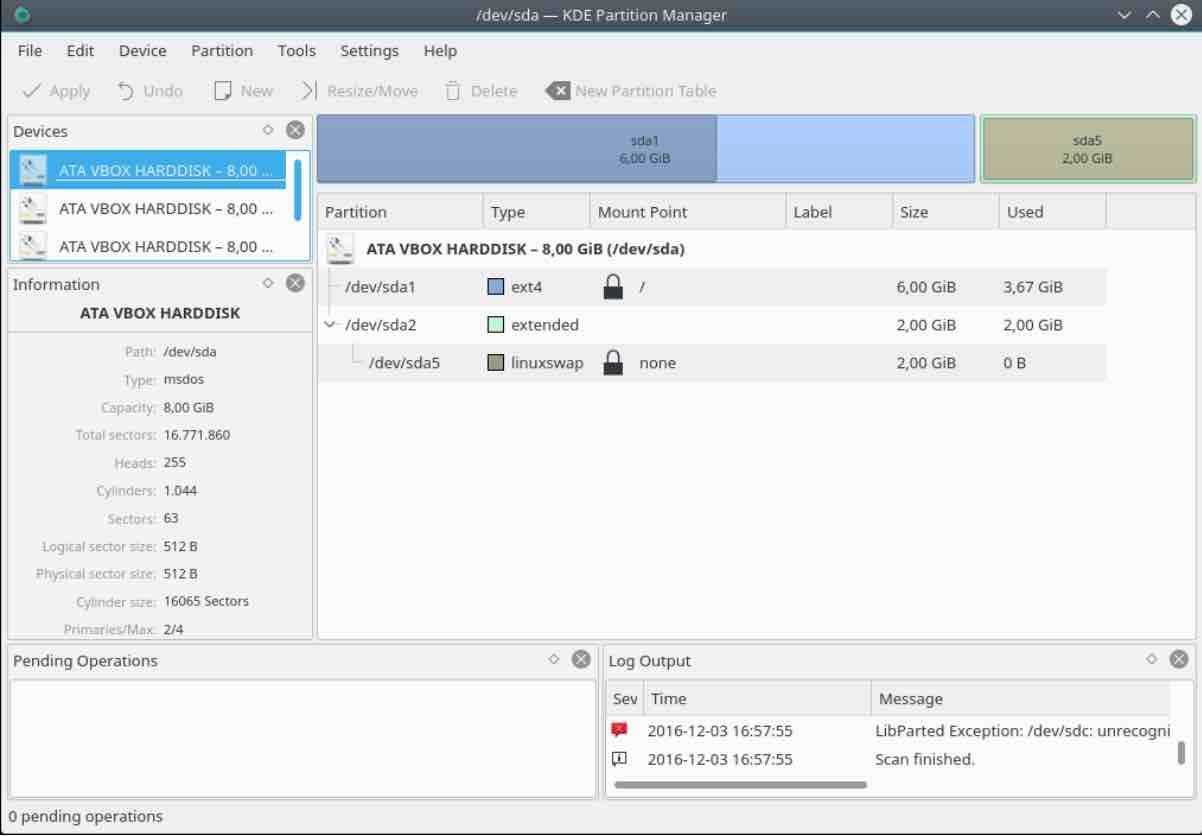
KDE Partition Manager is a partition management tool specifically designed for Linux systems that operate under the KDE desktop environment. This graphical tool provides a wide array of features and utilities that allow users to create, delete, and resize partitions on their hard drives. Moreover, it also allows users to view and modify partition table entries.
The KDE Partition Manager offers various tools and features to simplify the process of partition management. It supports an extensive range of file systems such as ext2/3/4, btrfs, reiserfs, NTFS, FAT16/32, JFS, XFS, and many more, making it an ideal choice for managing systems with multiple file systems.
Read: How to restore GRUB Bootloader in Ubuntu
With the KDE Partition Manager, users can create new partitions and resize existing ones according to their needs. The tool provides a plethora of options for specifying the size and location of partitions, as well as the file system to be used. It also allows for the deletion of existing partitions that are no longer necessary, freeing up space on the hard drive or reorganizing data. The tool additionally facilitates partition table management, allowing users to view and modify partition table entries, which can be useful in correcting errors or adjusting partition layouts on the hard drive.
KDE Partition Manager also includes disk analysis and repair tools, which enable users to analyze and repair disk errors. This is particularly useful for maintaining the health of the hard drive.
Installing KDE Partition Manager is a hassle-free process, as it’s typically included in the default repositories of Linux distributions that use the KDE desktop environment. Users can simply use their distribution’s package manager to search for “KDE Partition Manager” in their system menu, or enter “partitionmanager” into a terminal. After installation, users can witness the transformative power of this software in organizing and managing their Linux system’s data.
Read: How to fix : Unable to install GParted on Ubuntu
GNU Parted – (using the terminal)
GParted is a state-of-the-art and adaptable partition management software that works with almost any file system. It not only provides easy-to-use tools for creating, deleting, and resizing partitions, but also supports a variety of different file systems. In a nutshell, using GNU Parted makes managing your hard drive a piece of cake.
One of the main benefits of GParted command line is its versatility. As a command-line tool, it can be used from the terminal and is highly customizable. This makes it an ideal choice for advanced users who require more control over their partitioning operations.
Another benefit of GNU Parted is its extensive range of supported file systems. It can work with a variety of different file systems, which makes it an excellent option for users who need to manage systems with multiple file systems.
Furthermore, GNU Parted is free and open-source software, which means that it is available to everyone for use and modification. This makes it a fantastic option for users who want to take advantage of the latest features and improvements without having to pay for proprietary partition management software.
If you’re an advanced user looking to manage your Linux system at a low level, GNU Parted is the way to go.
Read: Switching between different Linux distributions without losing data
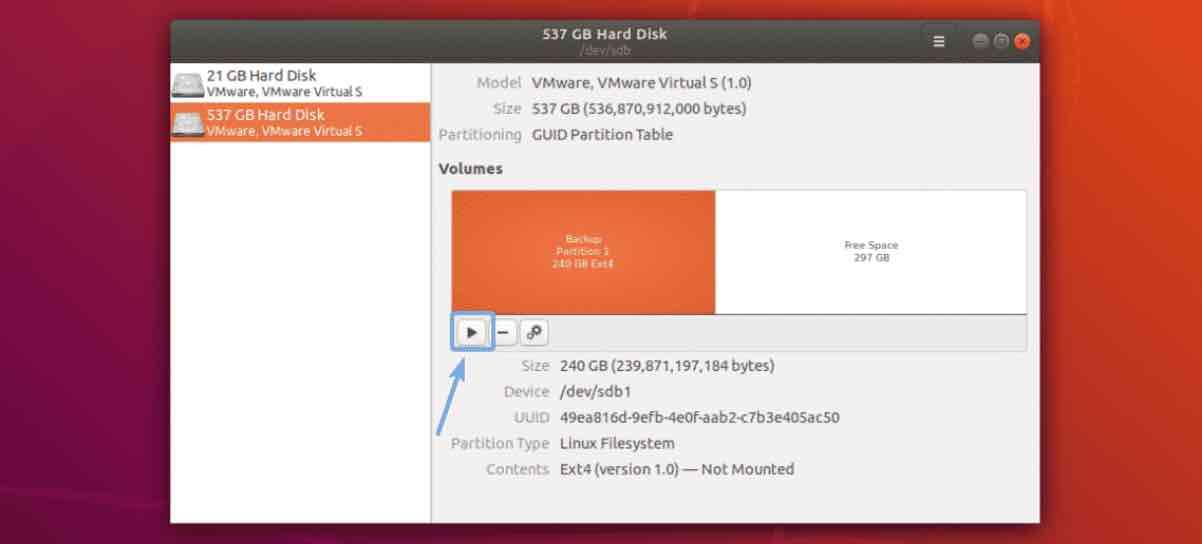
GNOME Disks
GNOME Disks is a user-friendly partition manager created for Linux systems. It’s integrated into most major Linux distributions and is the perfect tool for segmentation when using the GNOME desktop environment, providing an intuitive experience. Installing GNOME Disks is easy, as it’s available in most popular Linux distributions’ default repositories, making it effortless to install through your distribution’s package manager. Once installed, locate “Disks” in the system menu or type “gnome-disks” into a terminal, and you can immediately manage your device using the straightforward interface with various options such as creating, deleting, and resizing partitions.
Using GNOME Disks as your partition manager on a Linux system has several advantages. Firstly, it has a straightforward and user-friendly interface, which is designed to be easy to understand and navigate, making it an excellent choice for beginners and advanced users. Secondly, it supports a broad range of file systems, including ext2, ext3, ext4, fat16, fat32, hfs, hfs+, jfs, linux-swap, ntfs, reiserfs, and xfs, making it an excellent option for managing systems with multiple file systems. Thirdly, GNOME Disks allows users to customize the way it displays information and configure different settings to suit their needs, making it a flexible and adaptable tool that can be tailored to the specific needs of each user. Additionally, it’s free and open-source software, which means that it’s available for anyone to use and modify, and it’s widely available, as it’s included in many popular Linux distributions.
Read: How to install BalenaEtcher on Ubuntu 20.04
GNOME Disks is a user-friendly and feature-rich partition manager that’s suitable for a wide range of users and use cases.
Fdisk – (using the terminal)
fdisk is a great tool to help you mess with your hard drive. It can help you create or delete partitions, or even tweak entries in your partition table. For those seasoned system administrators out there, fdisk can give you more control over your system. It’s a powerful utility that lets you modify your system’s storage with just a few simple commands.
To work with fdisk, all you need to do is open up your terminal and type in the fdisk command, followed by the name of the device you want to control. For instance, if you wish to manage the first hard drive on your system, type in “fdisk /dev/sda”. This will display a list of options that you can use to create, delete, or adjust partitions on your hard drive. If you need to make a new partition, choose the “n” option and follow the instructions to define the size and location.
It’s important to keep in mind that fdisk is both powerful and hazardous. It has the potential to remove or modify your partitions irreversibly, leading to data loss. Hence, it’s crucial to back up any vital information before using fdisk. Additionally, take the time to read the documentation carefully and understand how the options operate before making any changes to your partitions.
Read: How to speed up Linux
ntfs-3g
NTFS-3G is an exceptional software tool that provides a wealth of benefits to Linux users. Not only is it free and open-source, but it also enables Linux systems to both read from and write to NTFS partitions. This is a remarkable feature that allows users to transfer files between Linux and Windows systems and gain access to files stored on NTFS partitions from within Linux.
NTFS-3G is built on top of the NTFS file system, which ensures that users have full read and write access to files and directories stored on NTFS partitions. As a result, it is an excellent tool for users who work with large files and partitions, as it can handle them with ease. Additionally, NTFS-3G is compatible with a wide range of Linux systems, including popular distributions such as Ubuntu, Debian, Fedora, and CentOS.
One of the most significant benefits of NTFS-3G is its ability to automatically handle the mapping of Linux and Windows permissions and ownership. This feature ensures that users can access and modify files stored on NTFS partitions without any difficulties. In addition, NTFS-3G smoothly integrates with the Linux file system, allowing users to effortlessly access NTFS partitions as if they were inherent to the Linux system.
Overall, NTFS-3G is an essential tool for anyone who needs to transfer files between Linux and Windows systems or access files stored on NTFS partitions from within Linux. Its flexibility and power make it an indispensable tool for users who work with large files and need to seamlessly access and modify them.
cfdisk – (Using the terminal)
cfdisk is your go-to tool for partitioning your hard drives. This command-line utility is easy to use and helps you create, delete, and modify your partitions quickly. Whether you’re a beginner or an experienced user, cfdisk makes it easy for you to manage your computer’s partitions and enhance your workflow.
With cfdisk, you can optimize your computer’s performance by managing your partitions effectively. To get started, open a terminal and type in “cfdisk /dev/sda” to manage your first hard drive. You’ll see a list of options on your screen. Use the arrow keys to choose “New” and press Enter to create a new partition. Then, specify the size and location of your new partition, choose the type of partition, and press Enter to confirm your selection.
After creating your new partition, select “Write” to save the changes to the partition table, and then choose “Quit” to exit cfdisk.
Read: How to fix high memory usage in Linux
GPT fdisk – (using the terminal)
GPT fdisk is a tool for managing partitions on your hard drives if you’re using Linux. With GPT fdisk, you can create and manage GPT partitions, which is a GUID Partition Table. You can also do other things like create hybrid MBR/GPT partitions and find partition types and associated GUID numbers.
If you have partitions that are no longer needed, GPT fdisk also allows you to delete them. It’s really simple to install because it’s often already in the default repositories of Linux distributions that use the KDE desktop environment.
To make a new partition using GPT fdisk, here’s what you should do:
First, open up a terminal and type in the gdisk command, followed by the name of the device you want to manage. For instance, to manage the first hard drive on your system, you could enter the command: gdisk /dev/sda.
Once you’re in GPT fdisk, you’ll see a list of options. Use the arrow keys to choose the “New” option and hit Enter.
Next, follow the instructions to specify the size and location of your new partition. You’ll also be asked to pick a partition type. Choose the right option and hit Enter when you’re done.
After you’ve made the new partition, use the arrow keys to select “Write” and hit Enter. This will write the changes to the partition table.
Finally, use the arrow keys to choose “Quit” and hit Enter to exit GPT fdisk.
Just like cfdisk, it’s essential to remember that GPT fdisk is a powerful partition manager, and accidentally deleting or modifying partitions can lead to data loss. So it’s important to back up your important information securely before using GPT fdisk, and to read the documentation carefully to understand how to use its different features.
LVM (Logical Volume Manager)
LVM, or Logical Volume Manager, is a really helpful tool for handling disk storage on Linux systems. It lets you create virtual partitions, called logical volumes, that can be set up independently of how the hard drives are physically arranged on the system.
One of the best things about LVM is its logical volume management feature. You can make, change, or delete logical volumes and also view and modify their settings. This feature is especially useful when dealing with storage spaces that aren’t limited by the physical arrangement of hard drives.
LVM is compatible with a wide range of file systems, such as ext2, ext3, ext4, fat16, fat32, hfs, linux-swap, hfs+, jfs, ntfs, reiserfs, and xfs. This makes it a versatile tool for managing systems that have different file systems.
Another great feature of LVM is that you can resize and move logical volumes without much effort. This makes it really easy to adjust the storage space on a system as your needs change.
LVM also lets you create snapshots of logical volumes, which are copies of the data stored on the volume at a specific moment in time. This feature is really useful for creating backups or going back to an earlier state if needed.
LVM has support for striping and mirroring, which allows you to distribute data across multiple physical drives to improve performance or create redundant copies of data for added reliability.
Read: Securing Ubuntu: Best Practices for Keeping Your System Safe
cgdisk – (using the terminal)
Cgdisk is a Linux command-line tool used for managing partitions on hard drives that use the GUID Partition Table (GPT) format. It allows users to create, delete, and modify partitions with ease, making it a great choice for both novice and experienced users.
Installing cgdisk is a simple process, as it’s usually included in the default repositories of most popular Linux distributions. You can use your distribution’s package manager to install it quickly and easily.
To start using cgdisk, open your terminal window and type “cgdisk”. If you want to manage the first hard drive on your system, just type this command: cgdisk /dev/sda.
After launching cgdisk, you’ll see several options to create, delete, or modify partitions on your hard drive. To create a new partition, select the “n” option and follow the instructions to specify its size and location.
If you like the content, we would appreciate your support by buying us a coffee. Thank you so much for your visit and support.