NOTE: The actual contents and opinions are the sole views of the author who maintains editorial independence.
Lately, there have been many user reports regarding an error that states Outlook data file cannot be accessed’ during use. Since this is a common issue, this article will be devoted to fixing it.
How do those who are using devices with Windows 10 get rid of this error message? First off, you can try to create a new account on Outlook. If that doesn’t work, there is also a Repair function that can be helpful. In other cases, a new pst file setting may be efficient.

For more details, use the following guide.
A system error message: Outlook data file cannot be accessed. How to solve this problem?
- Create a new Outlook profile
You can try to fix the issue by creating a new Outlook account.
The algorithm is the following:
- Open the menu by pressing Windows Key with X (Win + X) and go to the Settings section.
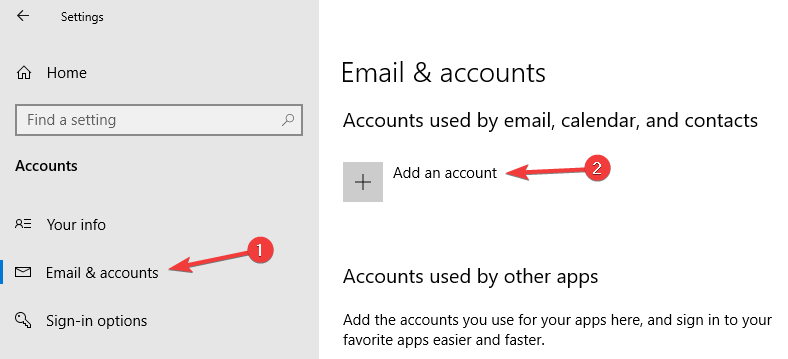
- In Settings, choose Accounts, then Email & accounts.
- Select the option Add an account.
- In the new window, choose E-mail Account. Fill out all the information required. Move on to the next step.
- Confirm by clicking the Finish button. Your account is done!
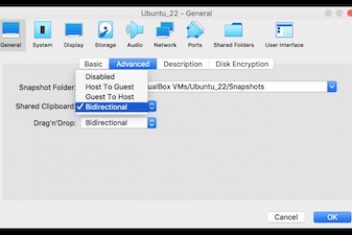
The procedure is automatic, and the creation of an IMAP profile is done by default. This is done in case the server of the email supports it. You can also set the configurations manually. Before manual settings, you need to place the data file on Outlook.
Read: Free OST Viewer online
The algorithm is as follows:
- Select User Accounts (Mail) from the Control Panel.
- After opening the Setup window, choose the Show Profiles option. Select your current account and choose Properties.
- Go to Data Files by clicking its button.
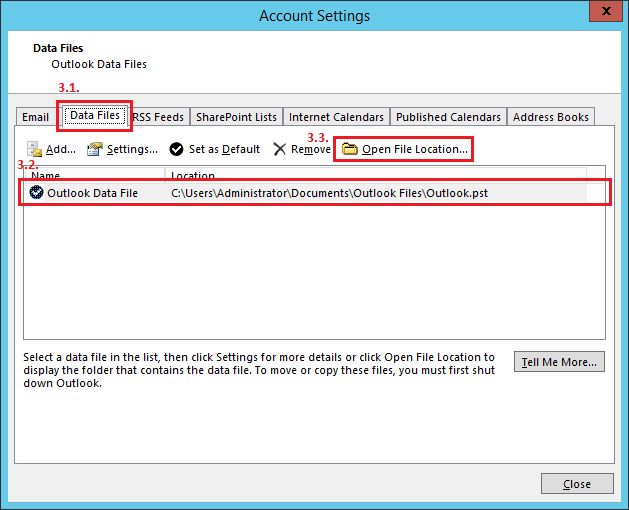
- In the new window of Account Settings, move to the Data Files tab. The name and placement of the data file will be available. Keep this information in mind or write it down somewhere – it will be required for further actions.
For manual configurations, follow the algorithm:
- Enter User accounts (Mail) from the Control Panel;
- Select the Add option;
- Fill out your account name, then confirm by clicking OK;
- In the options window Add New Account, choose the server for manual settings or extra types of server;
- In the box Choose service dialog, find a setting window for Internet E-mail;
- In new messages delivery, indicate Existing Outlook Data File, choose Browse option, and place the data file;
- Move to the next step. Your account is ready!
Some customers back up their data files and remove their existing profile before developing a new one and synchronizing it to the file. Remember, that while new account development will delete all the saved configurations, this action should remove the error as well.
2. Place the data file to its place set by default
Some customers say that the error message Outlook data file cannot be accessed may disappear after placing the file back in its original position.
According to them, file replacement to its location by default was helpful, and the error vanished completely. However, after this, you will need to restart your device.
3. Inbox Repair Tool
Another way to solve the issue is by using the Inbox Repair Tool. You can reach it through the Control Panel in the Mail section. You need to run the repair process and wait until it’s over. In case Scanpst Inbox repair tool fails then we recommend to use paid tool Stellar Repair for Outlook.
In your repaired Outlook, the error should go away.
4. Verify the placement of the delivery
According to some reports, the error can appear because of improper delivery placement. Normally, there is a Personal Folder Inbox that saves all emails. Wrong placement may cause an error. You need to check this point and set the location manually.
Moreover, some users noticed that the placement is only absent for certain profiles. In this case, you should fill this out manually. To do this, enter the Profile Settings section, proceed to Email Accounts, and choose the Change Location option.
You should fill out all the details correctly, otherwise, it won’t work.
5. Define a folder of Inbox
A common reason for this error occurring is the undefined folder for Inbox. In this case, you need to do the following:
- Find the Account Settings section in File;
- Select the Change Folder option and click on + button to open the folder;
- Choose Inbox, then confirm the action by clicking OK;
- Close the Settings menu and choose the Send and Receive option.
Some users say that to solve this issue, it’s enough to choose an alternative folder and save the settings. You will also need to choose the Inbox folder by default and save the configurations once again.
Also, you can try to create a new folder for email storage. If it helps, remove the folder and double-check if the issue remains.
6. Install a new file (pst)
Another solution is the installation of another pst file. For your data preservation, you may create a copy of an existing one. To do this, you just have to place the pst file and duplicate it.
Find the Emails tab, choose a Change Folder option, and delete an existing file. Create a new one and restart your Outlook. If you’re using a copy of an existing pst file, the error may remain. In this case, try to create a completely new version.
The algorithm for creating a new file:
- Proceed to Account Settings and indicate the necessary profile.
- Choose Change Folder, then select Create a new Outlook data file. Enter the login that you want to use.
- Click on + and select Inbox. A new path below the option of Change Folder will appear.
Some customers argue that it’s better to create a new version and set an old one to default. Many users have also admitted that this action helped them fix this error.
7. Fill out the placement of pst data file manually

According to some users, they couldn’t set the placement of the pst data file. While they were trying to create a new profile, they couldn’t locate the data file due to the passive state of the Browse option.
To solve this issue, you can enter the data file placement details manually. After saving the configurations, the problem may disappear.
8. Repair Data Files of the Outlook
If your Outlook shows an error message that the data file cannot be accessed, you can try to restore it.
The algorithm is the following:
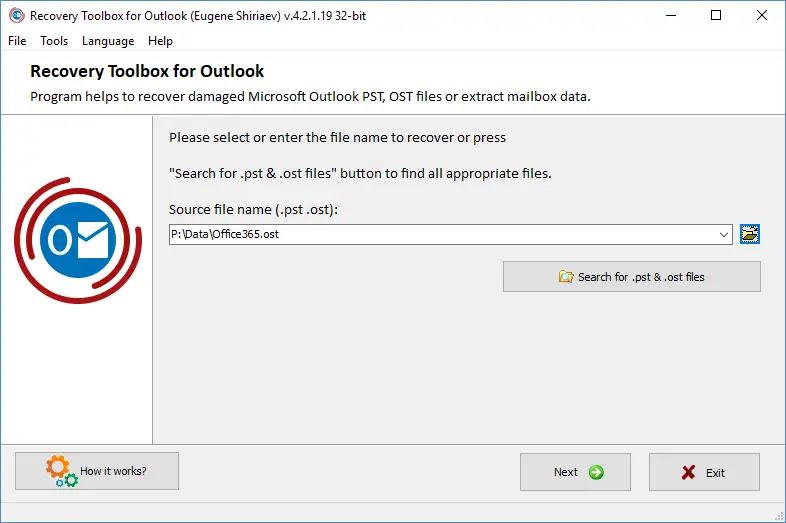
- Load, proceed with the installation procedure, and run Recovery Toolbox for Outlook from the website: https://outlook.recoverytoolbox.com/outlook-data-file-cannot-be-accessed.html
- Open the first window and select the destroyed pst file.
- Enter Recovery Mode.
- Indicate a folder for saving a restored document.
- Exchange the damaged file with the restored one.
You need to exchange the corrupted file with its restored version or complete the list of Outlook data files with the recovered document. This method is suitable for Outlook of 2013, 2016, and 2019.
Use the following algorithm:
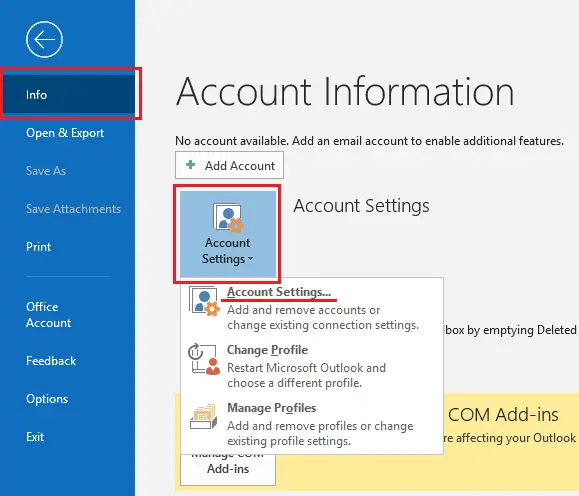
- From the menu go to File, then Info;
- Enter Account Settings by clicking the button in the popup window;
- Go to the tab of data files;
- Select the required data file from the list;
- Choose the option for Opening File Location.
9. Check if Send as and Send on Behalf functions are switched on
Some customers say that Exchange Server is somehow connected to the Send as and Send on behalf functions, and if both of them are working at the same time, the error will occur.
The quickest way to solve the issue is to turn off one of the functions.
10. Check the ownership policy
Some customers mentioned that the error message Outlook data file cannot be accessed may occur when they use the data file without ownership. To solve this issue, you have to use the file according to the ownership.
The algorithm is the following:
- Place the data file and click on it with the right button. Enter the Properties section.
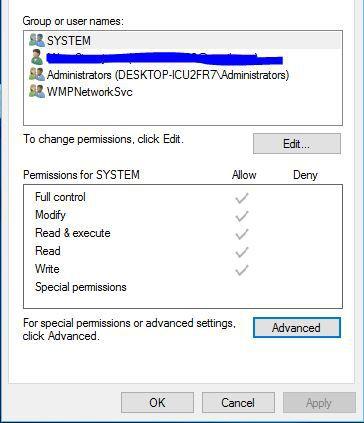
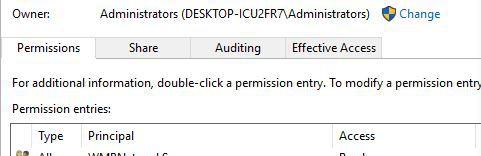
- Proceed to the Security tab and select the Advanced option.
- Verify the Owner configuration. If the Owner is not indicated, choose the Change option.
- Go to the Object Name configuration, fill out your login name and move to Check Names. If the login is verified, confirm the settings by clicking OK.

- After confirmation of the Owner configurations, be sure to implement Full Control of your profile. Apply the settings by clicking OK. The changes will be saved.
When the data file is used according to the ownership policy, the issue should be solved.
Read: How to password protect a folder in Windows 10
11. Proceed with Test Account Settings
Some customers managed to solve the problem by using the Test Account Settings option. It serves to verify saved configurations and correct all the existing errors.
12. Turn off the Mode of Cache Exchange
In particular cases, the Cached Exchange Mode can influence the correctness of Outlook functioning and result in an error occurring. You can try to solve the issue by turning off the Mode of Cache Exchange.
The algorithm is the following:
- From the Control Panel, proceed to Mail and select the Accounts section. There, choose the tab of E-mails.
- Choose the profile of your email and double-check the option of Use Cached Exchange Mode.
- Move to the next step, finish the action, and restart Outlook.
13. Finish all the processes related to Outlook
Some processes of Outlook may interrupt the program itself and cause the error message. This issue is very easy to fix, as you just need to enter Task Manager and stop all the activities that are related to Outlook.
To run the Task Manager, press the combination: Ctrl + Shift + Esc.
Additionally, you will have to stop all the activities which contain Communicator, Lync, or Outlook in their name. After they are closed, restart Outlook and double-check the issue.
A Specific way for Solving the Problem – IMAP Outlook Profile
1. Change the registry
This is an alternative way that requires changes implemented in your registry. This action can cause issues with particular softwares if something goes wrong, which is why you need to be very attentive with the following steps.
This option is suitable for those who used IMAP profiles when the data file relocation took place.
The algorithm for registry editing:
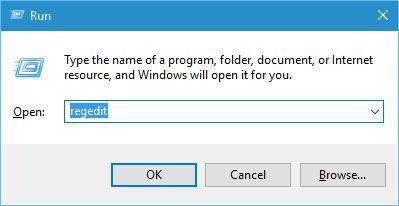
- Press Windows Button + R, then enter Regedit. Press Enter (or click OK).
- After opening the Registry Editor, navigate to the suggested key. Keep in mind that the key may vary depending on the device.
HKEY_USERS\S-1-5-21-2252105952-3583732995-3196064763-1000\Software\Microsoft\Windows\CurrentVersion\Windows Messaging Subsystem\Profiles\Outlook\9375CFF0413111d3B88A00104B2A6676
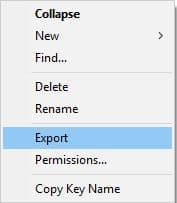
- After the key location is done, right-click and select the Export option. Choose the placement for saving the file. Therefore, if something goes wrong, this file can be useful for bringing back the default configurations.
- Find the folder with the Find the Delivery Store Entry ID key. Click on the key to enter its properties section. Data should be available on the right side of the column. Find the way to the original file and make changes so that it corresponds to the new way the file was saved.
- Leave the Editor and check if the error has disappeared.
In case of any problems, you can just restore configurations by default with the created file (step 3). Some users pointed out that they managed to solve the issue after changing the key name (step 2).
Take into consideration that key renaming may also cause Outlook errors.
2. Make a link to your data file
Certain users have argued that the problem occurred after changing the placement of the IMAP profile data file. They suggested that the way to avoid the issue is by linking to the new placement of the file.
The algorithm is the following:
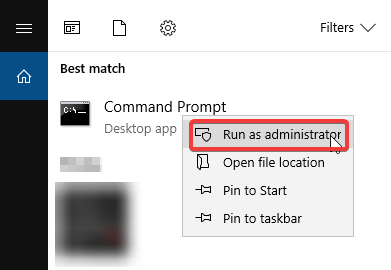
- Run the Command Prompt as anAdministrator. For this, you need to type cmd in the Windows search column and right-click on the first option. Choose Run as Administrator.
- For example, if the data file is located in disc C, navigate to C:\users\Local Settings\MicrosoftOutlook directory. Make the navigation through Command Prompt C:\users\Local Settings\Microsoft\ directory. You will need to use the cd command.
- After entering this directory in the Command Prompt, fill out mklink /D %CD%Outlook D:\Outlook. Remember that D:\Outlook is an example, so you have to use the directory that corresponds to your data file placement. Press the Enter key and wait for the execution.
If everything is done correctly, the error should disappear.
3. Relocate PST file
Some users argue that to fix the problem you just need to change the placement of your data file.
The algorithm is the following:
- Enter the Control Panel, then choose User accounts (Mail).
- From the Data Files tab, select the file for further replacement.
- Choose the Open File Location option. The Data Files section remains open.
- Create the .pst file location, cut it, and paste to another place.
- Return to Mail and click on your data file.
- A warning should appear that your file can’t be found. Choose the Browse option for your file location.
- Leave the Settings section and restart Outlook.
The error message Outlook data file cannot be accessed can interrupt normal, everyday use of your mailbox. Therefore, you should be aware of the most common ways to fix this problem.
If you are still facing troubles in fixing Outlook you should look into hiring a professional IT company. The best route is to browse the authorized partners of the exact software you are looking to fix. For example, seeking out a Microsoft Teams authorized partner would make sense in the age of remote work.
If you like the content, we would appreciate your support by buying us a coffee. Thank you so much for your visit and support.