It is very easy to take screenshots in Windows 10. One of the simplest ways to do this is to press the Windows and print screen keys simultaneously. Capturing videos is however an entirely different ball game. While Windows 10 has a built-in screenrecorder, it is not immediately accessible on all devices and you may need to install third-party screen capturing software such as iSpring Cam Pro screen recorder. Windows 10s’ built-in video recording software is called Game Bar. As the name implies, it was originally designed to help gamers capture clips of their gaming sessions. It can however be used to capture any activity on your computer, from a web browsing session to a graphic design session, at least in some cases.
Windows 10 record video of screen – Game Bar
The Game Bar has some system requirements before it can be used. One of these requirements is the right graphics card. Without meeting the required specifications, you will most likely receive an error message and will not be able to make use of the Game Bar. We however have a workaround that enables Game Bar on any computer regardless of its specifications.
Read: How to fix bluetooth problems in Windows 10
How to Use Windows Game Bar
The first step is to enable Game Bar in the settings. You can do this by opening your PC settings, navigating to Gaming, then Xbox Game Bar, and then toggling the switch to enable Xbox Game Bar. You should however note that Game Bar cannot be used to record certain areas of the Windows 10 UI such as the desktop, file explorer, and some other native Windows apps. Alternatives that allow you to record anything displayed on your screen will be discussed further along in this write-up.
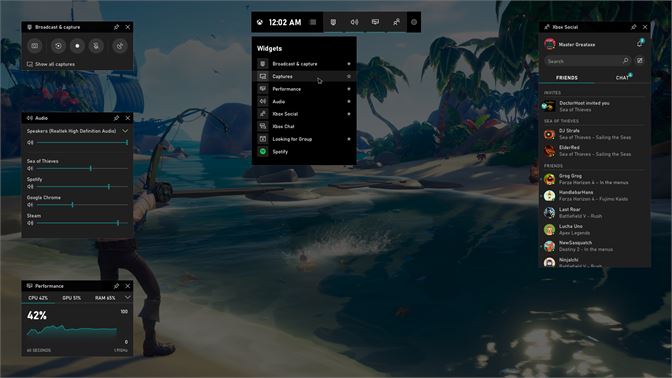
Once you have Game Bar enabled, you can start recording your screen. To do this, you launch the app you will like to capture video from. With the app running, you press the Windows + G keys on the keyboard. This will trigger a Game Bar widget with different recording options. You can also take screenshots using the Game Bar by clicking on the camera icon. Once you are satisfied with all of the settings, you can hit the Start Recording button to begin capturing the screen. A shortcut you can use to start recording is to press Windows + Alt + R keys on the keyboard. If you have an Xbox controller connected to your computer, you can launch the Game Bar by pressing the Xbox button. You will however have to enable this feature in the Xbox Game Bar settings on your PC.
Read: How to solve your Windows 10 sound issues
You will have to grant Game Bar permission to record your screen on your first recording session after which your recording is started. You will notice a small floating bar on your screen through which you can control the recording. Once you are done recording, you click the stop record button and your video gets saved automatically. You can watch your video by clicking on the notification that pops up once you end the recording or navigating to the file manager to access the recording. Your recordings are stored by default in “C:\Users\[username]\Videos\Captures”. You can however change the save location of your screen recordings by heading over to Settings, Gaming, Captures. Here you can select a different folder for your screen recordings to be stored.
Background Record on Game Bar
Game Bar has a neat feature that is worth mentioning. It allows you to capture the last few minutes of activity you have done in an app or game. This is especially useful for gamers as you sometimes have something cool happen on your screen that you would otherwise lose because you were not recording at the time. You can, however, enable a feature that allows Game Bar to keep a recording of the last few seconds or minutes of your gameplay. This recording is continuously being overwritten depending on the amount of time you set for it. To enable this feature, go to Settings, Gaming, Capture, and then enable Record in the background when playing a game. You can then set the time interval by clicking on Record the last and then selecting a time interval. This way you never have to lose any cool moments in your gaming sessions as you can just open the Game Bar and choose to save the last several seconds or minutes of your gameplay.
Read: How to Clean up Windows 10 the right way
Game Bar Workaround for Unsupported Computers
Earlier, we mentioned a workaround for computers that do not meet the required requirements for Windows 10 Game Bar. To do this, you will have to install a third-party software called Game DVR Config. Once you have this installed, launch it and tick the box for Force software MFT (16 FPS + VBR). Next, you’ll have to open the task manager and then end the process “Game Bar Presence Writer”. Once that is done, you should be able to use the Game Bar on your computer.
Alternatives to Game Bar on Windows 10
While Game Bar is the default screen capturing software for Windows 10 computers, it is limited in functionality. It doesn’t allow you to record your activity in certain apps for example. You also will not be able to capture video from a webcam simultaneously with Windows Game Bar. To do this, we recommended iSpring Cam Pro, a third-party screen capturing software.
Read: How to reinstall Windows 10 to fix problems
iSpring Cam Pro is a great screen capturing software for organizations and educationists. It offers greater functionality than Windows default Game Bar. With iSpring Cam Pro, you can record any area of the Windows 10 interface you want, including the desktop and the file explorer. It is also bundled with several cool features that make it the best choice for creating tutorials and video courses. iSpring Cam Pro allows you to record both system sounds and external audio simultaneously so that you can record a voiceover while you make your video. You are also able to record Picture in Picture with one part of the recording showing the recorded screen and another part showing the feed from your webcam. It also has an editor which allows you to add annotations, slides, and transitions to give your video a professional look. Other notable third-party screen capturing software are OBS Studio, Movavi Screen Recorder, and Camtasia.
If you like the content, we would appreciate your support by buying us a coffee. Thank you so much for your visit and support.