A lot has happened since the release of Windows 10 in 2015. Numerous patches and updates have been automatically imported in order to continuously adapt Microsoft’s new flagship andimprove the user experience. Not all of Microsoft’s functions are communicated or advertised however as openly as we as users would have wished.
In this article, you will discover many clever tricks and hacks that could make your Windows 10 life a lot easier.
Place shortcuts on the taskbar
Who doesn’t know the good old taskbar? You have always been able to store frequently used programs and call them up with just a click of the mouse. But did you know that this now also works with shortcuts, i.e. keyboard commands?
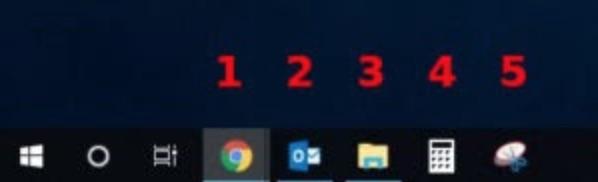
From left to right, all programs placed on the taskbar have an assigned number from 0 to 9. If you press the Windows key and the corresponding number on your keyboard at the same time, the program starts without a mouse click. However, the order of the digits is fixed and cannot be changed by the user. If you want to start a program with key 5, for example, you have to place it into the fifth slot, so make sure that 4 more programs appear on its left.
Table of Contents
Windows 10 god mode
At first glance, what sounds like a cheap cheat command from a computer game turns out to be one of the most practical Windows tricks and hacks: God mode. If you activate it, you are indeed a god. At least on your computer and in your own little Windows world. Many practical and useful options that were previously only accessible through endless menu cascades are now available to you directly with a click of the mouse. How it works?
Create a new folder on your desktop (right click on the desktop => New => folder) and give it the following name: “GodMode. {ED7BA470-8E54-465E-825C-99712043E01C}” (without the quotation marks). The result: A double click on the folder changed in this way reveals real gods … for computer nerds. With this mode enabled you can enter a folder having dozens and dozens of hidden configuration modes available.
Show hidden file extensions
Usually these are simply hidden files by Windows for the sake of clarity. At first glance, what should actually be practical reveals quite a security risk: Many unwanted programs, including malware, viruses and Trojans, like to camouflage themselves with pseudo file names such as Document.doc.exe. What looks like a harmless Word document is actually an executable program with unknown content. To permanently show the extensions, do the following: Open the File Explorer Options of a given folder and select the View tab.
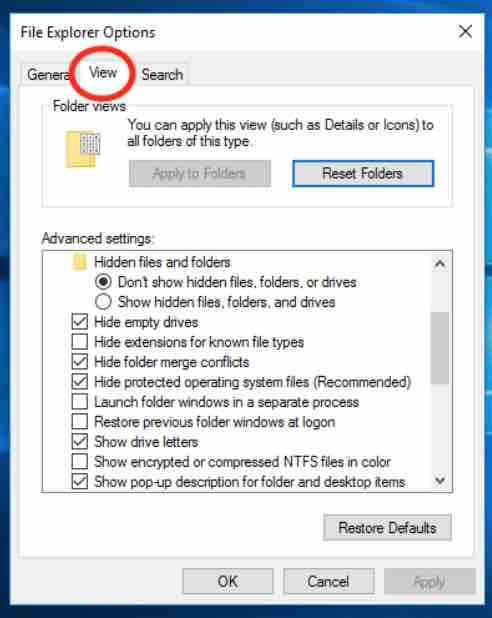
Here you will find a “Hide extensions for known file types” under the “View” tab and remove the check mark there.
Offline navigation
Microsoft’s Google Maps competition is simply called “Maps”. Similar to the competitor Google, all data can be downloaded and saved offline. This is always particularly useful if you are on the road with a tablet in the car, for example, and end up in one of the numerous dead spots.
To make a map available offline, do the following: Open the Map app by clicking on the Windows start button and select System. Next select Default maps option in the menu. Or simply search for Maps in the search window of your desktop.
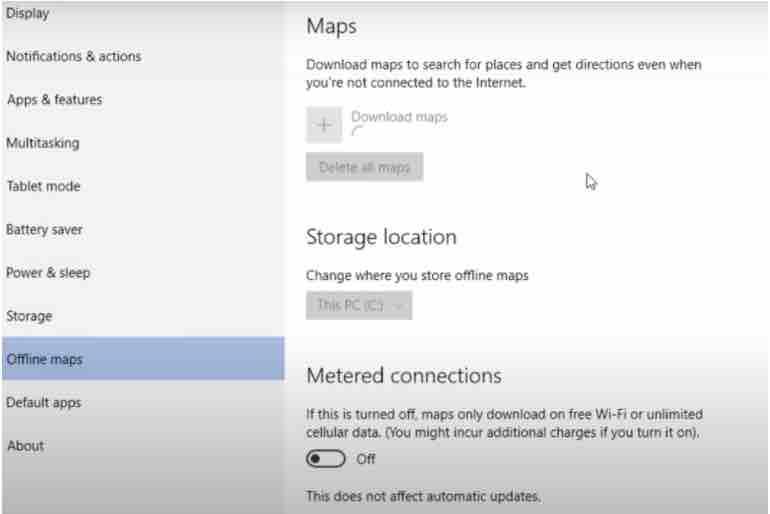
From now on this map (in case you have downloaded it already) is available at any time without an internet connection and navigation can start.
Disable Windows 10 quick access
The quick access feature of the new folder view in Windows 10 is sometimes annoying.
Basically always in your way, if you are looking for something, it never contains what you are looking for and simply disturbs the overview without end. In addition, anyone who comes to your PC after you have left it open, can easily see which files and folders you had recently opened.
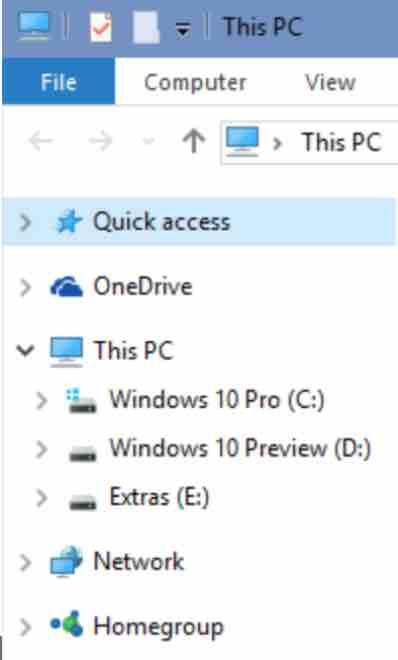
If this is just as annoying to you and you would like a little more clarity and privacy, then simply switch off the quick access feature.
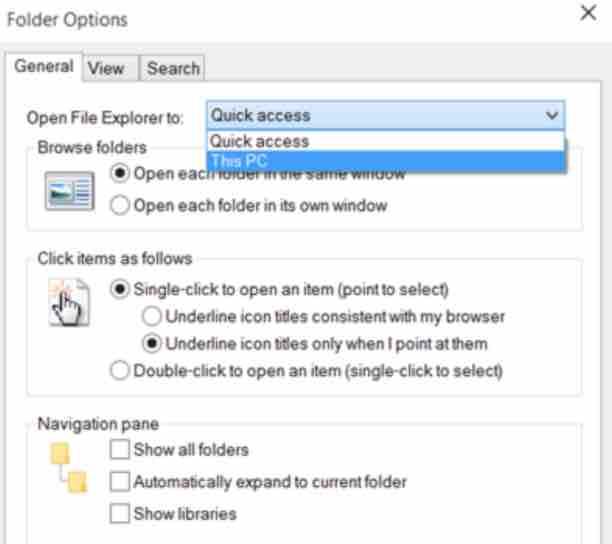
To do this, click on “Options” under the “View” tab and then on “Change folder and search options”. In the window that opens, select only the entry “This PC” at the top under “Open File Explorer to:” and confirm with “OK” at the bottom.
Read: How to speed up your Windows computer
Windows 10 snipping tool
Screenshots in themselves are not rocket science and can be made in seconds with the key combination [Alt] + [PrtScn] (windows 10 screenshot shortcut). It gets annoying when you only want a small part of your screenshot instead of all of your screen content. So far you had no choice but to load the screenshot into a graphics program and edit it afterwards. Thanks to the pre-installed Windows tool “Snipping Tool”, you can at least save yourself this step in the future.
Just type the word “Snipping Tool” into the Windows search, open the app and click on “new”. With a simple drag & drop you can draw a frame around the desired screen area.
The mouse wheel can do much more than scrolling
We all know the mouse wheel as a tool to scroll up or down along websites or documents. But the small disk between the left and right mouse button can do much more. For example, if you click on a link on the Internet with the mouse wheel, this link opens in a new tab.
A mouse wheel click on a tab, on the other hand, closes the relevant tab directly. If you scroll with the mouse wheel while holding down the [Ctrl] key, you can zoom in or out
Hide files
Don’t you want your brother or sister to snoop around in your files? Nothing easier than that: just hide the files.
- go to Windows Explorer and navigate to a folder you want to hide
- After you have marked it, select the “View” item at the top of the menu bar and then the “Hide selected items” item
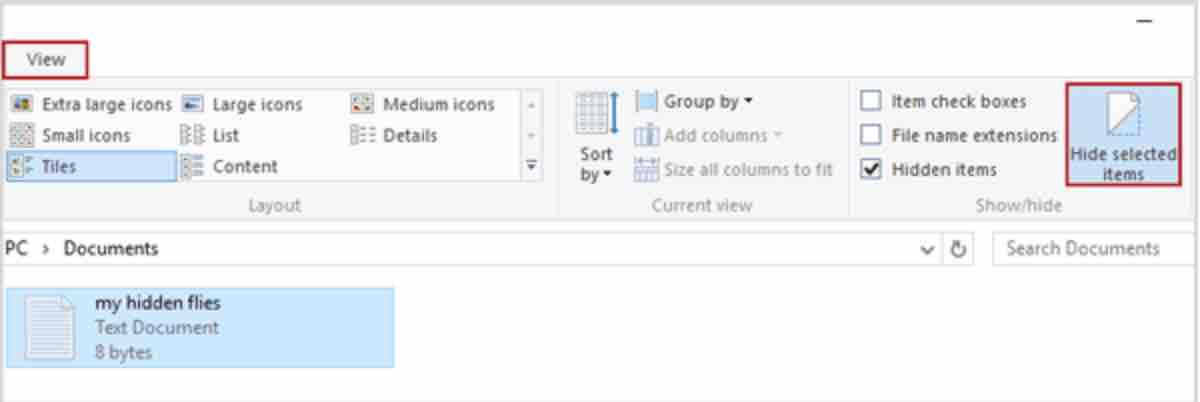
- In the window that opens, select point 2 and confirm with “OK”
- If the checkmark on the left of “Hidden Items” is not set, the previously marked folders disappear as if by magic.
But be careful! Anyone who uses the same computer and is familiar with this mechanism could also use this path to show all hidden elements again.
The dark side of (Windows) power
The dark theme of Windows 10 – as the name suggests – helps with a dark variant in plain black. Activation is very simple:
- Open Windows 10 Settings
- Select the section “Personalization” and there the sub-item “Colors”
- Scroll all the way down to the entry “Select standard app mode”
- You now set it to “Dark” and the change becomes active immediately.
Read out the WLAN key
Have you forgotten your WiFi key again ? your computer keeps asking for it instead of logging in automatically?
This is no reason to panic as long as you can still connect to the network with at least one of your computers at home! Your friend’s laptop also works for this, provided he has saved the access code. In this case you can read the saved key directly from the control panel.
Right-click on the WLAN symbol on the right hand side in your taskbar and open your “Network and Sharing Center” in the next window . Click on the corresponding WIFI connection and then on “Wireless properties” . In the next window, simply activate the “Show characters” button under the “Security” tab and the saved WLAN key will appear in plain text.
Windows 10 Virtual desktop
This not only allows you to open different windows at the same time and to sift through them at will – but also to group them in a meaningful way. You can then switch back and forth not only between the individual windows, but between the entire desktops. Multi-Tasking 2.0, so to speak.
To create a virtual desktop, simply press [Windows] + [Tab] and then click the plus sign in the lower right corner. In this way, any number of desktops can be created and then conveniently switched through one after the other by pressing [Windows] + [Ctrl] + [Arrow key].
If you then combine this with a second monitor, there are almost no limits to multitasking.
Install Windows 10 from a USB
If you want to install Windows 10 from scratch, you will have to download a tool to create an installation USB. It also serves to install your newly purchased Windows 10 on your PC .
- Go to the Get Windows 10 page and choose the Download the tool now option .
- Run it and choose the Create an installation media for another PC option .
- Choose the language, edition and architecture you want to use.
- Finally, choose if you want to burn the file directly to a USB or create an ISO that you can burn later on a DVD or USB.
- Now you just have to format the PC and install Windows 10 like any other operating system.
Control privacy in Windows 10
One of the things you have to take into account with Windows 10 is that it comes pre-configured so that you will be able to share all kinds of information. That is why it is important that you install it in a personalized way. You also have the possibility to modify the privacy parameters later.
- Open the start menu and enter Settings .
- Choose the Privacy option.
- Now take a few minutes to decide what information you want to share and with whom and what applications can access this or another item of your computer.
Hide Cortana’s search box
As soon as you install Windows 10, you have surely noticed that a search bar has appeared next to the start menu. It is the Cortana bar, where you can write anything you want to ask her. If you don’t want it to take up so much space, you can reduce it to a simple icon.
- Right click on it.
- Go to the Cortana option.
- In the options that will be displayed, choose Show Cortana icon .
- Done, instead of a search bar, now you only have one icon
Optimize your work by dividing the screen in two
If you are a journalist who works with several sources, or if you simply want to get the most out of your big screen, Windows 10 gives you the option of being able to divide it up in two.
Doing it is extremely easy, and will allow you to have an application opened in one half and another in the other half.
- Simply, when you are in an application press Win + Left or Win + Right .
- Depending on the application, it will adjust to one or the other side of the screen.
- In the other half, Windows will preview your other active apps so you can choose which one to put in.
Set up your email accounts
One of the novelties of Windows 10 is that it has its own email manager. It is not Outlook, but another native much easier to use in which the mail of your user account will come preconfigured.
But you can also add your Gmail, Yahoo, iCloud accounts, and the process is easier than it seems.
- Click on the gear icon to open the options.
- Choose Manage accounts and then the Add account option .
- A menu will open with several preconfigured services in which you only have to enter email and password.
- You can also add any other address using POP or IMAP.
- In addition to Add account , you have an option to Link inboxes that will join several of the accounts that you have added in a single tray.
Synchronize Gmail events in Windows 10 calendar
As with email, the native Calendar application will come preconfigured with your account. If you want to add the events of your personal Gmail calendar, you will have to carry out the same process of adding accounts as with the email, and once done make sure to synchronize the calendar.
- Click on the gear icon to open the options.
- Choose Manage accounts and follow the same steps as with email.
- Once your Gmail has been synchronized (or if you already had it with the mail), click on your account in the option Manage accounts .
- In the pop-up screen choose the option Change mailbox synchronization settings .
- In the Synchronization Options section make sure that Calendar is activated
Synchronize and create your contacts
Another native application that Windows 10 has included is Contacts. By default, the application will synchronize all the contacts of your linked accounts, so to synchronize new ones that we have not synchronized before, we will have to follow the same process of Manage accounts from the two previous steps.
- Then creating a new contact is as easy as hitting the + symbol to the right of Contacts on the main screen.
- Next you will have to choose one of your linked accounts to choose where the new contact will be saved.
- Finally you will only have to add your name, email or phone, and when you save it, it will automatically synchronize with the contacts of the account chosen in the previous step.
Modify the start menu
The new Windows 10 start menu is mainly made up of a panel of dynamic icons in which you can anchor all your applications. You have the possibility to customize the start menu to your liking, so here you have a series of small tricks that will help change the sections and the size of the icons.
- By keeping the left click you can drag the icons from one side to the other.
- By right-clicking on them you can change their size or disable dynamism.
- If you drag an icon down completely you will create a new section.
- If you don’t like the names of the sections you can change them by clicking on them.
- In Settings -> Personalization -> Home you can change many other elements.
Do you miss Windows 8? Activate tablet mode
Microsoft also hasn’t forgotten that there are quite a few users who did like some of the elements in Windows 8. So Windows 10 has a tablet mode that displays the start menu in full screen and maximizes all windows.
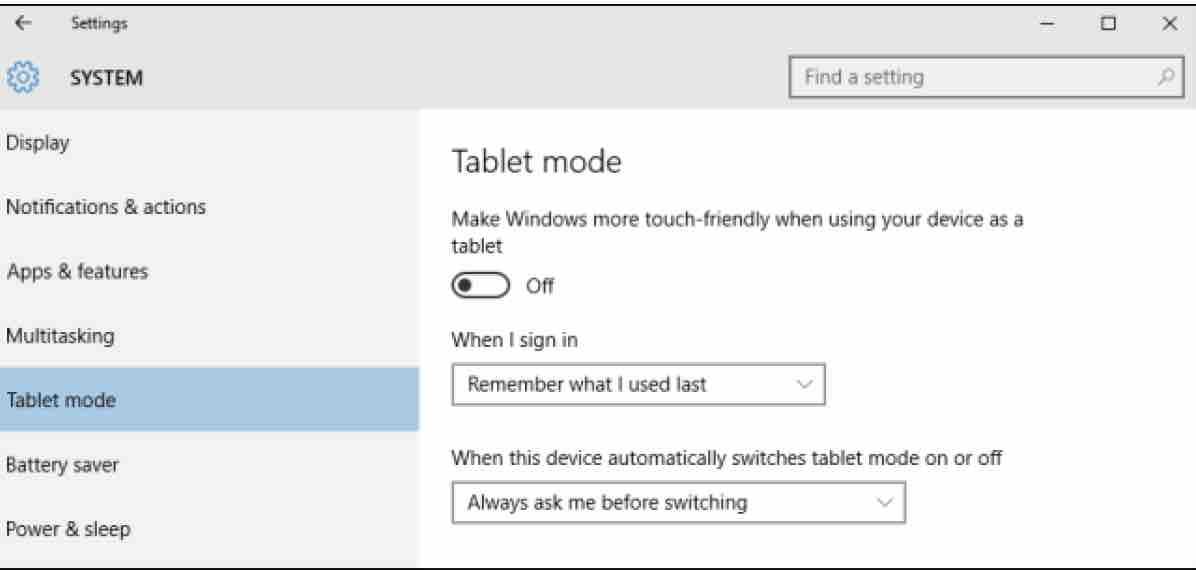
to get the most out of smaller screens.
- Open the start menu and enter Settings .
- Go to the System option , and there to the Tablet mode section .
- Here you can activate the mode, make it permanent on restart or decide whether to hide the application icons on the taskbar.
Install additional languages
Do you want to practice your Spanish or another language by changing your operating system or voice commands? Do you want the virtual keyboard keys to appear in the arrangement of another language? Well, you can do it by downloading and installing additional languages.
- Go to the Settings menu .
- Enter Time and language and go to the Region and language section .
- You can add and download the language you want.
- Once done you can set it as default.
- In options you can download the language pack, handwriting and voice.
Disable auto play
When you insert a new USB, CD, DVD or any other device, Windows 10 runs them automatically by default. If you find this annoying, you should know that you have a very simple way to disable it.
- Enter Settings through the start menu.
- Choose the Devices option .
- Now click on Autoplay .
- Here you can enable or disable the option, as well as edit the default values of some of your devices.
Don’t show recently opened items
In case you do not want the last files you have opened to appear, Windows 10 has a way to disable the display of these elements.
- Enter Settings through the start menu.
- Choose the Personalization option .
- Click on Start .
- Scroll down until you see the Show recently opened items option in Shortcut Lists on Start or in the taskbar .
- Just disabling the option will no longer appear.
Change the application to open a file with
It has happened to all of us that we have linked a type of file, for example PDFs, to an application to open them, and that later we discovered that the application was not the right one.
You can simply change that so that a file is opened with a specific application :
- Right-click on the file and choose Open With …
- In the pop-up menu, click on More applications .
- If the ones that appear do not convince you, click Find another application to open the files .
- You can also go to Settings -> System -> Default apps .
- There you can change the applications for the most common file types.
Activate the period without notifications
Windows 10 has a notification center like Linux and mobile operating systems. Sometimes these notifications can be annoying.
You have the possibility to define a specific period without notifications or choose which ones you want to be displayed.
- To temporarily disable notifications, open the notification center, tap Period without notifications .
- If you right click on the icon you can go to the configuration.
- You can choose under which circumstances notifications are activated.
- You can also disable those of specific applications
Protect your user account with a PIN
Passwords are out of date.Windows 10 gives you the option to add extra protection when you log in by being able to configure a PIN. It is one more layer of protection, and the process of logging in with your user will be much faster by just typing in 4 numbers rather than by entering a password.
- Go to the start menu and click Settings .
- Choose the Accounts option , and go to the Login Options section .
- You will see a PIN option in which you can create one or change the one you already have.
Reset the screenshot counter
You may have noticed that when you took numerous screenshots with Win + PrintScrn on a specific folder where they are automatically saved , you will have noticed in the file name, that there is a counter that gets incremented each time you take a new screenshot. There is a way to restart the counter.
- Type regedit in the start menu to access the system registry.
- Go to the HKEY CURRENT USER \ SOFTWARE \ Microsoft \ Windows \ CurrentVersion \ Explorer directory .
- Find the ScreenshotIndex entry .
- Double click on it, and as Value information put 1.
- Done, the next screenshot will be Screenshot (1) again for example.
Schedule your restarts
A classic Windows problem is that sometimes it restarts at the most inopportune moment, and sometimes when you turn it off it starts an endless process of updating applications. Therefore, the system allows you to choose when and how you want their restarts to behave, and also to schedule a time for them to take place.
- Enter the Settings panel .
- Choose the Update and Security option, and in Windows Update give the advanced options.
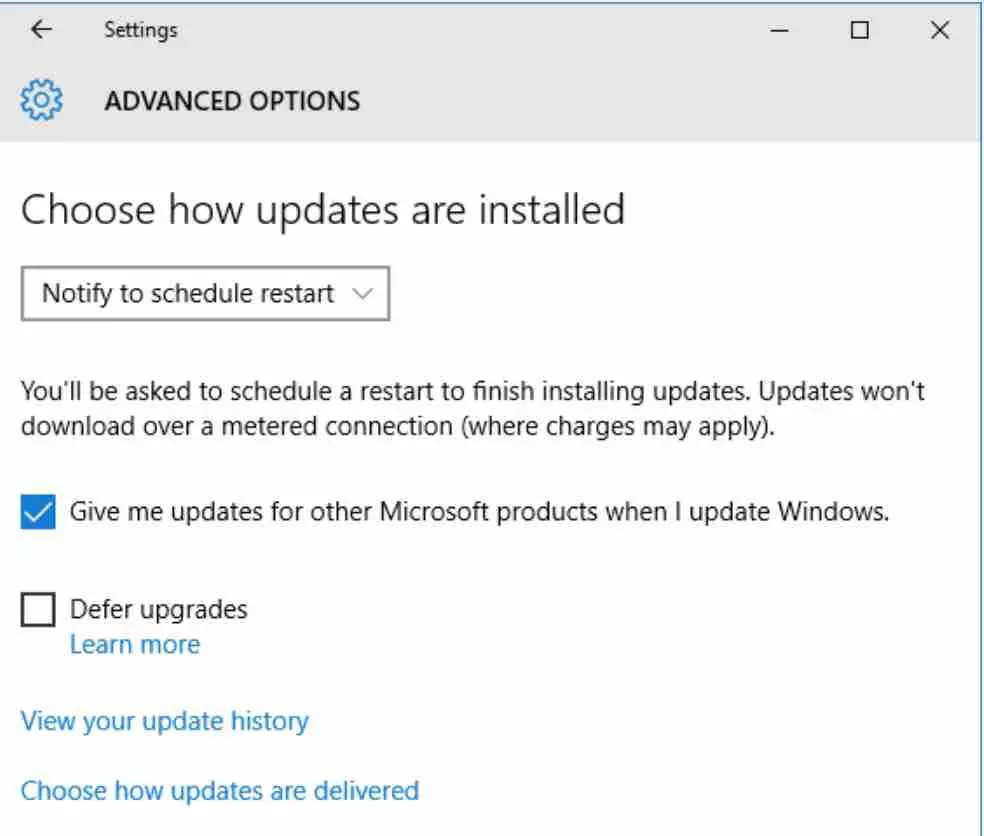
- In the choose how updates should be installed drop-down choose Notify to schedule restarts
- When an update is installed, it will now notify you if you want to restart at that time or schedule a certain time.
Space analyzer
As with any mobile or tablet, Windows 10 has incorporated a visual hard disk space analyzer full of options so that you can have complete control of your available space. Accessing it is extremely easy.
- Enter the Settings menu .
- Go to the System section , and choose the Storage tab .
- There you can also change the storage locations.
- At the top, click on the hard drive to analyze.
Create a transparent folder
Surely some of you have a folder with content that you would not like other people to see. How can you hide it? Very simple, creating an invisible or transparent folder on the desktop that only you, by knowing where it is, can access it.
- Right click on the desktop.
- Go to New -> Folder and create one normally.
- Right click on the folder and go to Properties .
- Go to the customize tab and choose the Change icon option .
- Select one of the transparent icons.
- Accept, and in the properties now go to General .
- Delete the folder name and press Alt + 0160 to enter a blank character as the name.
- Don’t forget where you left the folder on the desktop
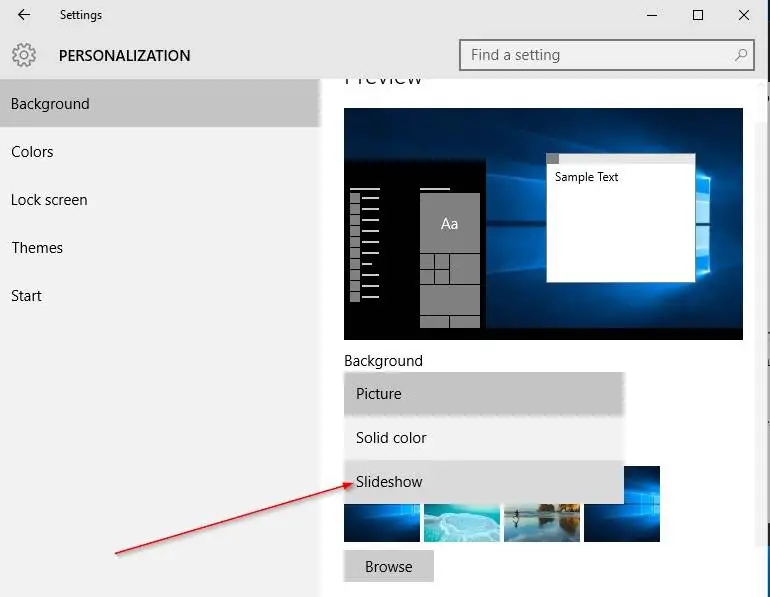
Windows 10 slideshow
Although some of us do not like to change the wallpaper too much and we tend to stick with one that we like for months or years, there are other users who like it otherwise. Here is how you can do that:
- Right-click on the desktop and go to Personalization (or go to Start> Settings> Personalization).
Changing wallpaper windows 10
- Choose the Background option and there to the dropdown of the same name, where you will choose the Slideshow option .
- Now you only have to choose the images that will rotate as wallpapers choosing those from a folder.
- Since you can only choose a folder, it is best to create one and put the images you want to rotate there
Change Windows 10 colors
One of the ways to customize your operating system is to display it with the colors you like best. There is a very quick way to change the colors of the taskbar, enable translucent backgrounds and so on.
- Open the Settings menu .
- Enter Personalization .
- Enter colors to decide whether to use matching ones with your wallpaper.
- If you disable this option, you can use the color that you like the most
If you like the content, we would appreciate your support by buying us a coffee. Thank you so much for your visit and support.
Since the release of Windows 10 in 2015, there has been a lot of change. The saved WLAN key will appear in plain text if the show characters button is activated in the next window. The start menu should be changed. The new start menu for Windows 10 has a panel of icons that anchor all your applications. You have the ability to do that.