Embark on a journey to master the art of Google Docs! In today’s digital landscape, effective collaboration and document creation are paramount.
Google Docs, a steadfast ally for both beginners and seasoned users, offers a myriad of features waiting to be explored. This guide is your key to unlocking the full potential of Google Docs with 18 essential tips and tricks.
Whether you’re drafting a business proposal, refining your resume, or engaged in collaborative document editing, this resource is designed to simplify your experience. From font selection nuances to seamless organization tactics, each insight is tailored to enhance your proficiency in using Google Docs.
Join us as we demystify the intricacies of this powerful tool, empowering you with the skills needed to navigate Google Docs effortlessly. This guide is your roadmap to becoming a Google Docs virtuoso—where efficiency meets creativity. Welcome to a realm where professional document creation is made simple and accessible to all.
Read: Using formulas in Google Sheets
Diversify Your Font Choices
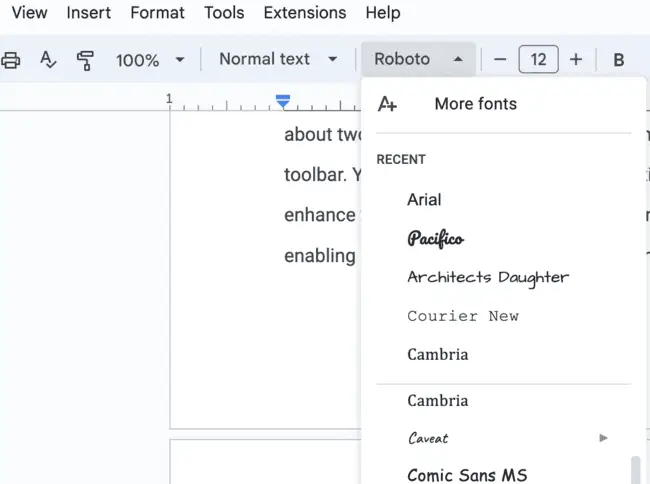
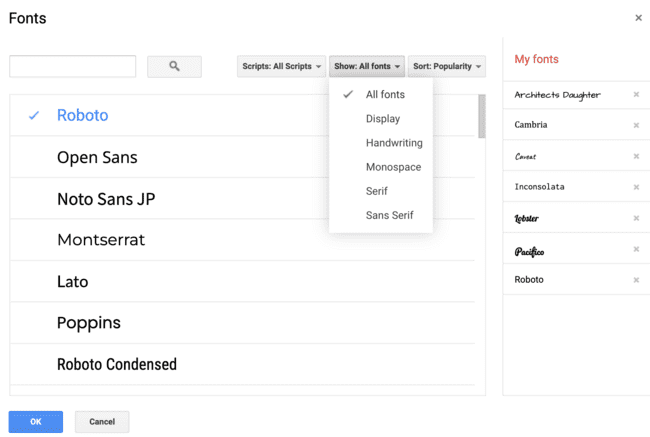
When initiating a new Google Docs document, you’re greeted with an initial set of about two dozen default fonts accessible through the dropdown menu on the editing toolbar. Yet, there’s a treasure trove of additional fonts awaiting integration. To enhance your font selection, select the “More fonts…” option in the dropdown menu, enabling exploration and selection based on your preferences and themes.
Read: 13 Best Font Manager Tools
2. Optimize Efficiency with Templates
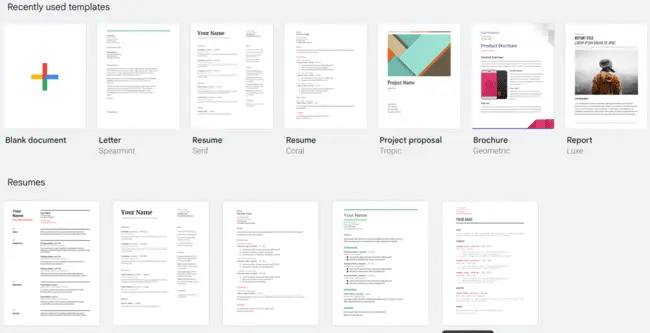
Why commence projects from scratch when a wealth of templates is readily available? Whether crafting a resume, formulating a project proposal, composing a business letter, documenting meeting minutes, or designing a brochure, Google Docs provides templates tailored to diverse business needs. Access these templates conveniently when you create a new document.
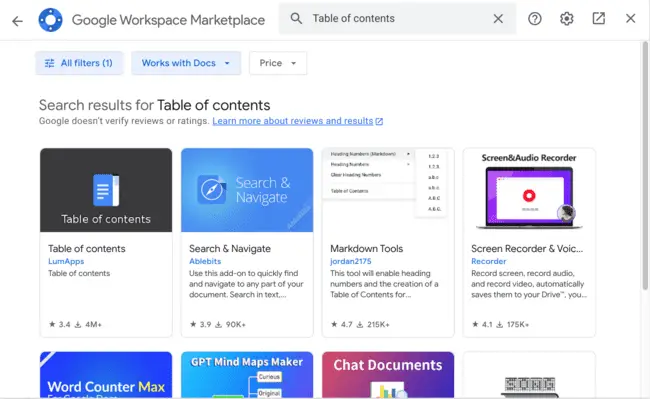
3. Navigate Seamlessly with the Table of Contents Sidebar
For lengthy documents featuring multiple subsections, the “Table of Contents” add-on proves invaluable by automatically generating a navigational sidebar. Facilitating seamless navigation, users can click through headers and subheaders within the sidebar to swiftly move between sections. Easily accessible through Add-ons > Get add-ons… > Search for “Table of Contents.”
4. Create or Remove Header
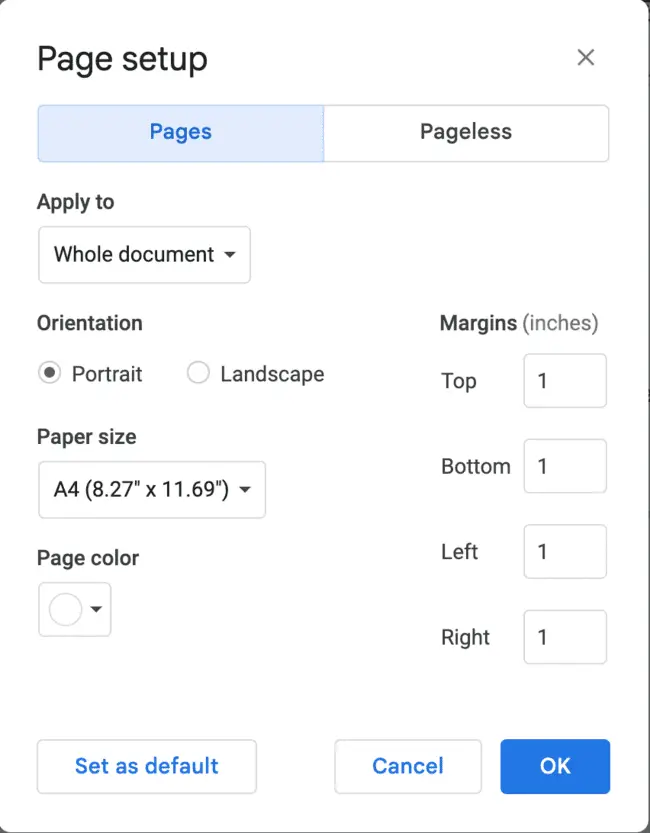
Efficiently utilize headers and footers, especially in extensive Google Docs with multiple pages. Create a header encompassing the document title and page numbers uniformly across all pages. To implement, double-click on the top of a page or choose “Insert” > “Header & page number” for customization. To remove or resize headers, clear the text or adjust page margins via “File” > “Page setup.”
Read: The Best Spreadsheet Software for Linux
5. Clear Formatting
Mitigate formatting discrepancies that may arise from pasting text into Google Docs by employing the “Format > Clear Formatting” tool. Highlight the text in question and invoke this feature to seamlessly align the foreign text with the existing document formatting.
6. Create a Folder
Given the collaborative nature of Google Drive, establishing a designated folder for your documents enhances organization. Initiate a new Google Docs folder by selecting the blue “New” button, then “Folder.” Assign a memorable label, and the folder will appear in the “Folders” section under “My Drive.”

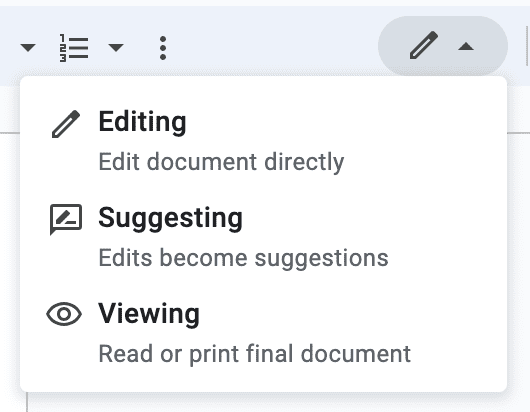
7. Suggesting Mode
For scenarios requiring change suggestions without direct edits, leverage “Suggesting” mode in Google Docs. Switch from “Editing” to “Suggesting” via the pencil icon, enabling tracked changes visible on the document’s right side, complete with details like the suggestor’s name and timestamp.
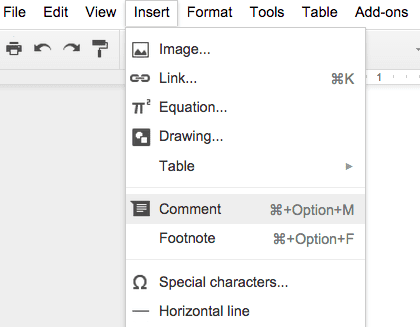
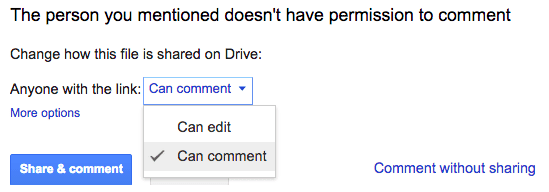
8. Comments
Facilitate collaboration and communication by incorporating comments directly into your document. Select text or an image, choose “Insert” > “Comment,” and a comment thread will appear on the right. Tag individuals with @ or + for personalized notifications.
Read: How to fix margins on Google Docs
9. Footnotes
Effortlessly integrate footnotes into your Google Docs, providing additional context or references. Simply place the cursor where the footnote should appear, go to “Insert” > “Footnote,” and input the relevant information. This discreet feature adds depth to your document without overwhelming the main text.
10. Find and Replace
Efficiency meets precision with Google Docs’ “Find and Replace” functionality, akin to its counterpart in Microsoft Word. Navigate to “Edit” > “Find and replace” or use the keyboard shortcut (Command + F on Mac or Ctrl + F on Windows). This feature simplifies the correction of recurring errors or updates, with the option to replace all instances at once.

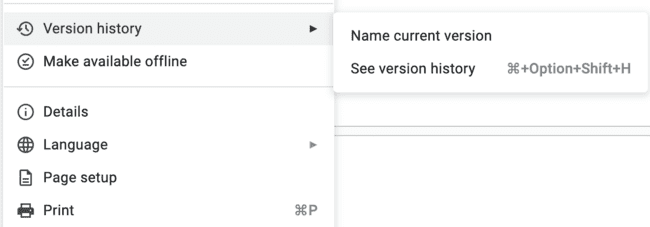
11. Revision History
Track the evolution of your document and revert to prior versions effortlessly using the Revision History feature. Access it through “File” > “View Revision History.” The side panel offers an overview of contributors and changes, while detailed revisions provide a granular view of modifications.
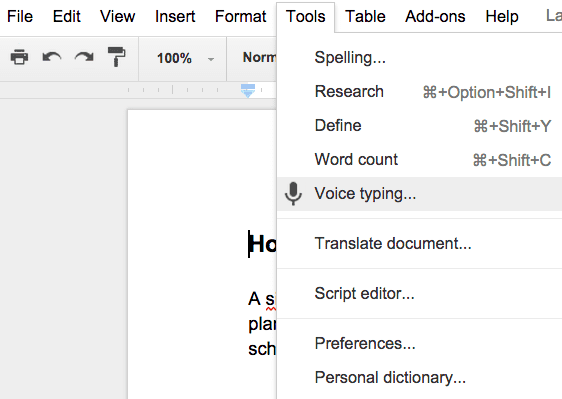
12. Voice Typing
Embrace hands-free document creation using Voice Typing. Accessible through “Tools” > “Voice typing,” this feature allows users with Google Chrome to articulate their content. Punctuation commands like “period” or “new line” facilitate a smooth dictation process, enhancing accessibility and workflow.
Read: How to edit Excel spreadsheets on Google Drive
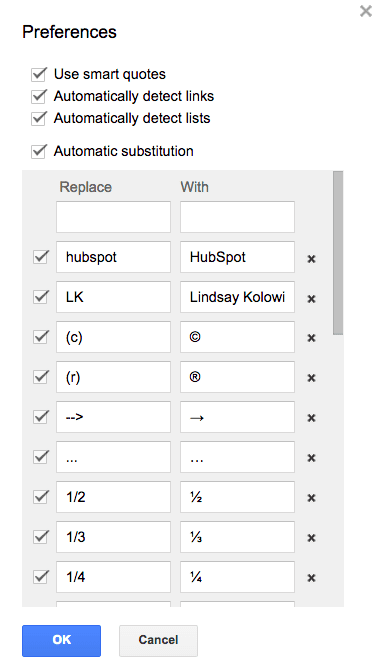
13. Create Your Own Shortcuts
Tailor your Google Docs experience by creating custom shortcuts. Navigate to “Tools” > “Preferences” > “Automatic Substitution” to add or modify shortcuts. This customization empowers users to streamline repetitive tasks and enhance their individual workflows.
14. Meetings
To enable meetings on Google Docs, proceed as follows:
- Access the document, spreadsheet, or presentation intended for the meeting.
- Locate the Meet button positioned in the top right corner of the screen.
- Opt for Start a new meeting from the menu.
- A side panel will materialize on the right side, presenting your meeting particulars.
- To extend invitations, select Copy and distribute the meeting link to participants.
- Initiate document, spreadsheet, or presentation sharing by clicking Share screen at the bottom right, choosing the relevant tab, and then clicking Share.
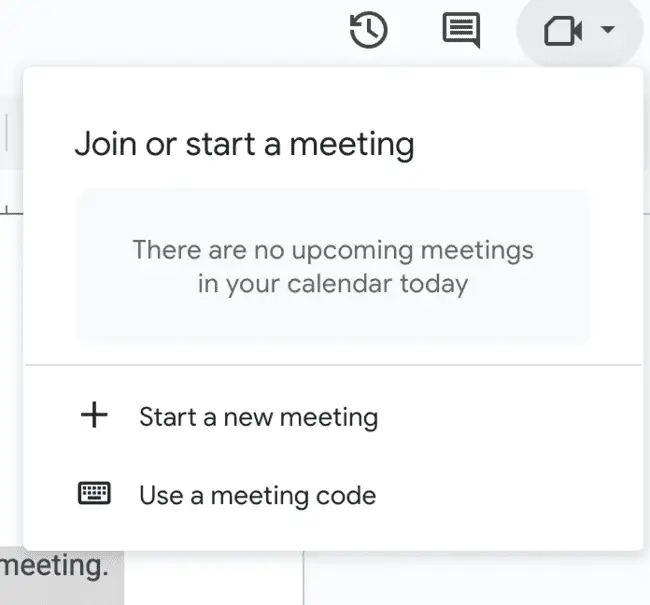
Be aware that for Google Meet video meetings or presenting via Google Docs, Sheets, Slides, or Jamboard, a computer equipped with Chrome or Edge browsers¹ is requisite.
15. Image Editing
Extend your document’s visual appeal by refining inserted images directly within Google Docs. Click on an image to reveal editing tools, including cropping and adding borders. These features empower users to tailor images to their specific layout requirements seamlessly.
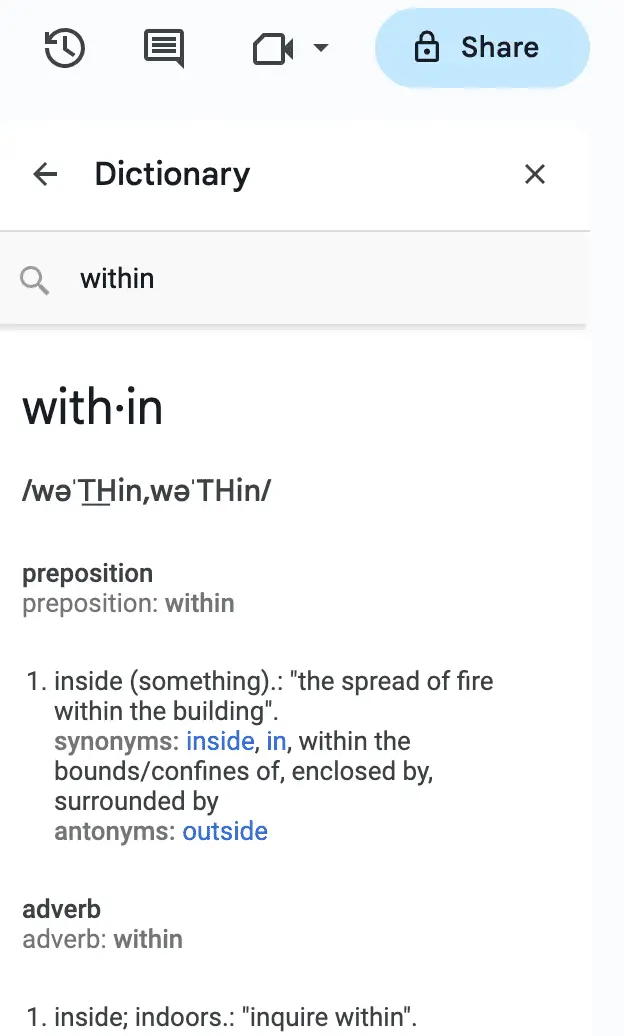
16. Words with Google : Access Definitions and Synonyms with Dictionary
Explore definitions and alternative terms effortlessly using the native dictionary feature in Google Docs. To discover synonyms for a particular word, highlight the desired term, and opt for either right-clicking and choosing Define ‘[word]’ or navigating to Tools > Dictionary in the menu. A sidebar will unveil on the right, presenting the word’s definition along with a list of synonyms.
For a more comprehensive synonym search, leverage add-ons tailored for Google Docs. OneLook Thesaurus stands out as a remarkable add-on, surpassing the capabilities of the built-in dictionary.
Post-installation, employing it is straightforward: select your word, access Add-ons from the menu, hover over OneLook Thesaurus, and select Synonyms to reveal your results in the sidebar. Additionally, Power Thesaurus, another commendable add-on for Google Docs, provides an extensive array of synonyms for the selected text. Once installed, choose your word, access Add-ons from the menu, hover over Power Thesaurus, and click Search Selected Term to view your results in the sidebar.
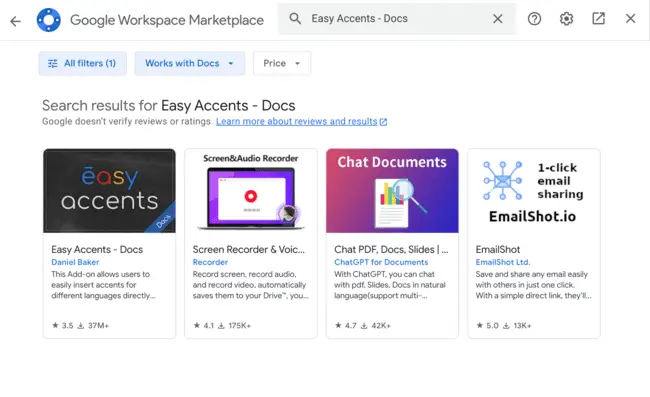
17. Streamline Multilingual Writing with Easy Accents
Simplify multilingual writing with the “Easy Accents” add-on, offering quick access to accents for 20 languages. Install the add-on through “Add-ons” > “Get add-ons…” > Search for “Easy Accents.” This tool eliminates the need for memorizing accent shortcuts, ensuring accurate language representation.
18. Add a New Page
Customize document structure by adding manual page breaks. Scroll to the desired location, click “Insert” > “Break” > “Page Break” to seamlessly transition between pages. Additionally, incorporate today’s date using custom scripts accessed through “Tools” > “Script Editor.” This adds a date insertion option to your toolbar, enhancing document organization.
If you like the content, we would appreciate your support by buying us a coffee. Thank you so much for your visit and support.