Have you ever had a file that was accidentally deleted on your Linux system and wish you could get it back? If so, you are not alone. Many Linux users face this situation at some point and wonder how to recover their lost data. Fortunately,you can use several tools and methods that can help you restore the deleted files on Linux, depending on factors such as the file system, the type of deletion, and the time elapsed since the deletion.
Linux boasts support for numerous file systems and diverse data structures, all integral to efficient file system management that upholds data integrity. Whether you’re dealing with image files like JPG and PNG, executable files (EXE), multimedia files such as MPG, or various others, Linux empowers you to recover data stored in a wide array of formats. However, if you haven’t backed up your files in advance and lack access to a trash folder, achieving absolute certainty in data recovery becomes challenging. In such cases, an alternative approach involves extracting raw data directly from the storage device. Linux offers a seamless and comprehensive solution for recovering files on a drive that have been lost, deleted, formatted, or corrupted, ensuring your data retrieval needs are met with ease and efficiency.
In this tutorial, we will cover some of the most common and effective ways to recover deleted files on Linux using some built-in and downloadable utilities. We will also explain some of the factors that affect the chances of successful recovery and provide some tips to prevent data loss in the future.
Read: Five best open source Backup utilities for Linux
Factors Affecting File Recovery on Linux
Before we dive into the specific tools and methods for file recovery on Linux, let’s briefly discuss some of the factors that affect the feasibility and complexity of restoring deleted files.
- File system: The file system is the way that the operating system organizes and manages the data on a storage device. Different file systems have different features and behaviors that affect how they handle deleted files. For example, some file systems, such as ext4, use a journal to keep track of changes to the file system structure, which can help recover deleted files. Other file systems, such as FAT32 or NTFS, do not have a journal and rely on other methods to locate deleted files.
- Type of deletion: The type of deletion refers to how the file was removed from the file system. There are two main types of deletion: soft deletion and hard deletion. Soft deletion is when the file is moved to a special directory, such as the trash or recycle bin, where it can be easily restored. Hard deletion is when the file is permanently erased from the file system, such as by using the rm command or emptying the trash. Soft deletion is easier to recover from than hard deletion, as the file is still intact and accessible on the disk.
- Time elapsed since deletion: The time elapsed since deletion refers to how long ago the file was deleted from the file system. The longer the time elapsed, the lower the chances of successful recovery. This is because when a file is deleted, it is not actually wiped from the disk, but rather marked as free space that can be overwritten by new data. The more new data is written to the disk, the more likely it is that the accidentally deleted file will be overwritten and lost forever.
Methods and Tools for File Recovery on Linux
Now that we have an idea of what affects file recovery on Linux, let’s look at some of the methods and tools that can help us recover our deleted files. We will start with some simple and easy methods that work for soft-deleted files, and then move on to some more advanced and complex methods that work for hard-deleted files.
Method 1: Restore from Trash or Recycle Bin
The simplest and easiest way to recover deleted files on Linux is to restore them from the trash or recycle bin. This method works for files that were soft-deleted by moving them to a special directory, such as ~/.local/share/Trash on most Linux desktop environments. To restore files from the trash or recycle bin, you can use either a graphical file manager or a command-line tool.
Read: Understanding Continuous Data Protection (CDP) – Near-CDP Solutions
Using a Graphical File Manager
To use a graphical file manager to restore files from the trash or recycle bin, follow these steps:
- Open your preferred file manager application, such as Nautilus, Dolphin, Thunar, or Nemo.
- Navigate to the trash or recycle bin directory, which is usually located in the sidebar or under a menu option.
- Locate the files that you want to restore and select them.
- Right-click on the selected files and choose “Restore From Trash” or “Move to …” from the context menu.
- The files will be restored to their original location on the file system.
Using a Command-Line Tool
To use a command-line tool to restore files from the trash or recycle bin, follow these steps:
- Open a terminal window and change to the trash or recycle bin directory using the cd command. For example:
cd ~/.local/share/Trash
- List the contents of the directory using the ls command. You should see two subdirectories: files and info.

The files directory contains the actual deleted files, while the info directory contains metadata about them, such as their original location and deletion time. - Locate the files that you want to restore and note their names.
- Move the files from the trash or recycle bin directory to their original location using the mv command. You can find their original location by looking at their corresponding .trashinfo files in the info directory.

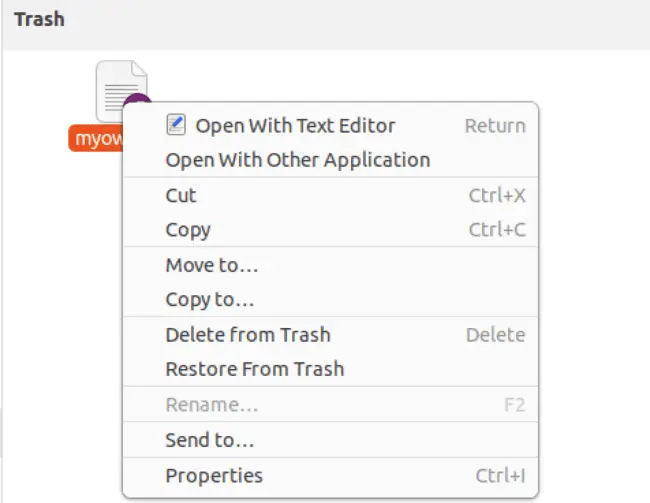
- Now execute the command (change the name to your own file): nano myownlink.trashinfoThis will bring up the window below :

You will be able to see the original location of the deleted file. - You will then be able to restore your deleted file to its original location on the file system.
Method 2: Use the lsof Command
The lsof command is a built-in utility that lists open files on a Linux system. It can also be used to recover deleted files that are still held open by a process. This method works for files that were hard-deleted by using the rm command or similar, but are still in use by an application or service.
Read: Android device data management using AirDroid
In the realm of Linux filesystems, a file is essentially a pointer to an inode. This inode is a treasure trove of vital file attributes, including ownership, permissions, and the all-important data block addresses that lead to the actual file content on disk. When you use the ‘rm’ command against a file, you’re not obliterating the inode itself. Instead, you’re severing the link that leads to it. Interestingly, other Linux processes (like your video player) might still have this seemingly vanished file within their grasp. It’s only when all these links are eradicated that the inode and its associated data blocks are freed up for new data storage.
The key to successful and speedy data recovery lies in this delay. If a process still has the file open, the data might still be there, even though the file appears to have disappeared from directory listings.
Enter the /proc directory – Linux’s process pseudo filesystem. Each Linux process has its own dedicated directory here, filled with a plethora of useful components. Among these components, the ‘fd’ (file descriptor) subdirectory is particularly noteworthy as it contains links to files that are still actively monitored by their respective processes.
A deleted file might not be gone for good. If you know where to look, you can often find a copy of the file in the /proc directory:
/proc/process_id/fd/file_descriptor
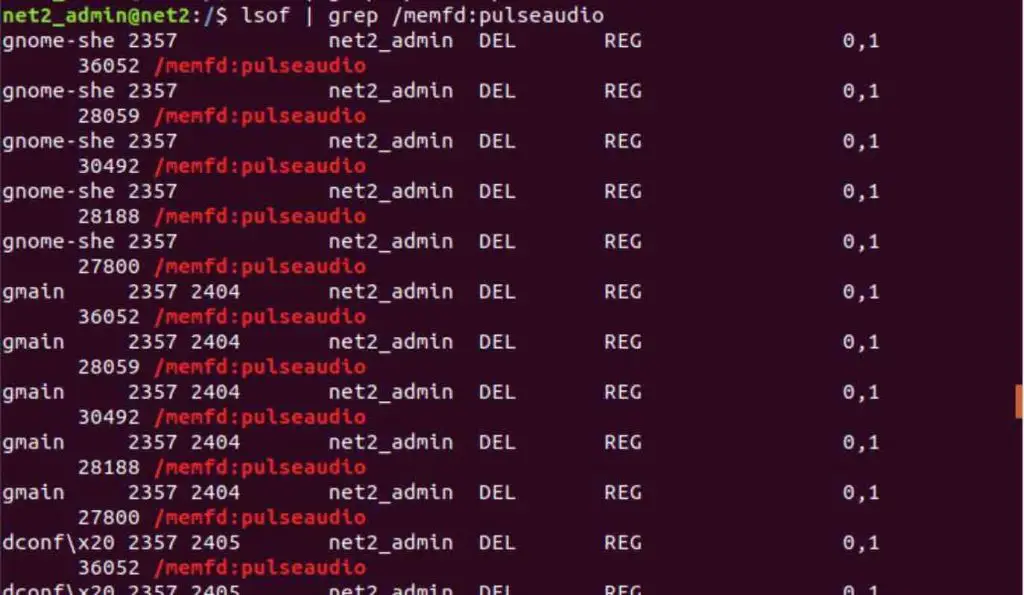
If a running process still has the deleted file open, you can recover it through the open file descriptor mentioned above. To check if this is possible, you can use the following command:
lsof | grep “/path_to_file”
If the command returns an output like this:
progname 4171 user 22r REG 8,1 17192251 344118 /path_to_file
Take note of the PID (Process ID) in the second column (in this case, 4171) and the file descriptor number in the fourth column (22r, with “r” indicating that it’s a regular file). With this information, you’re well on your way to recovering your lost file.
You can now retrieve the file by executing the following command:
cp /proc/4171/fd/22 /path_to_restored_file
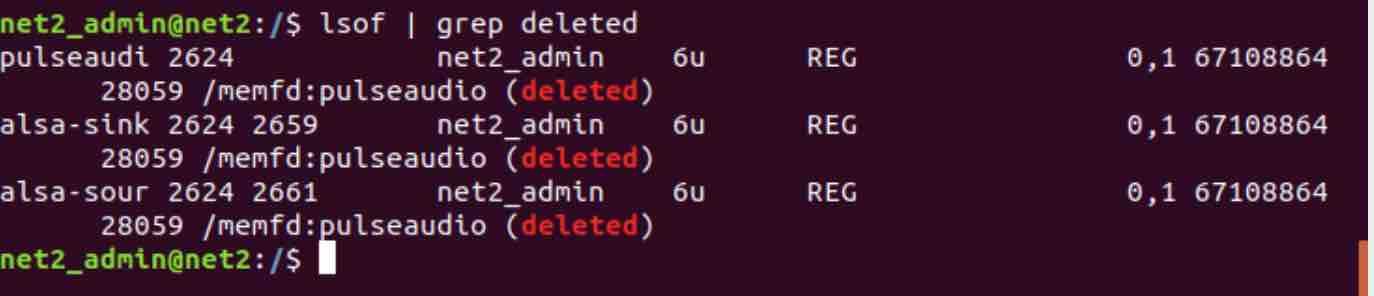
Additionally, you can run the command:
lsof | grep deleted
A word of caution: You might be inclined to use the -a flag with cp while restoring the file, but it’s advisable not to do so. If you do, instead of merely copying the actual file content, you’ll end up copying a (now-) broken symbolic link to the original file (that was once listed in its original directory).
Read: Is There Any Free Software For Data Recovery
Method 3: Use TestDisk- Disk recovery utility
TestDisk for Linux is an open-source Free recovery application that operates across various platforms. It’s a powerful tool designed to help IT Linux admins recover lost partitions and deleted files of any type, including photos and videos. This versatile tool works with a wide range of file systems and can recover data from formatted hard drive as well as from almost any medium, be it SD cards, CD-ROMs or USBs.
What sets TestDisk software apart is its ability to perform even when the media’s file system has been severely damaged or reformatted.
Here’s what you can do with this Free hard drive recovery tool – TestDisk:
1. Restoring NTFS Boot Sectors
2. Salvaging FAT32 Boot Sectors
3. Retrieving Deleted Partitions and Repairing Route Table Errors
4. Tracking Blocks in ext2, ext3, and ext4
Remember, TestDisk Open source file recovery utility for Linux is distributed under the GNU General Public License (GPLV v2 +), making it a reliable and cost-effective solution that will help you restore data from formatted hard drive as well as other various needs.
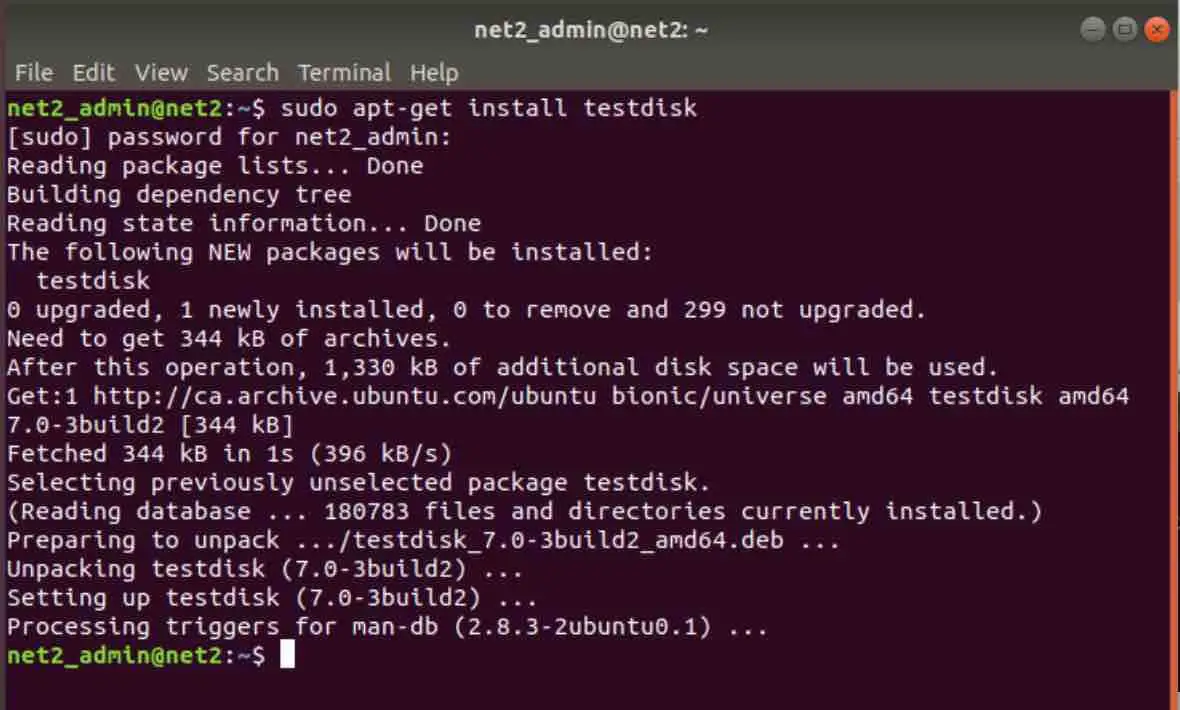
Installation of TestDisk data recovery tool:
Open up your terminal and invoke the following command :
sudo apt-get install testdisk
To run the testdisk utility, execute the command :
testdisk
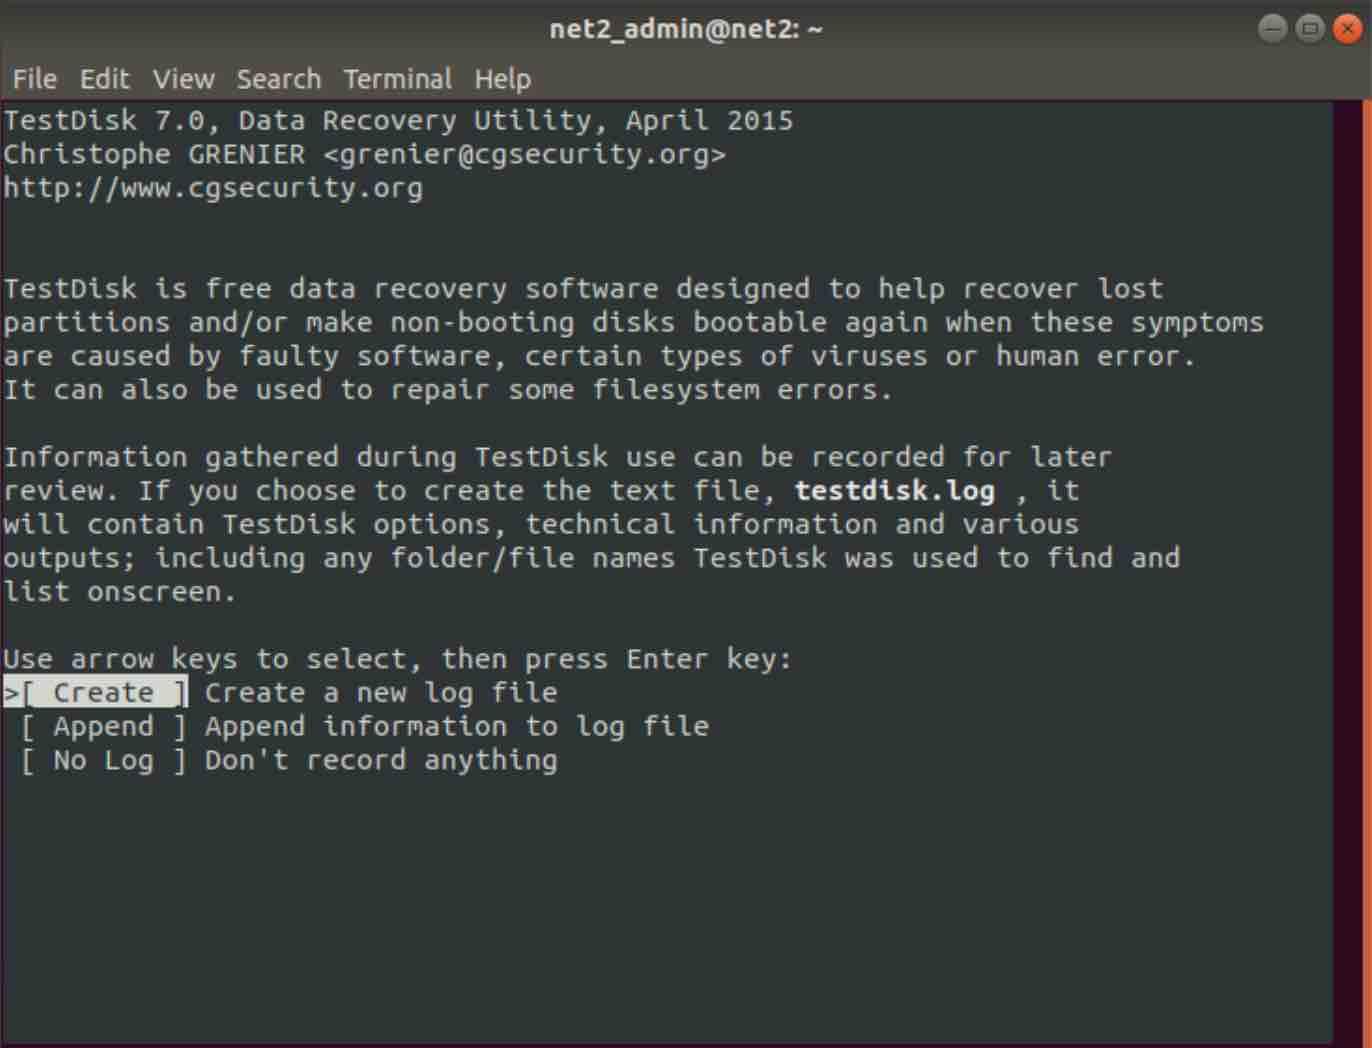
As indicated in the output, TestDisk provides the option to generate a testdisk.log file. This log file is a repository of vital data about your missing files. It’s a feature that’s strongly suggested for IT Linux admins.
Pick your media, click ‘Proceed,’ and you’ll soon be asked to select your partition table type.
Read: Review of TunesKit iOS System Recovery for Windows
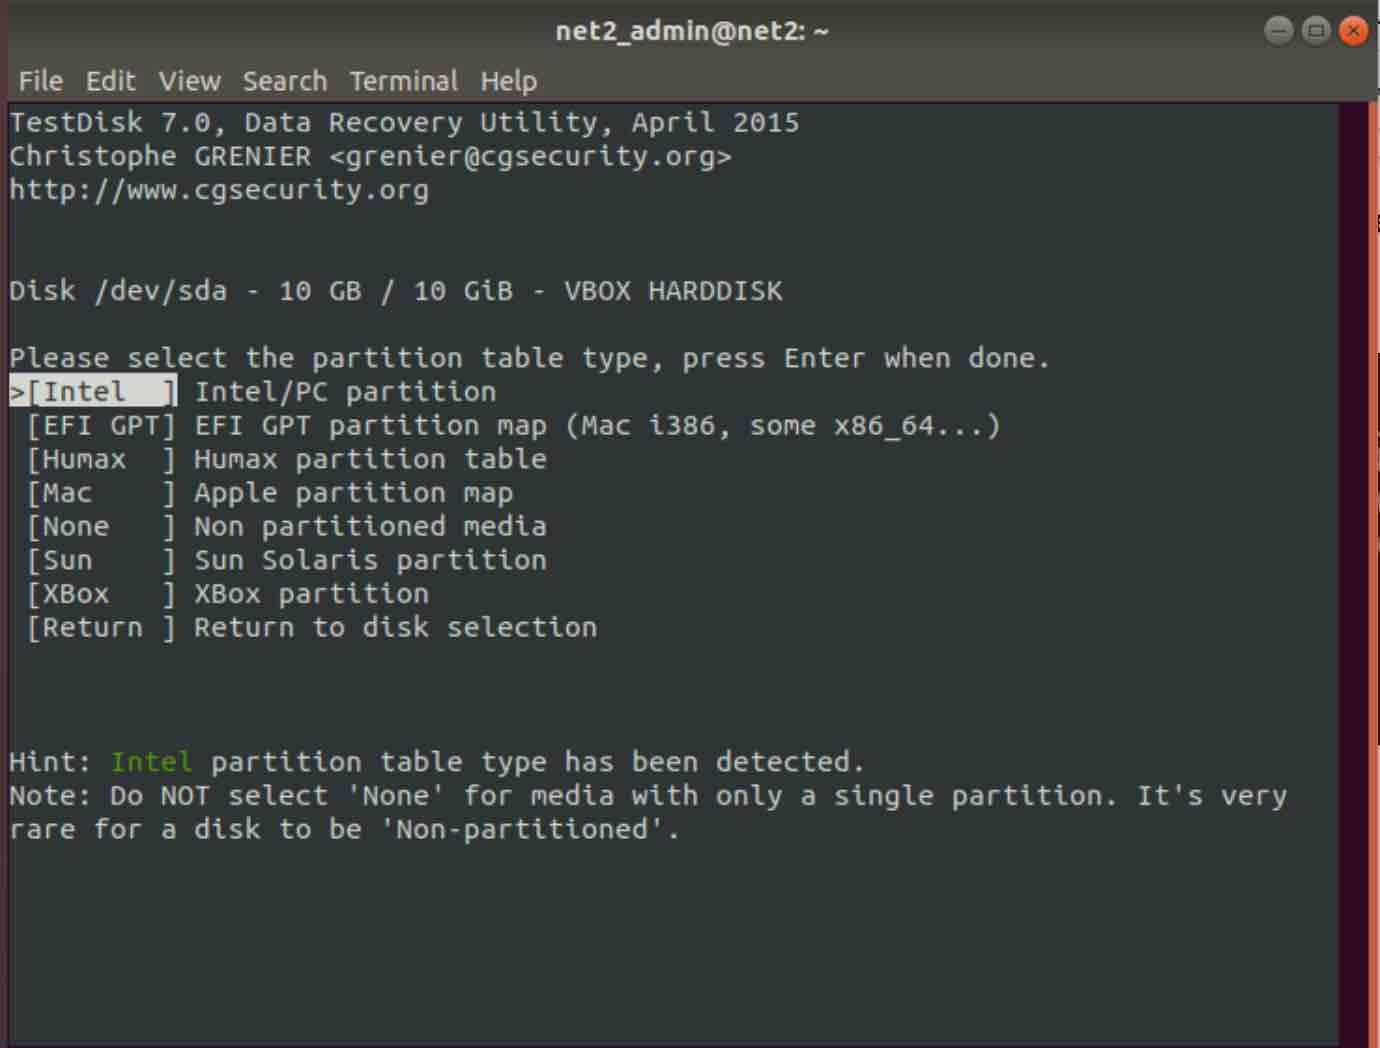
The tool conveniently preselects the partition table type, but feel free to choose the one that best suits your needs.
After choosing the correct drive and partition type, you’ll encounter the following:
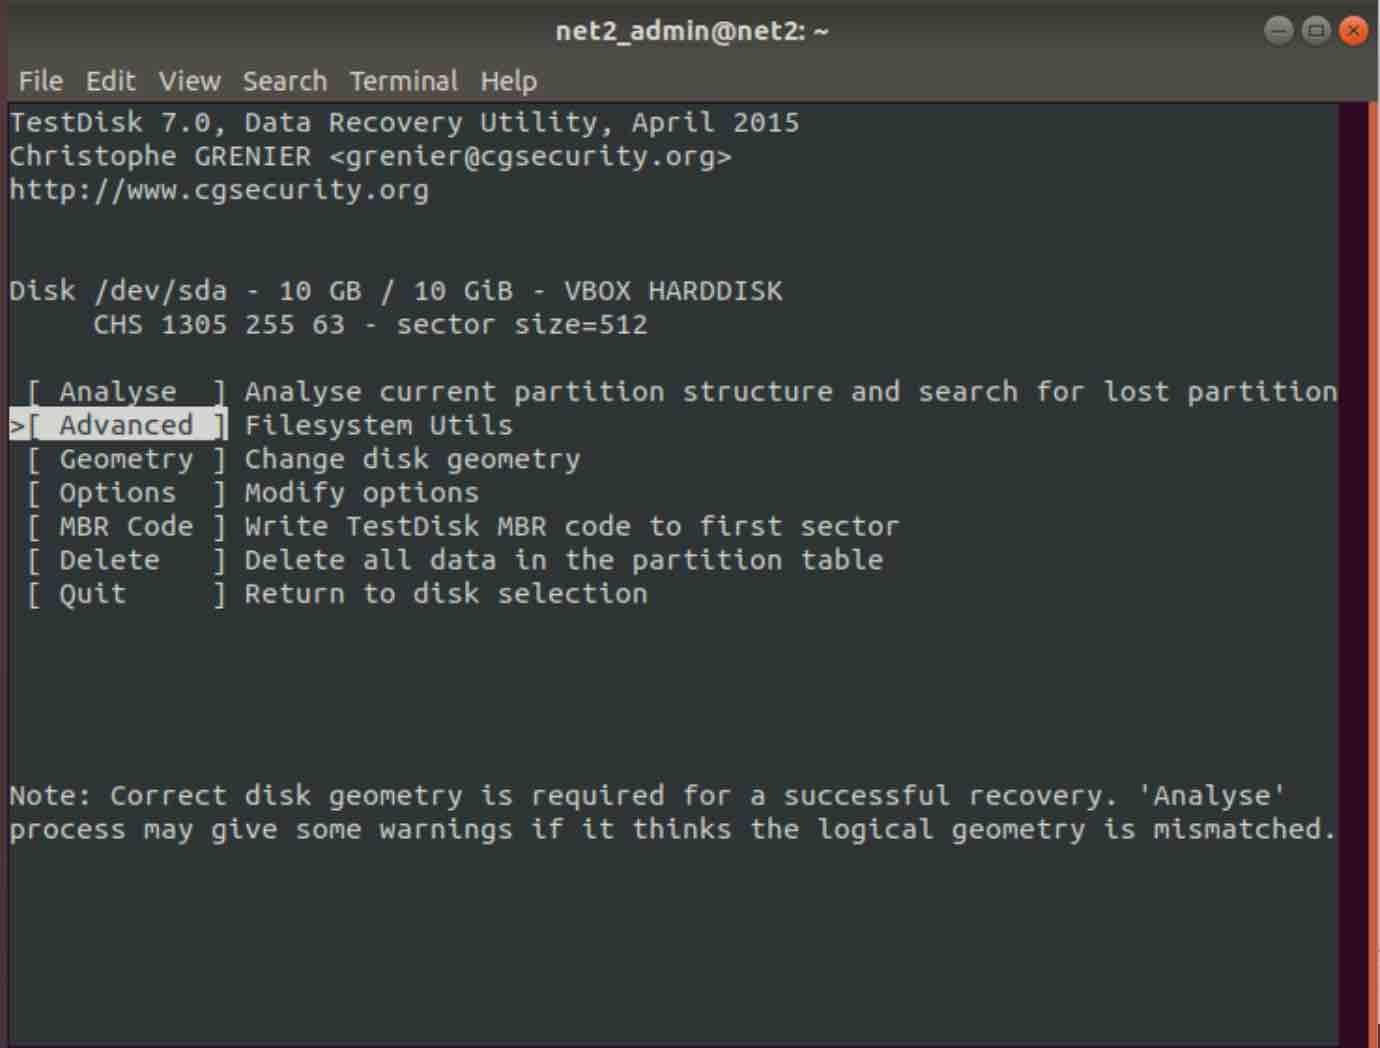
If you’re looking to recover a deleted file, opt for the ‘Advanced’ option and press Enter. If your chosen media has multiple partitions, they will appear on the next screen. Once you pick the partition you want, a list of its directories will be displayed.
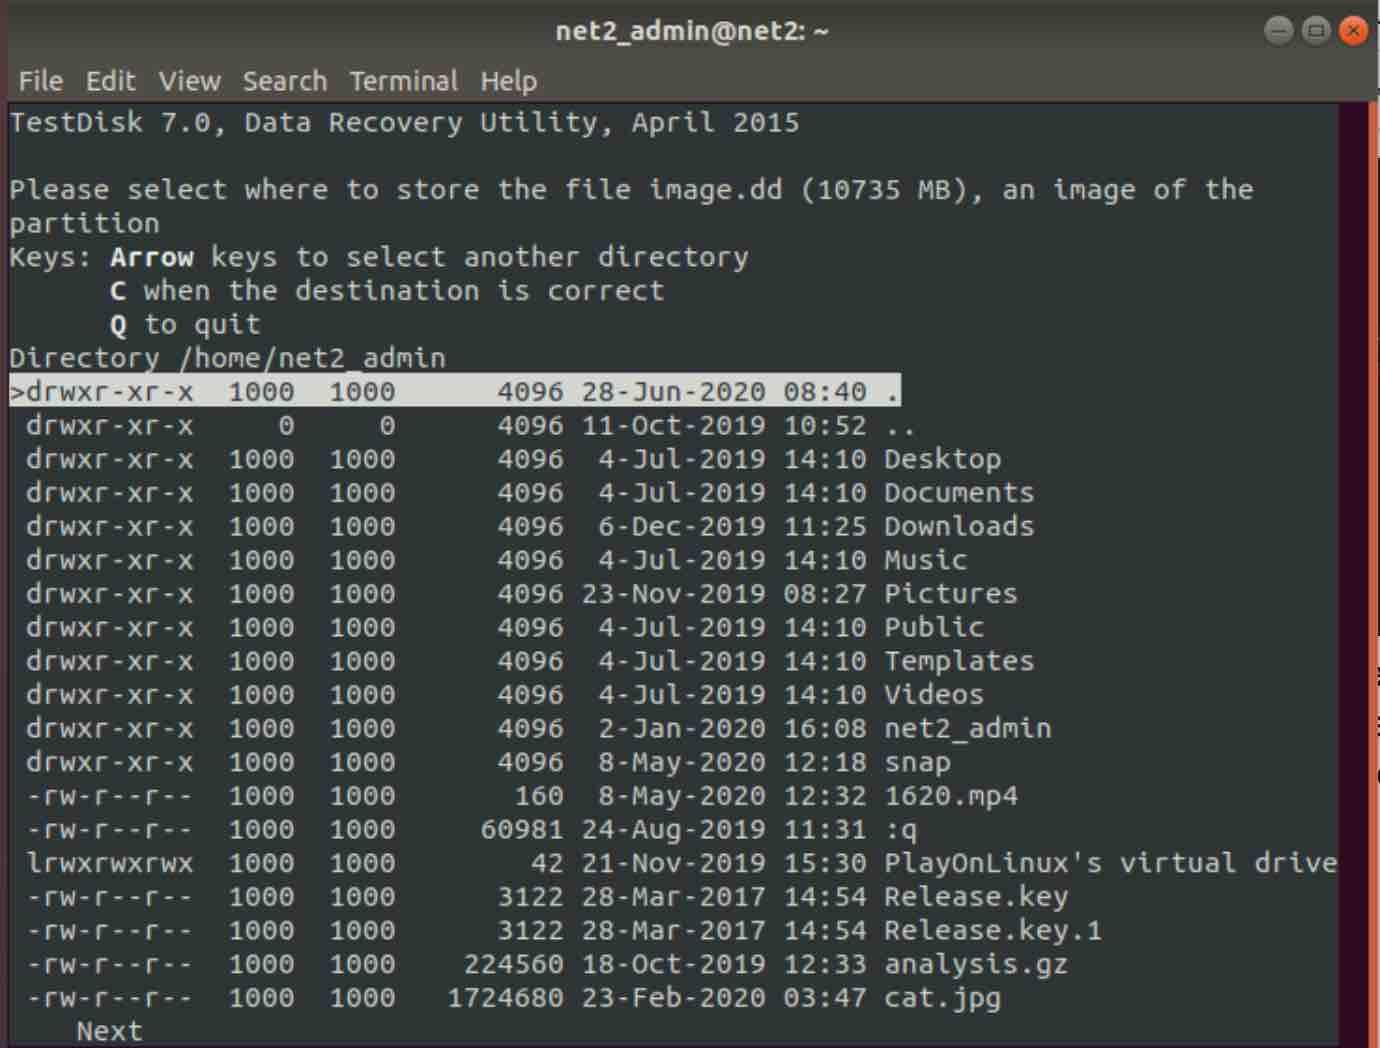
Choose the folder where you suspect your file was lost, then press Enter. If the deleted files are detected, they will appear in red, as illustrated in the example scenario below:
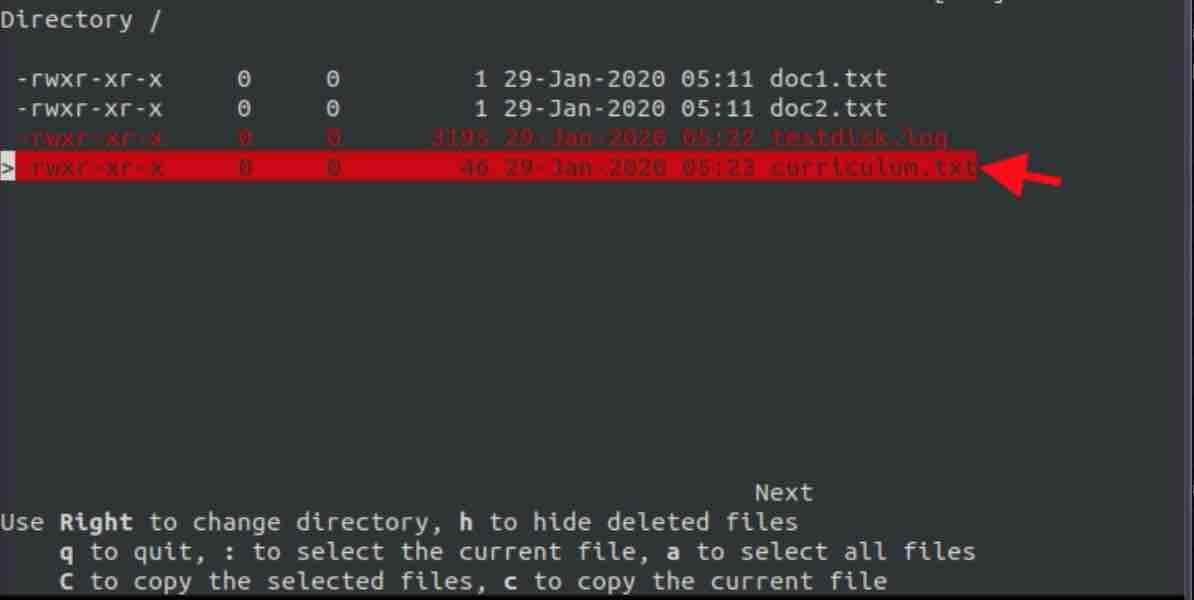
Select option C to copy the chosen file. Next, specify the directory for file recovery. If successful, you’ll see a message like “Copy done! 1 ok, 0 failed.”
After following these steps, check your file’s content for integrity. If any issues arise, repeat the process. If TestDisk can’t restore your partition type, such as ext4, don’t worry. You have another tool, Photorec, included with TestDisk.
Testdisk software download link.
Read: How To Fix A Corrupted SD Card Without Losing Data
Method 4: Use PhotoRec – Data recovery app
PhotoRec is another Free app for data recovery that is part of the TestDisk package. PhotoRec can recover deleted files from various file systems, including ext2, ext3, ext4, FAT, NTFS, and more. Photorec software can also recover files from various media types, such as hard disks, memory cards, USB drives, etc. PhotoRec is especially useful for recovering multimedia files, such as photos, videos, audio files, etc., as it can recognize hundreds of file formats based on their signatures. PhotoRec is also a command-line based tool that can be run from a live CD (Your CD recovery utility) or USB drive.
To install it, simply run the following command if you haven’t already:
sudo apt-get install testdisk
To use the program, execute this command:
sudo photorec
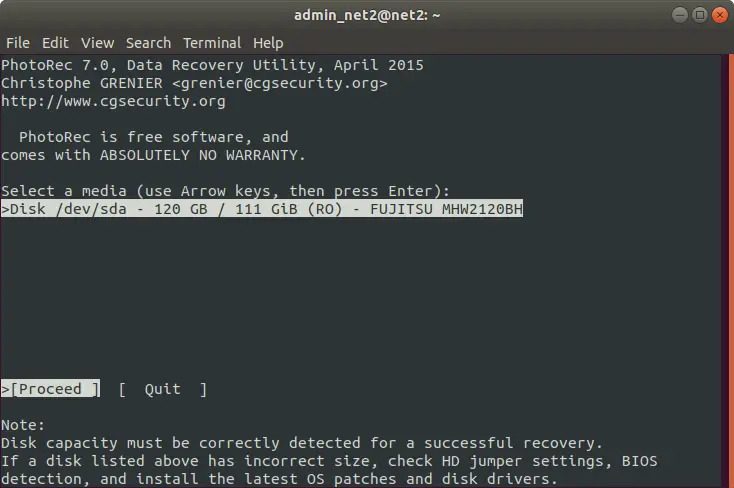
Feel free to select your media. Click “Proceed” and then hit “Enter.” In the subsequent screens, press “Q” to navigate back.
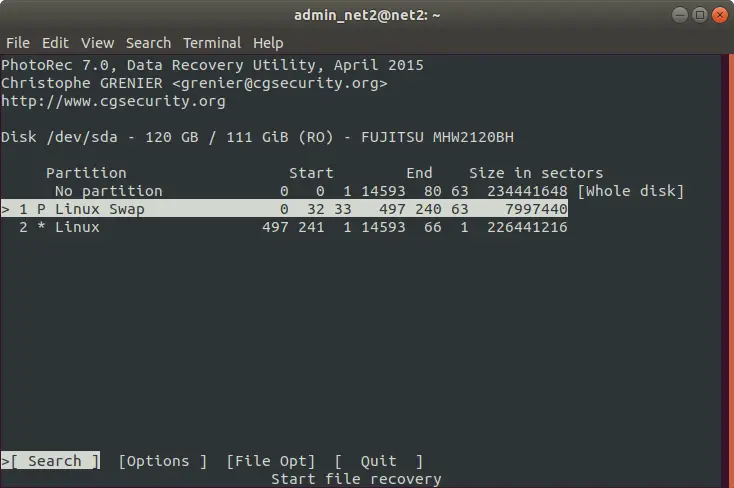
Next, select the partition of your choice:
Note: If you click on the [Options] menu item, the recovery options listed below will be displayed:

Clicking on the menu item [File Opt] will display the following intriguing information:
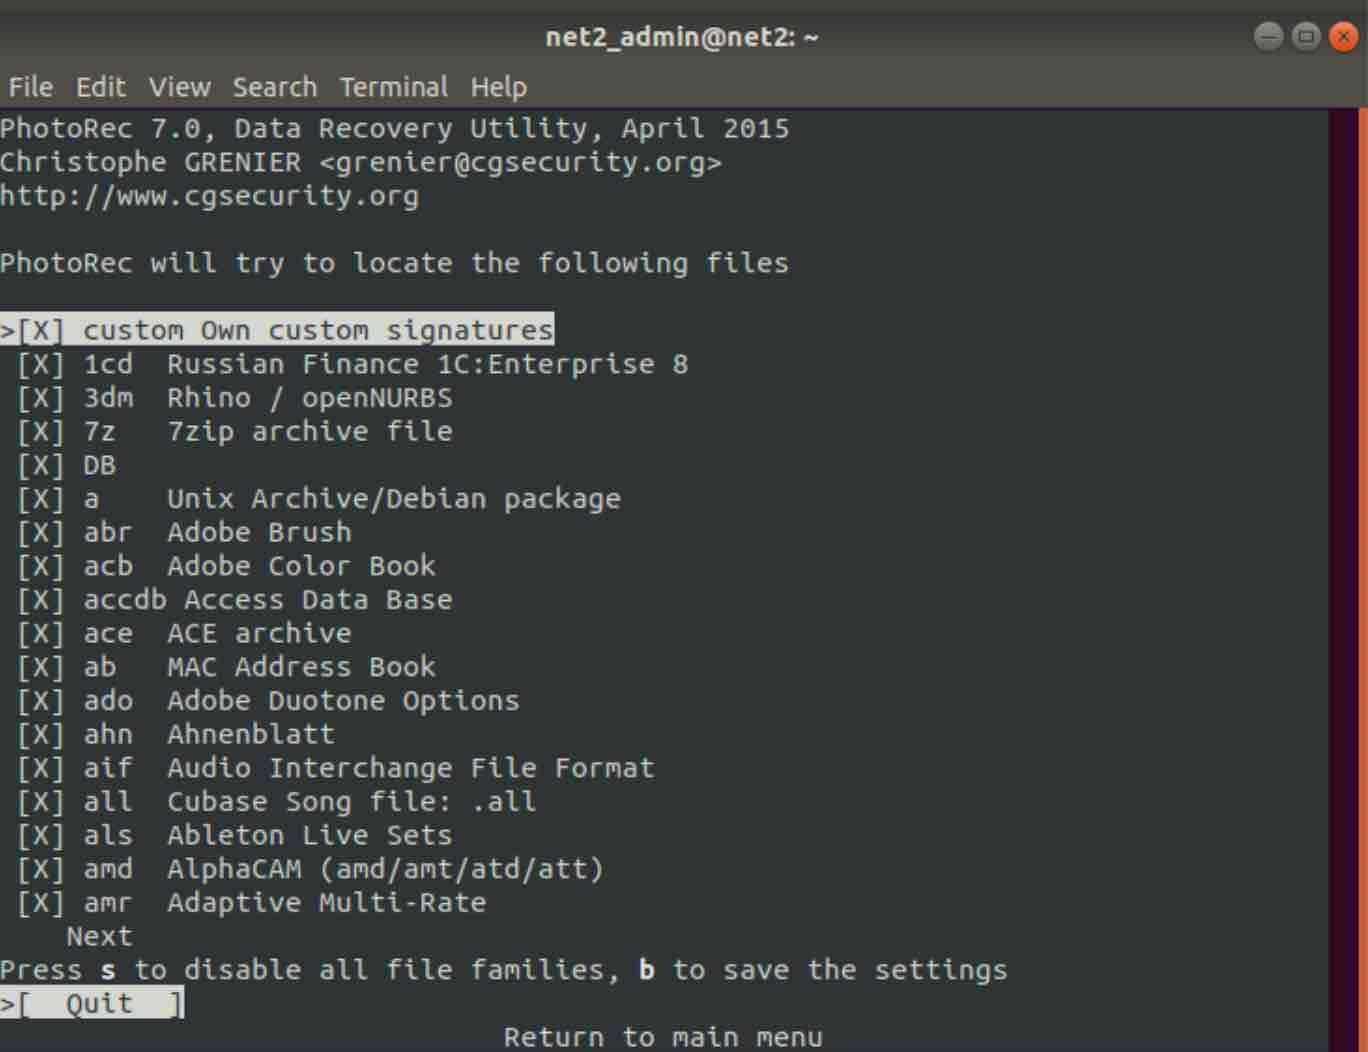
Here, you can choose your preferred file extensions for the recovered files. After selecting one or more entries, press ‘s’ to save.
Now, press ‘Q’ twice to return to the previous screen.

Read: Best SD Card Recovery Software in 2022 (Paid and Free)
Choose “Search” to initiate the recovery process.
Note: You might encounter the following screen with two options:
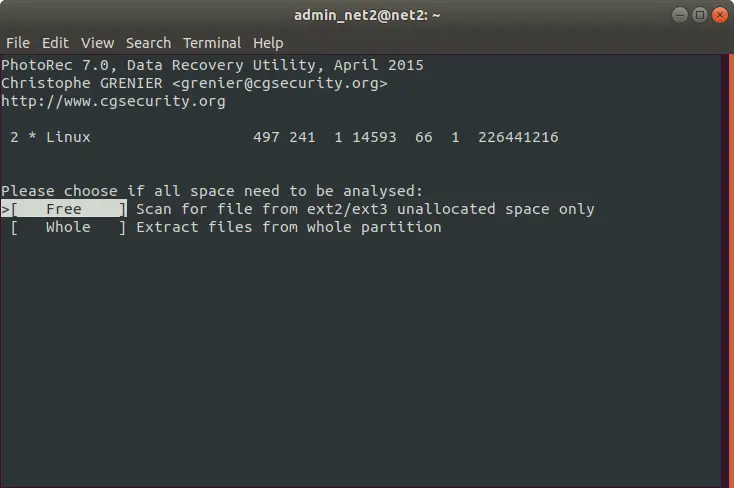
Ensure you choose either an unallocated space or the entire partition (slower) that requires analysis. Press Enter to proceed.
Alternatively, in the next screen, you can select the filesystem type:
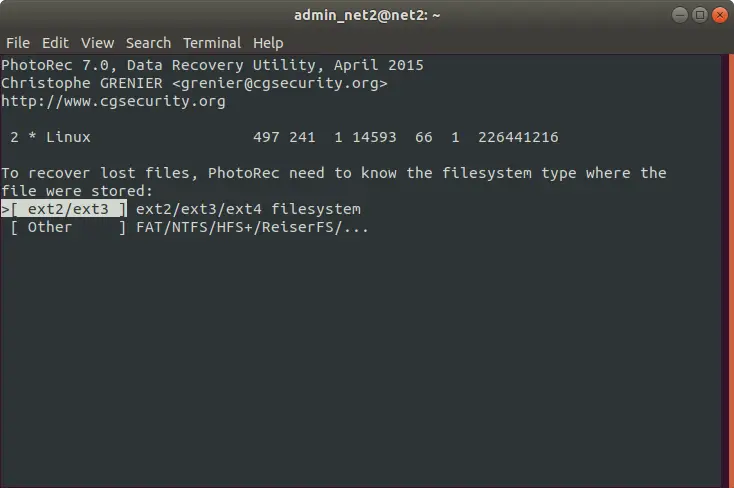
If your filesystem type differs from ext2/ext3, choose the second option, “Other.”
Then, select a destination folder for storing the recovered files and press C to proceed. Ensure the directory is on a separate partition to avoid overwriting the deleted files.
Recovery will commence immediately upon pressing C.
Ultimately, Photorec will provide the count of recovered files and their respective locations.

For more information, consider visiting the Photorec software download page.
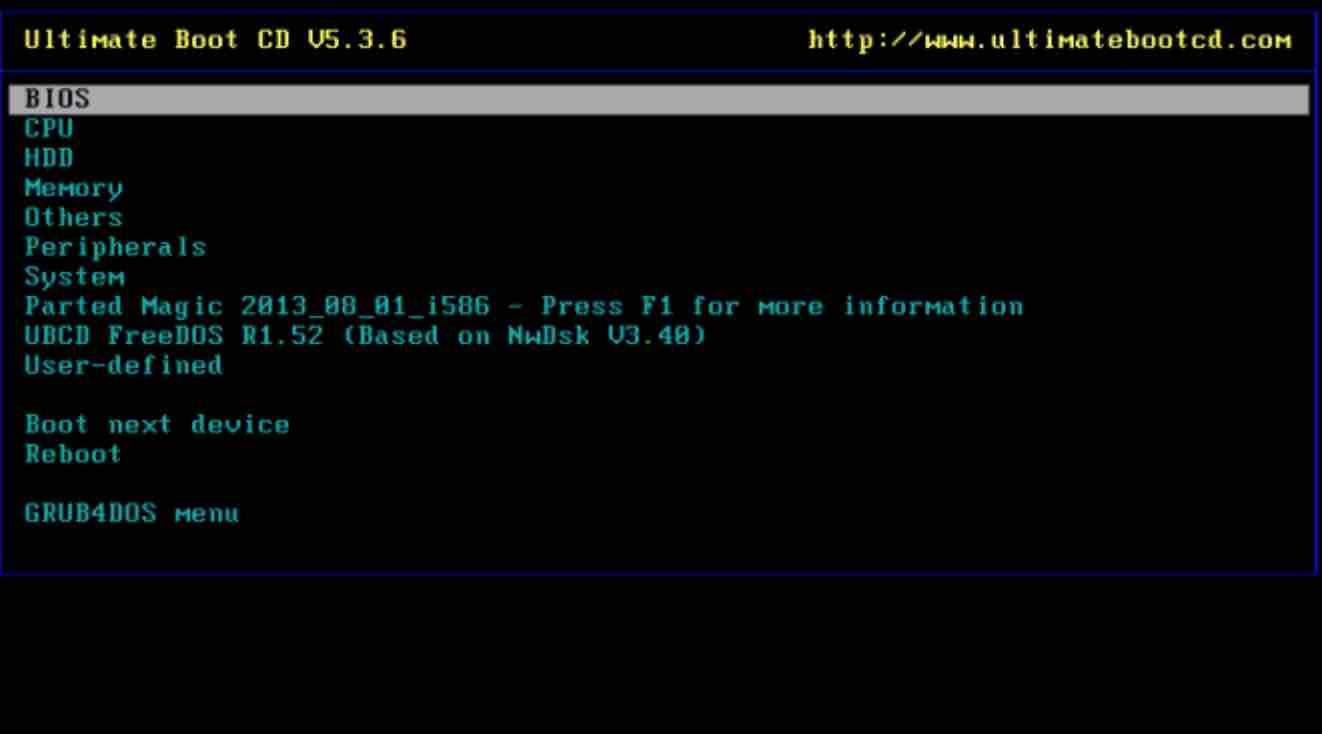
Method 5: Ultimate Boot CD – File recovery tool
Ultimate Boot CD is a bootable CD-ROM app (or a CD data recovery utility) that contains a collection of diagnostic and repair utilities for various systems, such as hard disk, memory, CPU, network, and more. It can also run other bootable tools from ISO images or floppy disk images.
Some of the main features and benefits of this File repair tool are:
-
- Troubleshoot and fix various hardware and software problems on your system, such as bad sectors, corrupted partitions, virus infections, boot failures, etc.
- Test and benchmark your system performance and stability, such as CPU speed, memory speed, disk speed, etc.
- Backup and restore your data and partitions, such as cloning disks, imaging disks, wiping disks, etc.
- Restore files from backup and carriy out corrupted data recovery and partitions from damaged or deleted disks, such as undeleting files, recovering partitions, repairing file systems, etc.
- Manage your disks and partitions, such as creating partitions, resizing partitions, formatting partitions, etc.
- Access your system and data when you cannot boot normally, such as using a command-line interface or a graphical user interface.
Method 6: R-Linux – Data recovery tool
R-Linux app is a free file recovery utility for the Ext2/Ext3/Ext4 FS file system used in the Linux OS and several Unixes. It can recover files from existing partitions, deleted partitions, damaged disks, or disk images. It supports advanced features such as RAID recovery, disk cloning, and file preview.
You can download this disk recovery utility from the official website. Additionally, there’s R-Studio, a paid software that supports NTFS partitions and offers a Demo version. Both tools are compatible with Windows, Mac, and Linux, including 32 and 64-bit versions in .deb and .rpm formats. You can access the tool manual here.
Read: The structure of Linux operating system
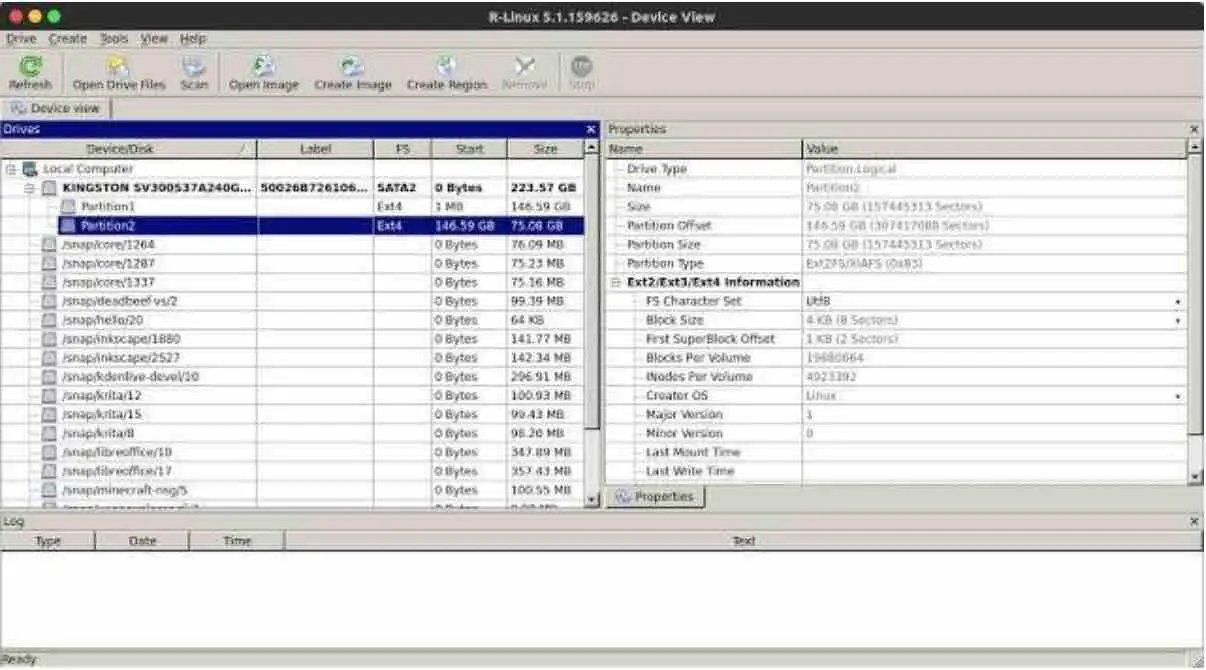
Once you launch the program, choose the disk or partition for data recovery.

After choosing the disk, click on the “Scan” button located at the top of the program to display disk details on the right side.
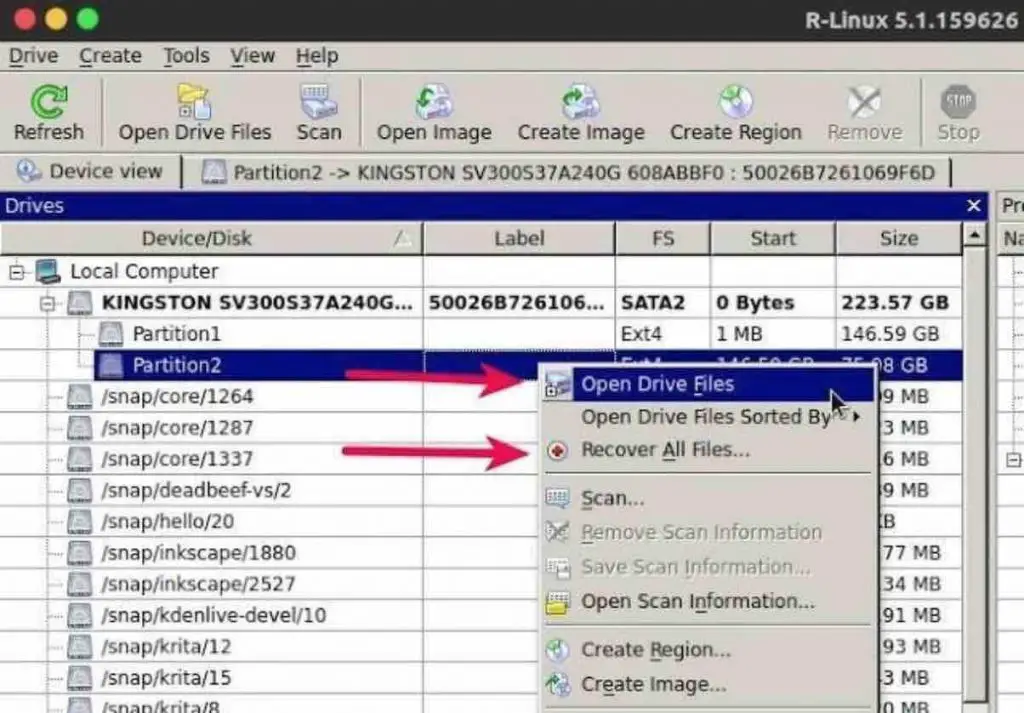
Right-click on the partition or disk you wish to recover and select the “Open Drive Files” option, which will lead you to the file manager.
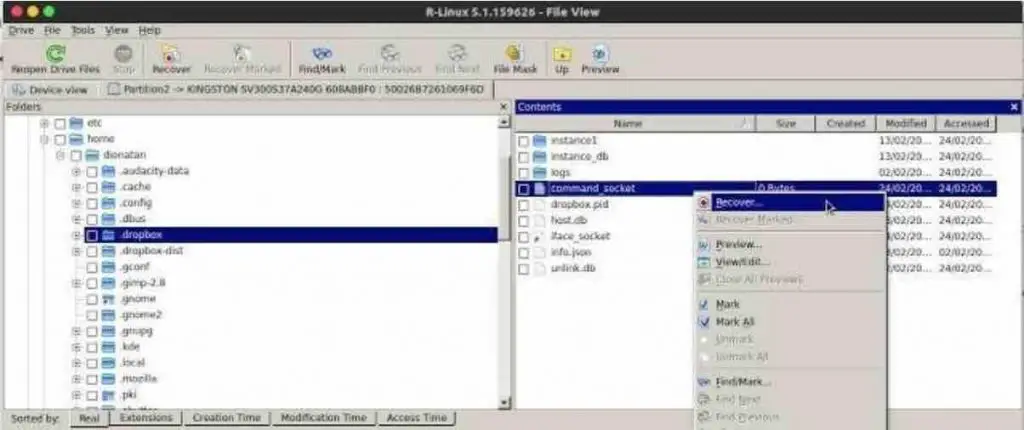
This Disk recovery tool will scan your disk, displaying directories on the left and files within the directories on the right. To recover a file, right-click on the desired file and select “Recover…” Then, choose the output folder for the recovery. You can also recover multiple files simultaneously.
Alternatively, you can recover all files by selecting the “Recover All Files” option, as shown in the image above. This will recover all possible files, so ensure you have sufficient storage for the recovered files. Take note of the size of the disk or partition you are recovering.
Method 7: Trinity Rescue Kit
Trinity Rescue Kit is a Linux-based live distribution app that features a graphical wizard for rescuing and repairing broken GNU/Linux and Windows installations and boot loaders. It can also perform tasks such as virus scanning, password resetting, disk wiping, file recovery. and network booting. It can also be considered as File repair software.

The boot menu provides boot options akin to typical Linux distributions. After booting, numerous tools become accessible. These include:
1. Data backup
2. Data recovery
3. Drive swapping
4. Partition modification or recovery, and Rootkit detection
5. Antivirus scanners like ClamAV, Avast, and BitDefender.
Don’t be daunted by the text-mode screen; it’s straightforward to use.
Trinity rescue download link.
Method 8: Rescatux
Rescatux is a Debian-based live distribution app that provides a graphical tool for restoring and fixing common problems in GNU/Linux and Windows systems, such as corrupted boot loaders, partitions, file systems, passwords, and more. It can also run other useful utilities such as GParted, TestDisk, PhotoRec, and Boot Info Script.
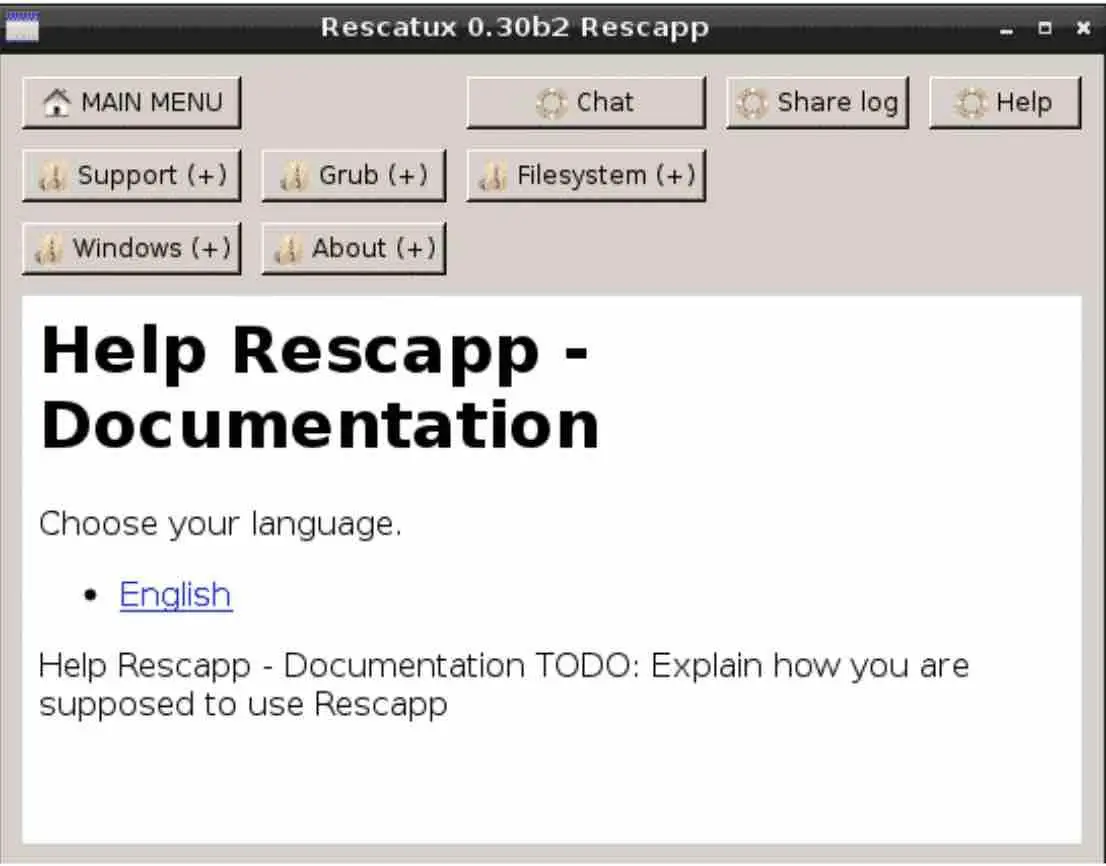
Using Rescapp, you can accomplish various tasks, including resetting passwords, restoring GRUB on Linux, or repairing the Master Boot Record on Windows. It also facilitates file system checks, partition repairs, and file recovery.
Read: How to increase swap space in Linux
Method 9: SystemRescueCD
SystemRescueCD is a Linux system rescue disk app available as a bootable CD-ROM or USB stick for administrating or repairing your system and data after a crash. It includes a set of system tools such as GNU Parted, FSArchiver, ddrescue, file system tools, network tools, and more. It supports all important file systems and network file systems.

SystemRescueCD offers a diverse set of partition management and repair tools, data backup options, and bootloader troubleshooting features. Additionally, it includes numerous antivirus and detection tools. You can easily download SystemRescueCD as an ISO file, which can be burned to a CD or used to create a bootable USB drive.
SystemRescueCD download link.
Method 10: DDRescue
DDRescue is a file recovery tool that copies data from one file or block device to another, trying to rescue the good parts first in case of read errors. It can also merge multiple damaged copies of a file or device into a complete and error-free one. It can recover files from formatted hard drives since It works well with disks that have bad sectors or are failing.
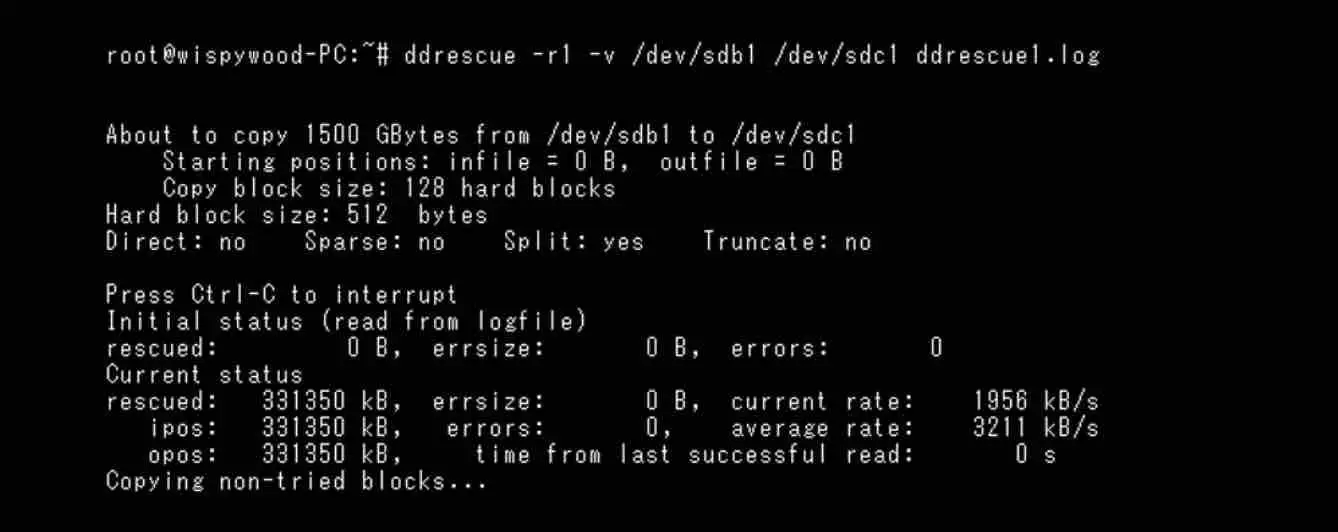
DDR operates fully automatically. In the event of an error, there’s no waiting or need to restart from scratch. DDRrescue doesn’t write zeros when encountering bad sectors on the source media, nor does it truncate the output file. Consequently, running it on the same device aims to fill gaps without erasing previously recovered data.
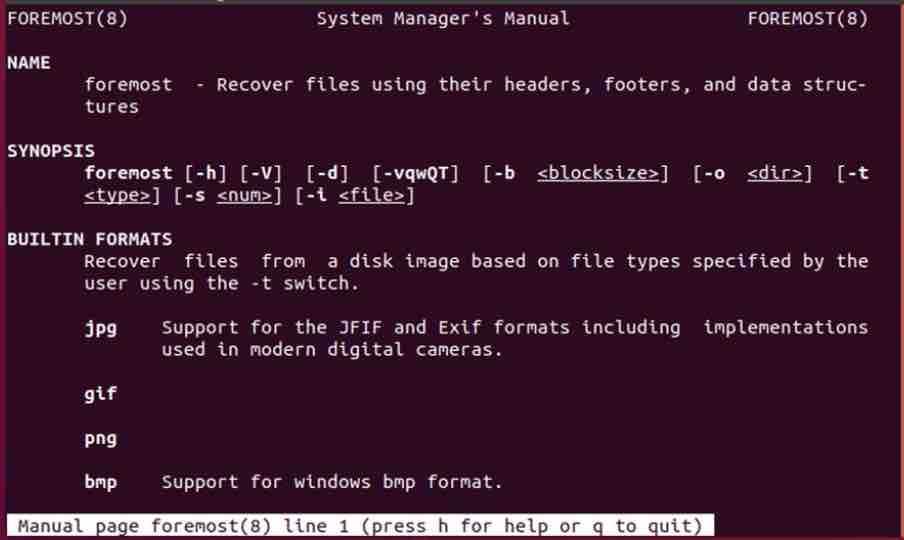
Method 11: Foremost – Best app for deleted photo recovery
Foremost is a forensic data recovery program that can recover files based on their headers, footers, and internal data structures. It supports many file types such as images, documents, archives, audio, video, and more. It can process raw disk images , partitions, live disks or devices.
Why is Foremost useful for this task? Put simply, when you delete a file from your system and move it to the trash, it stays there until you empty the trash. Even if the trash is emptied, it doesn’t necessarily mean the files are permanently gone. Foremost can potentially recover your files, although not always with all their content intact.
To install Foremost on Ubuntu and similar distributions, you can use the following command:
sudo apt install foremost
The basic command to recover JPG files, for example, would look like this:
sudo foremost -t jpg -i /dev/sda1 -o /home/net2/recovered
For recovering DOCX files, you can use a command similar to this:
foremost -v -t docx -i /dev/sda1 -o /home/net2/recovered
Keep in mind that the general logic for the command is:
foremost -i input_file -o output_directory
After recovery, Foremost often changes the file names, so be aware of that. Also, make sure to close all applications that might generate files before running these commands.
Method 12: ExtUndelete
ExtUndelete is a command-line tool that can recover deleted files from ext3 or ext4 file systems. It works by parsing the file system’s journal, which is a record of all the changes made to the file system, including file deletions. It can restore files with their original names and paths, or save them to a specified directory.
Recovering data from Linux file systems like Ext3 and Ext4 can be challenging. These file systems are optimized for space usage, so when you delete data, the freed-up space is quickly rewritten. If you’ve noticed an error, it’s crucial to prevent any further write access to the storage media to avoid overwriting the deleted object by another application. You can enforce read-only access via the terminal using a command like this:
mount -o remount,ro /dev/sda1
Please adjust the command to match your specific settings, including the device name (e.g., “sda1”) or the mount point (e.g., “media”). Keep in mind that attempting data recovery always carries the risk of data loss. It’s highly recommended to create a full backup of the disk before proceeding.
Read: Guide to Linux Ubuntu/Debian log files for beginners
To install Extundelete, execute the following command:
sudo apt-get install extundelete
Now, run this command to identify the names of your computer’s partitions, which is essential for the next steps:
sudo fdisk -l

To recover data from your desired partition, simply execute the following command:`
sudo extundelete /dev/sda1 –restore-all
If you prefer to direct the recovered files to a specific folder, use a command like this:
sudo extundelete –output-dir ‘/dev/sdb1/recovery’ –restore-all /dev/sda2
The tool is designed so that, after examining a partition or file, it will write all found files to the current directory. In this case, the software will attempt to restore all recoverable files using the “–restore-all” flag. If you wish to specify a particular file for recovery, use this command:
extundelete –restore-file my_data.txt /dev/sdb1
For the unique scenario of recovering deleted photo files from a memory card, Linux offers a specialized application known as “recoverjpeg,” which is user-friendly and accessible via your package manager or the Ubuntu software centers.
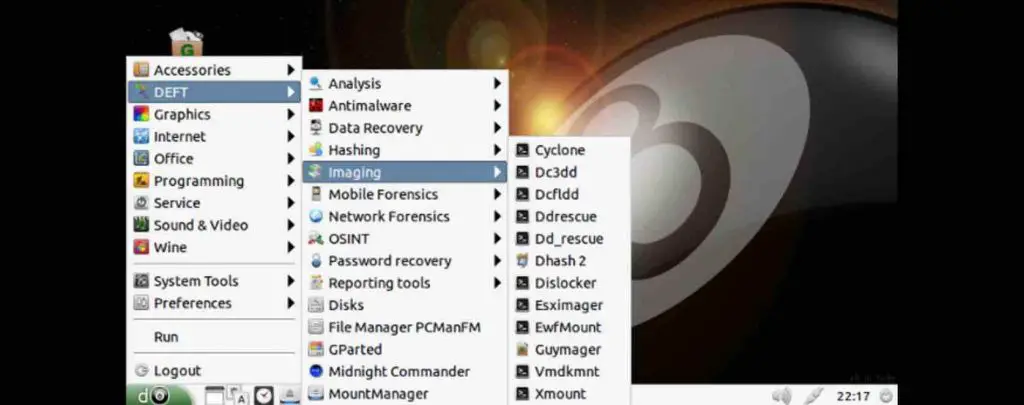
Method 13: Deft Linux
Deft Linux is a Linux distribution app based on Lubuntu that is designed for computer forensics and IT security. It contains a suite of free tools for digital forensics and intelligence activities, such as disk analysis, file recovery, password cracking, malware detection, network monitoring, and more. It also includes DART (Digital Advanced Response Toolkit), a graphical tool that runs Windows applications in safe mode for live forensic analysis.
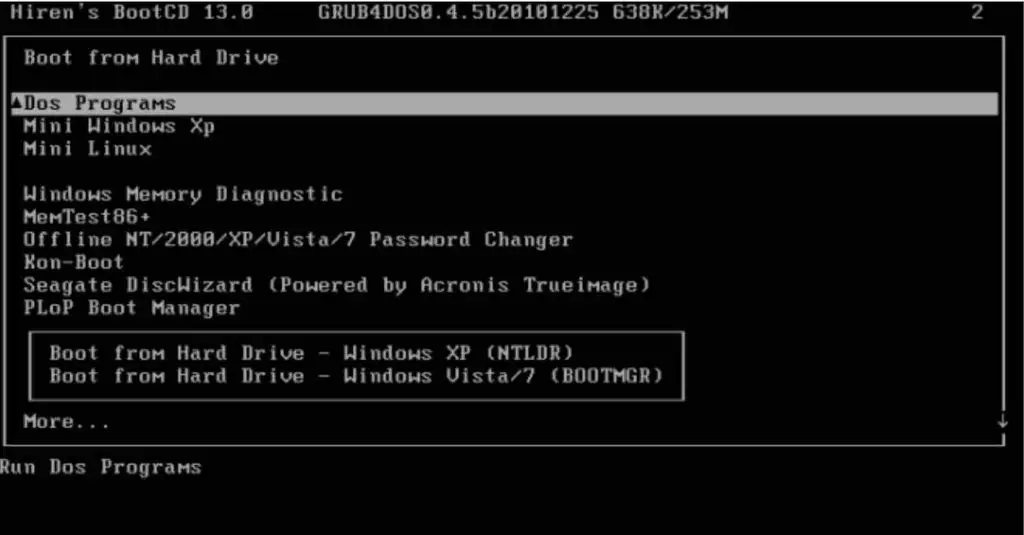
Method 14: Hiren’s BootCD Usb tool
Hiren’s BootCD is a bootable CD-ROM or USB stick app that contains a collection of free tools for various purposes such as system diagnosis, repair, backup, recovery, security, optimization, and more. It supports both BIOS and UEFI booting modes and can run on Windows or Linux systems. It includes tools such as Mini Windows 10 PE x64, Partition Tools, Backup Tools, Antivirus Tools, Password Tools, Testing Tools, Hard Disk Tools, and more.
It also provides additional handy utilities such as BIOS resetting, CMOS clearing, and temporary file and folder cleanup. You can also perform secure data deletion with this disk data recovery tool as well as create backups on another drive, recover corrupted partitions, and conduct hardware failure scans for your system.
Its capabilities extend even further. If you’re considering recovery software, Hiren’s Boot CD should be your top choice. You can easily download Hiren’s Boot CD as an ISO file for straightforward installation on a USB drive or burning to a CD. You will be able to easily recover files from formatted hard disk or retrieve files from formatted hard drive.
Tips to Prevent Data Loss on Linux
While there are several methods and tools that can help you recover deleted files on Linux, it is always better to prevent data loss in the first place. Here are some tips that can help you avoid losing your important files on Linux:
- Backup your data regularly: The best way to prevent data loss is to back up your data regularly to an external device or a cloud service. You can use various tools and methods to recover backup files on Linux, such as rsync, tar, dd, Deja Dup, Timeshift, etc. You should also verify your backups periodically and restore them when needed.
- Use a trash or recycle bin: Whenever possible, use a trash or recycle bin to delete your files instead of permanently erasing them from the file system. This way, you can easily restore them if you change your mind or realize that you need them later. You can also configure your trash or recycle bin settings, such as the size limit, the retention period, and the deletion confirmation.
- Be careful with the rm command: The rm command is one of the most powerful and dangerous commands on Linux, as it can permanently delete files and directories without any confirmation or recovery option. You should always be careful when using the rm command and double-check the arguments and options before executing it. You can also use some aliases or modifications to make the rm command safer and more user-friendly, such as adding a confirmation prompt, moving files to the trash instead of deleting them, or adding a verbose output.
- Use a file recovery tool as soon as possible: If you do lose your files by accident, you should use file recovery tools as soon as possible to increase your chances of successful recovery. The longer you wait, the more likely it is that your Recently deleted files will be overwritten by new data and become unrecoverable.
Conclusion
In this comprehensive guide, we’ve explored a multitude of methods and tools for recovering deleted or corrupted files on your Linux system. From restoring files from the trash to utilizing powerful recovery applications like TestDisk, PhotoRec, and ExtUndelete, we’ve covered the spectrum of possibilities.
If you like the content, we would appreciate your support by buying us a coffee. Thank you so much for your visit and support.